Documentation of my research
August 24, 2025
Running a business in the modern world is complicating, stressful, and difficult. Any business that is not retail have a certain complexity unmatched by other industries. It’s a mix of manufacturing, art, marketing, inventory management, dataflow, and many other things. There is a need to compare vendors, compare proper portions of a given ingredients, track each ingredient, the costs, schedules, and so much more. In any given system; each component you add, makes the system exponentially more complex. Each component may have it’s own subcomponents, concepts, and layers of abstraction. Each branching out, to make their own subcomponents, concepts, and layers of abstraction. This documentation aims to outline each component, it’s purpose, and use case, in a clear, thoughtful, and detailed manner. It should provide an easy to understand workflow for each component, and provide the reader with a level of confidence in using this system to produce profitable, repeatable results.
To Mitchelle. Without you, life would not taste as good.
To Maddie. Show them more heart then scars.
© 2025 Joe Corso. All rights reserved.
No part of this publication may be reproduced, distributed, or transmitted in any form or by any means—including photocopying, recording, or other electronic or mechanical methods—without the prior written permission of the author, except in the case of brief quotations embodied in critical reviews and certain other noncommercial uses permitted by copyright law.
For permission requests, contact: pads.email.address@gmail.com
2025-11-08
career category.2025-08-24
20-notes/research for research papers2025-08-12
business/, articles/,
technical/, property/, trading/,
notes/manuscript/17-tenants ->
manuscript/13-propertymanuscript/20-back ->
manuscript/99-back2025-05-28
2025-05-25
notes/ directory for internal tracking.todo.md and
dev-log.md.manuscript/ to separate blog/tutorials from
business content.2025-05-24
compendium.md → compendium.pdf/html.config/.includes/header.md across doc
types.2025-05-23
17-tenants/.{#fig:id} and
fig-pos: H placement worked.I started programming with HTML, and CSS. My goal was to make an e-commerce website to sell the products I made blowing glass. I realized this might be something for me when I was awake at 5am feverishly typing in more lines of code. I then noticed how important it was to organize the code. Every week I was changing the directory structure. Slowly I learned python, the Django, then Flask, then Bash. When I learned Bash I felt like my power lever exceeded 9K. But I still had the same problem: a lot of code with no where to go. So I started to write wrappers in Bash, to call the function name rather then source a random file. Eventually it turned into a full command with options and arguments. Eventually, an new problem arose. How to remember all this stuff? So I decided to document everything. I found texinfo because I wanted something to run in a terminal, online, and printout. So here we are, my comprehensive guide on all things I’ve researched, and documented so far to this point.
I always had this problem with being very scatter brained. I always
have a million thoughts on my mind, and I wanted a way to organize those
thoughts. I wanted it to be quick, so that when I have a thought I could
easily get it out before my mind moves to the next thought. But I also
need to keep track of how I organized it, because the second I
have to think about what I’m doing, my previous thought is gone; I
forget what I’m doing, and I have to stop to think about what I’m
thinking about. It becomes a programmers purgatory, where you’re back to
square one again, in some sort of meaningless paradox where it matters
to you. But the rules are made up, and the points don’t matter. I
started with some small scripts for websites, that quickly blew up into
the PADS Project. It got messy really quick, I forgot how a lot of it
worked, and I lost track of what a test, or a finished project, or a
repository directory, and I had backups inside backups inside backups,
or no backups; and I didn’t know what was what because I had no version
control. So as I started adding documentation and versions, the HTML,
CSS, js, started getting really complex, and I had to keep going through
all the files to find the spot where I had to change the version or I
forgot a comma, or something stupid. It became this whole project in and
of itself to maintain. As the bash scripts grew I had to remember all
these different alias’s and docs for that. So I compacted it down into a
getopts command, with the help and such. I spent months
rethinking the naming schemas, and organizing the code like some sort of
data curator, with the need to inject that sweet fresh code straight
into my veins on a daily basis, lest I drive myself insane with the
thought of thinking about thinking about it. Long story short, I found
pandocs, and mkdocs, and those were great, but I realized how to make my
own.
“I remember it vividly. I was standing on the edge of my toilet hanging a clock, the porcelain was wet, I slipped, hit my head on the sink, and when I came to I had a revelation! A vision! A picture in my head! A picture of this! This is what makes time travel possible: the flux capacitor! It’s taken me nearly thirty years and my entire family fortune to realize the vision of that day. My God, has it been that long? Things have certainly changed around here. I remember when this was all farmland as far as the eye could see! Old man Peabody owned all of this! He had this crazy idea about breeding pine trees.”
- Dr. Emmett Brown
I decided to take a more scientific approach. Build it all into a compendium, write up a blog, and technical research for each project. If I follow the workflow, I can get all the ideas out in a neat self-generating package, and I know I don’t have to think about it anymore. If I catch myself rethinking things I can look back at the docs, and remind myself why I chose to do thing in the first place, at ease my thoughts, and sleep well at night knowing I have all that sweet sweet delicious code. So this is me. My thoughts, my compendium of my brain. How I write it, How I organize it, how I present it, how I think about it. If you get something out of this cool.
Welcome to Operation Mindmap. This book is designed as a hybrid
resource that combines reference material, tutorials, technical
documentation, and strategic planning. Whether you’re here to explore
the codebase, learn a new tool, or understand a system architecture,
this guide will help you navigate the content effectively.
This book was generated using paddocs. This frontmatter acts as a
demonstration for the program, as well as further documentation of how
it works.
This book is divided into the following primary sections:
Each topic area may be further broken down into individual “chapters” that can stand alone.
assets/, config/, includes/, and
src/ or referenced directly.To get the most from this book, you should have:
pandoc, git,
python, bash, flask.This book is designed to render into:
Use paddocs to generate your code
into your preferred format.
File Directory: ../manuscript/
Template Directory: ../assets/schemas/
This book is organized as a modular compendium designed to serve as
both a reference manual and learning tool.
Each part targets a specific audience — developers, business analysts,
and systems engineers — and uses consistent, schema-linked
templates.
Synopsis:
This document defines the organization and schema references for every
content section of the PADS documentation system. Each section maps to a
directory and template schema to standardize documentation across
disciplines.
Core Themes:
- Consistency across documentation modules
- Clear template linkage and structure
- Modularity for both human-readable and programmatic parsing
Target Audience:
Developers • Engineers • Writers • Analysts
Preliminary information, usage guide, and roadmap for the entire book.
Directory: /paddocs/assets/schemas/frontmatter/
Templates:
- 00-copyright.md — Copyright and licensing info
- 01-revisions.md — Document revisions and change log
- 02-preface.md — Preface and introduction
- 03-howto.md — Instructions for using or navigating this document
- 04-structure.md — Structure outline (this file)
- 05-roadmap.md — Project milestones and timeline
Core document metadata and cover page.
Directory: /paddocs/assets/schemas/metadata/
Templates:
- cover.md — Cover/title page
- metadata.yaml — Structured metadata (YAML)
Learning-focused content like blogs and tutorials.
Directory: /paddocs/assets/schemas/articles/
Templates:
- 00-00-multipart-tutorial.md — Multipart tutorial
- 00-blog.md — Introductory blog post
- 00-tutorial.md — Step-by-step tutorial
Business documentation and operational reports.
Directory: /paddocs/assets/schemas/business/
Templates:
- 00-executive-summary.md — Business summary
- 01-company-overview.md — Company overview
- 02-products-services.md — Product and service descriptions
- 03-market-analysis.md — Market trends and competitor research
- 04-marketing-sales.md — Marketing and sales strategies
- 05-operations-report.md — Operational report
- 06-management-report.md — Management and organization overview
- 07-financial-report.md — Financial overview
- 08-risk-report.md — Risk analysis and mitigation
- 09-misc-report.md — Miscellaneous reports
- 10-appendix.md — Supporting materials
Engineering, design, and implementation documents.
Directory: /paddocs/assets/schemas/technical/
Templates:
- 00-project-proposal.md — Technical project proposal
- 01-project-overview.md — Project overview
- 02-design-report.md — Design and architecture
- 03-technical-report.md — Technical details and implementation
- 04-research-log.md — Research log and findings
- 05-final-report.md — Final report
Instructional and technical reference material.
Directory: /paddocs/assets/schemas/manuals/
Templates:
- README.md — General repository manual
- programming-manual.md — Programming manual
Scheduling, daily logs, and project tracking.
Directory: /paddocs/assets/schemas/planning/
Templates:
- 00-project-note.md — Project notes
- 01-daily-log.md — Daily log
- 02-weekly-planner.md — Weekly planner
Real estate and tenancy management documentation.
Directory: /paddocs/assets/schemas/property/
Templates:
- 00-property-report.md — Property report
- 01-tenant-profile.md — Tenant profile
- 02-incident-report.md — Incident report
- 03-memo.md — Memo
- 04-project-report.md — Project report
Financial and market analysis, reporting, and journals.
Directory: /paddocs/assets/schemas/trading/
Templates:
- 00-market-overview.md — Market overview
- 01-sector-analysis.md — Sector analysis
- 02-company-profile.md — Company profile
- 03-fundamental-analysis.md — Fundamental analysis
- 04-technical-analysis.md — Technical analysis
- 05-sentiment-analysis.md — Sentiment analysis
- 06-trading-plan.md — Trading plan
- 07-trade-setup.md — Trade setup
- 08-pre-trade-checklist.md — Pre-trade checklist
- 09-trade-log.md — Trade log
- 10-daily-trading-journal.md — Daily trading journal
- 11-weekly-performance-report.md — Weekly performance report
- 12-monthly-performance-report.md — Monthly performance report
- 13-risk-management-report.md — Risk management
- 14-economic-calendar-review.md — Economic calendar review
- 15-news-impact-report.md — News impact analysis
- 16-earnings-report-analysis.md — Earnings report analysis
- 17-post-mortem.md — Post-mortem report
Glossary, index, and references.
Directory: /paddocs/assets/schemas/backmatter/
Templates:
- a-glossary.md — Glossary
- b-index.md — Index
- z-references.md — References
Additional templates, metadata, or unclassified reports.
(Currently none beyond schema directories.)
| Version | Date | Changes |
|---|---|---|
| v1.0 | 2025-10-25 | Initial structure conversion into standardized book layout |
Generated by ChatGPT (Book Structure Layout Template Integration)
This roadmap outlines the full lifecycle of planning, building, styling, and publishing a structured compendium of documentation
Goal: Define the purpose, scope, and content baseline for the compendium.
Tasks
Goal: Build the content architecture and template system.
Tasks
Goal: Create, revise, and organize source Markdown content.
Tasks
Goal: Convert Markdown into polished PDF, HTML, and other formats.
Tasks
Goal: Apply cohesive styling and interactive features.
Tasks
Goal: Distribute the final compendium and make it accessible.
Tasks
Project Codex Hub
Joe Corso
2025-08-12
Issues arise when needing to manage a business, or a computer lab. Data needs to be easily accessable across multiple devices. SaaS Companies may cause finanical burden with un-needed monthly fees for cloud services. In today market it is important to run a local server with as little stress as possible. Without also causing more financial burden due to electric and maintainence cost.
This report is generated to serve the purpose of documenting the
steps, and process of building a server PC for use in a fast-paced
production environment with easy to understand, repeatable results in as
little time as possible.
This report serves the purpose in assisting with making critical
decisions for the core systems of a small business.
The main components to any digital system is the hardware, OS, and software stack. For a business owner, this is a time consuming, and very complex process. Most often; the business owner must conform their structure to the confines of a Microsoft™ Windows environment, along side quickbooks, and an accountant you send a stack of receipts to. This can be cost inducive, prohibitive, and not scalable as the company grows. Unfortunately, the companies to which you must depend on for these services are not concerned with maximum performance, customizability, or personal privacy.
With the aformentioned in mind, it is a key component of any small business to make critical decisions which will assist in governing core business infrastructure. It must be repeatable, scalable, and robust enough to stay stable and secure on limited hardware, in a high impact environment. This report should remove the guess work, and present a dependable system.
This project involves designing and deploying a minimal, reliable home server. The server will act as a foundational component in a personal infrastructure lab, supporting services such as backups, development environments, internal documentation, project hosting, and Accounting for small business’s.
Leveraging Arch Linux for performance and minimalism, the server integrates with the PADS system for automation, system maintenance, and self-documentation. The project balances cost-efficiency, energy savings, and modular design, making it ideal for self-hosting developers devOps, and business management.
Project CodexHub is a strategic initiative to design and implement a robust, modular, and developer-centric directory structure that serves as the foundation for all coding, deployment, documentation, and automation activities on a business centric Linux system. This effort unifies workspace organization, code management, backups, security, and operational tooling under a single, scalable system.
The core objective is to create a flexible and intuitive layout that supports the PADS system (Personal Assistant & Deployment System), accommodates multiple programming and infrastructure projects, and includes dedicated spaces for backups, virtual environments, templates, Git workflows, downloads, and a secure personal vault.
CodexHub enables developers to work smarter and faster by reducing context switching, minimizing configuration overhead, and centralizing project logic, secrets, documentation, and tooling. It promotes repeatability, clarity, and best practices — whether used on a Raspberry Pi home server, a laptop dev box, or a production-grade workstation.
By formalizing the home directory around CodexHub, users gain a powerful launchpad for deep system-level experimentation, clean development practices, and frictionless deployment pipelines.
Disk: /dev/nvme1n1

Partition Table (GPT):
├── /dev/nvme0n1p1 → Target OS Root (770GB)
├── /dev/nvme0n1p2 → EFI System Partition (512M)
├── /dev/nvme0n1p3 → SWAP (8GB)
├── /dev/nvme0n1p4 → /home (150GB)

Disk: /dev/sd*1

Partition Table (GPT):
├── /dev/sd*1 → /mnt/media (2TB)
├── /dev/sd*2 → /mnt/backups (1TB)
├── /dev/sd*3 → /mnt/repo (1TB)
├── /dev/sr0 → /mnt/opticalgit-shell or gitearsync or
resticBuild Date: 2025-07-09
Designed for:llama.cpp(3B–7B CPU Inference), Arch Linux, Headless/Server Ready
Estimated Power: ~150W max (CPU-only), ~300W w/ GPU
Target Use: Local LLMs, PADS builder, dev server
| Qty | Component | Model / Description | Price (USD) |
|---|---|---|---|
| 1 | CPU | AMD Ryzen 5 5500 – 6-core, 12-thread Zen 3 (w/ Wraith Stealth Cooler) | $62.00 |
| 1 | Motherboard | MSI PRO B550M-VC WiFi (mATX, AM4, PCIe 4.0, WiFi 6E, BT 5.2) | $75.99 |
| 1 | RAM | Crucial Pro 32GB (2×16GB) DDR4-3200 UDIMM | $74.99 |
| 1 | NVMe SSD | Crucial P3 Plus 1TB PCIe Gen4 (M.2 2280) | $61.90 |
| 1 | HDD | Seagate Exos 7E8 4TB 7200RPM SATA (Renewed) | $64.88 |
| 1 | Case | Cooler Master MasterBox Q300L (mATX, filtered, compact) | $39.99 |
| 1 | PSU | ARESGAME AGV 500W 80+ Bronze, non-modular | $37.99 |
| 1 | Case Fans | DARKROCK 120mm x3, 3-pin, 1200 RPM, low-noise | $8.99 |
Estimated Total: $426.73
All prices are approximate from Amazon as of July 2025. Tax/shipping not included.
| Component | Purpose |
|---|---|
| 1–2x SATA cable | For HDD if none included |
| HDMI/DP cable | For external monitor output |
| USB stick (8GB) | For initial Arch bootloader |
    project: llama-arch-box
    date: 2025-07-09
    format: markdown
    target_model: llama.cpp q4/q5 (3B–7B)
    ram_min: 16GB
    ram_recommended: 32GB
gpu_required: false.pads/v0.0.2
├── name
│ ├── admin
│ │ ├── data
│ │ ├── insurance
│ │ ├── payroll
│ │ └── permits
│ ├── assets
│ │ ├── diagrams
│ │ ├── images
│ │ └── schemas
│ ├── clients
│ │ ├── feedback
│ │ ├── loyalty_program
│ │ └── reservations
│ ├── docs
│ │ ├── book
│ │ ├── chapter
│ │ ├── notes
│ │ └── section
│ ├── marketing
│ │ ├── branding
│ │ ├── campaigns
│ │ └── social_media
│ ├── operations
│ │ ├── inventory
│ │ ├── kitchen_logs
│ │ ├── menu
│ │ ├── orders
│ │ └── recipes
│ ├── reports
│ │ ├── daily_sales
│ │ ├── monthly
│ │ ├── weekly
│ │ └── yearly
│ └── staff
│ ├── handbook
│ ├── schedules
│ └── training_materials
└── system
├── bin
│ ├── archwiz
│ ├── paddocs
│ ├── pads
│ ├── proj
│ ├── s
│ ├── sys
│ └── tools
├── build
├── config
│ ├── bash.conf
│ ├── bash.sig
│ ├── pads.conf
│ ├── pads.sig
│ ├── profile.conf
│ └── prompt_command.sh
├── database
│ ├── accountingDB.sql
│ ├── blogDB.sql
│ └── repositoryDB.sql
├── lib
│ ├── conky
│ ├── interlink
│ ├── mindmap
│ ├── traderJoes
│ └── tux
├── logs
├── src
│ ├── archwiz
│ ├── paddocs
│ ├── pads
│ ├── proj
│ ├── sys
│ ├── tests
│ └── tools
├── srv
│ ├── dashboard
│ ├── share
│ ├── test
│ └── x
└── testSystem Workflow
Product Development Workflow
How it works:
- Back of House: chefs create menus, recipes, and check
ingredient availability.
- PADS layer: validates, organizes, and pushes to
system.
- System scripts: turn that into structured menus +
verified recipes.
- Customer feedback → PADS paddocs → updates documentation &
triggers review.
- Loops back into menu concept & recipe design
(A1).
vault/ufwThis technical report outlines the process and implementation details for setting up a PC as a functional server. It focuses on building a minimal Arch Linux environment, deploying essential services. Integrating it with PADS for system automation and documentation, and interlink for double entry accounting. Utilizing a directory structure which is easy to navigate, and embodies the workflow of the software.
Build a clean, minimal, repeatable Arch Linux installation directly
onto a partition (/dev/nvme0n1p2) using a self-contained
Arch “builder” environment (/dev/nvme0n1p1) equipped with
tools from PADS. This avoids reliance on live ISOs, aiming for full
control, reproducibility, and scripted provisioning.
This technical report outlines the structural design, implementation
details, and core logic behind CodexHub, a developer-centric directory
environment used to support the PADS system, local infrastructure, and
language model tooling. The structure is optimized for automation,
reproducibility, documentation generation, and secure storage.
CodexHub is intended for advanced users managing:
Contains the PADS core, separated by purpose:
sys/: System-level OS scripts (e.g., updates,
cleaning)proj/: Python project generatorstools/: CLI toolspaddocs/: Documentation frameworkmodels/: Language model integration and logsetc/: Config filesvar/: Logs and runtime stateinstall/: Setup and uninstaller scriptstests/: Bash-based test coverageA self-documenting engine that extracts and renders documentation:
assets/: Diagrams, report schemas, imagessrc/: Python and Bash extractorsconfig/: CSL styles, templates, and build
configurationincludes/: Common Markdown includesmanuscript/: Structured content by document typeoutput/: Rendered HTML, PDF, Markdownmetadata.yaml: Metadata for citation, authorship,
versioningHandles input/output for future LLM integration:
prompts/: Prompt templates by taskoutputs/: LLM completions or responsessessions/: Archived model runsconfigs/: YAML/JSON config for local or remote
modelseval/: Prompt accuracy and test setsvault/ is designed for encrypted mount (e.g.,
gocryptfs).~/bin for quick
access.paddocs supports Markdown, manpage, and PDF render
targets..env, .padsrc) are
machine-parseable for automation.vault/ requires external encryption toolsvault/ FUSE-based mounting systemdashboards/[!NOTE]
We are building a headless system.
We don’t need a desktop environment yet.
Follow Arch install instructions here
Ensure System Layout is correct on the /etc/fstab
file.
Build the directory structure for development:
$ mkdir -p {name/{admin/{permits,insurance,accounting,payroll},staff/{schedules,training_materials,handbook},operations/{inventory/{ingredients,suppliers,stock_reports},orders/,recipes/{main_dishes,desserts,drinks},kitchen_logs},menu/{drafts,current,archive},marketing/{branding,campaigns,social_media},customers/{reservations,loyalty_program,feedback},reports/{daily_sales,weekly,monthly,yearly}},system/{bin,config,database,modules,api,frontend,logs,tests},docs/{section,chapter,book}}Make user for owner, and build directory structure:
Install extra packages:
    $ cd ~/downloads
    $ sudo pacman -Syu git
    $ git clone https://aur.archlinux.org/yay.git && cd yay && makepkg -si
$ yay -Syu openssh cmus ranger w3m jellyfin rsync btop cups gcc nmap pandoc-cli pavucontrol reflector yt-dlp cmake gcc kotlin nginxSet up virtual env
$ python -m venv /path/to/env/envNameActivate the virual env
$ . /path/to/env/envName/bin/activateInstall flask into virtual env
$ python -m pip install flaskInstall mysql-connector
$ python -m pip install mysql-connectorNote!
Interlink has all the dependancies listed in the
pyproject.toml.You can just install interlink and skip installing everything manually
Install Interlink
$ python -m pip install git+https://github.com/padsRepo/interlink.git $ sudo mount /dev/sda1 /mnt/media
$ sudo mount /dev/sdb1 /mnt/repo $ sudo mkdir -p /mnt/{media/{music,movies,shows,games,pics},repo/{git,lib,archive},device,optical,share/{bookshelf,config,templates,themes,vault,wallpapers},usb}[!NOTE]
You may have a FAT formatted HDD.
FAT follows a different syntax for changing ownership of a file, and you will get a “Operation not permitted” error.
You can reformat the drive to ext4 or, run this command:
$ sudo mount -t vfat -o defaults,user,exec,uid=1000,gid=100,umask=000,rw /dev/sdb1 /mnt/repo
$ chown -R $USER:$USER /mnt $ sudo systemctl enable nginx.service
$ sudo systemctl start nginx.service/etc/nginx/nginx.conf location / {
root /srv/http;
index index.html index.htm;
}index.html: $ echo "PADS Server" >> $HOME/index.html
$ sudo mv $HOME/index.html /srv/http $ sudo systemctl restart nginx.serviceetc/pacman.conf, and enable multilib $ sudo pacman -Syu git
$ cd ~/downloads && git clone https://aur.archlinux.org/yay.git && cd yay && makepkg -si
$ yay -Syu openssh alacritty cmus ranger kate w3m firefox thunderbird jellyfin libreoffice rsync btop cups discord gcc gimp lxappearance nmap pandoc-cli pavucontrol reflector steam yt-dlp cmake conky gcc kotlinql $ sudo systemctl enable bluetooth.service
$ sudo systemctl start bluetooth.service
$ modinfo btusb
$ pulseaudio --start $ lspci | grep -i nvidia
$ sudo pacman -Syu base-devel linux-headers --needed
$ sudo pacman -Syu nvidia nvidia-utils nvidia-settings --needed
$ sudo mkinitcpio -P
$ reboot $ yay -Syu mergerfs
$ mergerfs /mnt/1:/mnt/2 /backups/mnt $ sudo EDITOR=nano visudo
$ sudo usermod -aG wheel frank
$ %wheel ALL=(ALL) NOPASSWD: /usr/bin/pacman -Syu,/usr/bin/yay -Syu $ yay -Syu llama.cpp --noconfirm
$ llama-cli[Note!]
More on using LLM’s here.
$ sudo systemctl enable jellyfin.service
$ sudo systemctl start jellyfin.serviceClone PADS repo to ~/dev/pads
Run install/setup.sh to configure system-wide access
Symlink pads into ~/bin for CLI use
Create project: pads proj create flask-site
Generate docs: pads paddocs build
sshd: Remote access via SSH key
systemd-timesyncd: Time synchronization
nGINX: Reverse Proxy for local website
Optional: gitea, rsyncd, lighttpd, cups (for print server)
Python 3.x with venv support
make, gcc, and git pre-installed
pads tools for system utilities
pads sys update: Run regular system upgrades
pads sys clean: Rotate logs and clean cache
pads tools ping-all: Validate network status
Avoid overloading I/O with concurrent disk-heavy tasks
Use passive cooling to prevent throttling
Migrate to SSD over USB
Implement offsite backup
Add automatic documentation updates via Git hooks
Integrate language models as CLI assistants for task execution
Project CodexHub provides a lightweight, cost-efficient, and flexible
platform for local development and system automation. When paired with
the PADS ecosystem, it becomes a powerful tool for managing business
infrastructure with minimal complexity.
CodexHub is a robust, modular home environment purpose-built for
automation, documentation, local development, and intelligent tooling.
Its technical foundation makes it ideal for engineers seeking
repeatable, secure, and fully documented workflows. Combined with the
PADS system, it enables a self-sustaining, extensible platform for
personal infrastructure and intelligent computing.
“Running record of steps, discoveries, and next actions.”
Outlining the PC Build Building the initial skeleton project
Choosing the Operating System was easy, as I’ve already had it in my
mind to use Arch Linux. It is a rolling release OS, which will give you
bleeding edge software. There are no major releases, which means you
will never have to install the next version. Windows™ for examples has
versions 95, through to 11. Each new release requires a fresh install
(and with Windows™ 11 fresh hardware). With Arch Linux, you can pull the
live usb out of the closet, dust it off, update it, and you’re good to
go like it never turned off.
Running the full system from a USB was a nightmare. It ran slow, and
crashed due to I/O bottleneck.
Running the system from an external SSD would work in theory, except
mine has too many bad sectors, and continuously crashed. Researching the
PC was not very difficult, as I’ve put together servers, and PC builds
before.
Installing, and setting up a proof of concept was easy, as I’ve already
written most of the software, and used it to run home business’s in the
past. I chose 128GB SSD in an external enclosure for speed, and
portablility. I also already had it sitting in the closet.
The documentation (these reports) is written using paddocs, so getting the docs running was
quick.
Choosing a directory structure took some thought. There needs to be a
space for development on the system, but cannot be programmer centric.
There should be space for the root user, the developer, and a live
system for the business owner. The space for the developer should source
code for each library, as well as installation scripts. Commands will be
tested from the developers user space, while an official release of a
package will be installed to the /usr/local/ directory, to
ensure global use without package confiction. It should also reflect the
directory structure of the business application for testing in sandbox
mode before uploading to a production environment. The business will be
run from the owners user space, as if acting as the root user on the
system. This ensures full access to critical business data without user
error distroying parts of, or the whole system. Each employee, form,
report, and documentation will be present, or built under the owners
user space. The directory structure becomes the living environment for
the program to run. As if the directory structure is the
program.
Without server software, it would not be a server. The chosen stack will
be flask, nginx, python, bash, html, css, and javascript. There is
consideration for using kotlin in the future. A DNS can be built from
the router, or server, which can point the web browser to a customized
dashboard that can be used to manage all services within the
business.
I made a few mermaid charts to represent the digital workflow of the
company, and how the software ties in with the physical business.
Building the web server
$ sudo apt install nginx
    $ sudo systemctl enable nginx.service
$ sudo systemctl start nginx.service/etc/nginx/nginx.conf location / {
root /srv/http;
index index.html index.htm;
} $ sudo systemctl restart nginx.serviceOptional Flask Server:
$ mkdir /mnt/srv/project $ python -m venv /mnt/srv/project/venv $ . /mnt/srv/project/venv/bin/activate $ python -m pip install flask $ python -m pip install mysql-connectorNote!
Interlink has all the dependancies listed in the
pyproject.toml.You can just install interlink and skip installing everything manually
    $ git clone pi@rpi400:/mnt/repo/git/interlink.git
$ python -m pip install interlink/Integrating PADS Detailed steps on setting up the directory structure.
    $ mkdir -p {restaurant/{admin/{permits,insurance,accounting,payroll},staff/{schedules,training_materials,handbook},operations/{inventory/{ingredients,suppliers,stock_reports},orders/,recipes/{main_dishes,desserts,drinks},kitchen_logs},menu/{drafts,current,archive},marketing/{branding,campaigns,social_media},customers/{reservations,loyalty_program,feedback},reports/{daily_sales,weekly,monthly,yearly}},system/{bin,config,database,modules,api,frontend,logs,tests},docs/{section,chapter,book}}
$ sudo mkdir -p /mnt/{media/{music,movies,shows,games,pics},repo/{git,lib,archive},device,optical,share/{bookshelf,config,templates,themes,vault,wallpapers},usb} $ cd /mnt/repo/downloads
$ git clone pi@rpi400:/mnt/repo/git/pads.git
$ cp -r pads/{archwiz,paddocs,pads,proj,sys,tests,tools} ~/system/modules/
$ cp pads/bin/* ~/system/bin/
$ cp pads/etc/*.* ~/system/config/
$ cp -r pads/etc/conky ~/system/api
~/.bash_profile
$ . ~/system/config/profile.conf
~/.bashrc
$ . ~/system/config/bash.confChange the necessary ENV VARS
Begin Documentation
Set up configuration files for Qtile
paddocs depends on pandoc and
texlive and texlive-latexextra and
ttf-hack. It must be installedMermaid charts
https://github.com/jgm/pandoc/issues/8897
 block
inside the div which prevents the browser from loading it properly
without extra filters.[Brief recap of what the project is and its purpose]
[How the project was developed step-by-step]
[List of final features and modules]
[Full specs, APIs, protocols used]
[Testing approach, tools used, and results]
[Key takeaways and improvements for next time]
[Potential next versions, enhancements, or research]
[Extra charts, diagrams, or detailed reference material]
Template generated by ChatGPT
Compendium section: 10-docs
Title: Project CodexHub
Author: Joe Corso
Tags: [project, infastructure, devlog, build, docs]
Status: [ Draft / Final / Reviewed ]
Template:
- 00-project-proposal.md
- 01-project-overview.md
- 02-design-report.md
- 03-technical-report.md
- 04-research-log.md
- 05-final-report.md
License: “All Rights Reserved”
Schema: technical
Version: 0.0.1
Branding: Operation Starship
Project Interlink
Joe Corso
01-21-2024
It takes too long to manually write every form and report you need for a database
Automate the generation of forms, reports, navigation, and access controls
Interlink reduces time-to-deploy for data-heavy applications by abstracting away routine form and report logic. It streamlines software operations and automates flask appications at the infrastructure level.
NA
By consolidating templating, access control, and DB-driven form/report logic, Interlink provides a minimalist yet powerful platform that complements Flask’s ecosystem. Interlink is a modular, Flask-based Python framework designed to accelerate development of data-driven web applications. Interlink automates the generation of forms, reports, navigation, and access control based on MySQL database schemas. The system offers a low-code solution for rapidly building internal tools and administrative dashboards without sacrificing control or customizability.
formulator: Generates HTML forms and
reports directly from database tables.templeton: Provides a templating layer
and ready-to-use Flask Blueprints for common views.safeHaven: Offers pluggable security
decorators (@requireLogin, @honeypot, etc.) to
protect routes.toolkit: A utility module for DB
connections, route registration, and view generation automation.Interlink is a practical, extensible framework that embodies the PADS philosophy: less boilerplate, more velocity. It empowers developers to move fast, stay organized, and build interfaces that just work — all while keeping security and modularity at the forefront.
Each module can be loaded as a Flask Blueprint, allowing independent development and integration. Navigation, view registration, and auth middleware are initialized at the application level.
/interlink/src/interlink
├── formulator
│   ├── __init__.py
│   └── logic.py
├── __init__.py
├── __main__.py
├── safeHaven
│   └── __init__.py
├── templeton
│   ├── __init__.py
│   ├── templates
│   │   ├── 404.html
│   │   ├── 500.html
│   │   ├── admin.html
│   │   ├── copyright.html
│   │   ├── data.html
│   │   ├── forms.html
│   │   ├── guide
│   │   │   └── index.html
│   │   ├── login.html
│   │   ├── nav.html
│   │   ├── reports.html
│   │   ├── template.html
│   │   └── templeton.html
│   └── views.py
└── toolkit
└── __init__.py ┌─────────────┐ ┌──────────────┐
│ formulator │───▶│ templeton │
└─────────────┘ └──────────────┘
│ │
▼ ▼
┌─────────────┐ ┌──────────────┐
│ safeHaven │ │ toolkit │
└─────────────┘ └──────────────┘A minimal UI approach is taken by default, but templates are overrideable using Jinja2 template inheritance. Menus and layouts are dynamically generated based on the database schema and user permissions.
Interlink is a Flask-compatible backend library suite that generates form interfaces, reporting views, and access-controlled pages based on MySQL table schemas. It follows a plugin architecture with four core modules: formulator, templeton, safeHaven, and toolkit.
Clearly define the technical challenge or need that this report addresses.
Describe the processes, tools, and technologies used to address the
problem.
Include diagrams, charts, or pseudocode if applicable.
interlink.formulator
interlink.templeton
interlink.safeHaven
interlink.toolkit
What it lacks for in developers, it makes up for in development.
“Running record of steps, discoveries, and next actions.”
Cleaned up a lot of the files to make it resemble a MVC concept a little better.
Started working on a CLI version. I hope it could be useful for throwing up a report in the terminal real quick; as opposed to starting a server, etc. I think in the future, the output could be piped to a separate text file that could be printed or maybe incorporated in an LLM. I worked on it a few weeks ago, and did write the research so this is in hind sight, and I don’t remember the steps.
I was getting tired of trying to figure out how to set up this lib
each time I needed to work on it, so I created a few new directories to
just put everything I needed into the proper directories.
tests for tests, scripts for setup and
runtime, examples to build a working demo. Also a
tree.txt file in docs.
$ mkdir {tests,examples,scripts,docs} $ mkdir tests/dev
$ python -m venv tests/dev/venv
$ . tests/dev/venv/bin/activate
$ python -m pip install --upgrade pip
$ python -m pip install -e ~/code/interlinkBuild Flask project (I just copied from an old setup using interlink already).
Add src/interlink/__main__.py file. So that
interlink can be run from the command line
(i.e. python -m interlink)
Install click, add as a dependancy to pyproject.toml
file.
  $ python -m pip install click

  -> pyproject.toml
  dependencies = [
  "flask>=2.3",
  "mysql>=0.0.3",
  "mysqlclient>=2.2.7",
  "mysql-connector>=2.2.9",
  "click>=8.3.1"
]Refactoring some code, so it makes more sense. I noticed that the description in the Generator class was the same as the DB class.
getFormData() into the class
formulator.Generator.generateForm()getDatabase(),
getTables(), getEnumData(),
getMetadata() to a new class DataHandlerGenerator class to make more
sense.(Continue adding sections for each workday or session)
Interlink is a modular Python/Flask library suite that automates the generation of CRUD forms, tabular reports, and navigation menus from MySQL database schemas. Its purpose is to drastically reduce development time for database-driven web applications while ensuring consistent design, maintainable code, and built-in security.
formulator, templeton,
safeHaven, and toolkit.INFORMATION_SCHEMA.safeHaven.toolkit.templeton.safeHaven).env
filepytest.Template generated by ChatGPT
Documentation generated by PADDOCS
Compendium section: 10-docs
Title: Project Interlink
Author: Joe Corso
Created: 2024-01-21
Updated: 2025-07-02
Tags: interlink, flask, forms, report, mariadb
Status: [ Draft / Final / Reviewed ]
Template:
- 00-project-proposal.md
- 01-project-overview.md
- 02-design-report.md
- 03-technical-report.md
- 04-research-log.md
- 05-final-report.md
License: “All Rights Reserved”
Schema: technical
Version: 0.1.1
Branding: Operation Mindmap
version
1.2.1
author
Joe Corso
date
01-21-2024
updated
02-22-2026
copyright
Copyright 2024 Joe Corso
license
MIT License
pads.email.address@gmail.com
status
Production
description
Flask Generator for Forms, Reports, URLs and Templates.
Flask Generator for Forms, Reports, URLs and templates.
This is a collection of libraries written to work in Python’s flask
framework. It will generate a form and report for any table in a
database. It will also create the urls, and the navigation bar. You can
customize your website by generating your own instance of the API; or
you can register the
Blueprint(e.g. app.register_blueprint(templetonBP)), which has its own
set of templates.
So essentially, if you create a database for a library like in all
tutorials and you need a form template and a report template, it will
generate the form or report from the table in the database, and fill in
the details in the template. To render the page in the browser just type
in the url which corresponds to the table name, or make a navigation bar
to generate the links for you.
Examples:
Setting up interlink is very easy. It depends on mysql-connector, and flask. Which will be downloaded automatically when installed. Let’s say we want to make a blog, and we have a database named “blog” with a table named “manifest”. This documentation is not in the same scope of writing SQL, we will assume you’ve set up your blog any way you want. That’s the beauty of interlink, it doesn’t matter.
        $ python -m venv path/to/venv/my_env
        $ . path/to/venv/my_env/bin/activate
$ python -m pip install git+https://github.com/padsRepo/interlink.git__init__.py
file for easier reading. __init__.py
import os
from flask import Flask, Blueprint, render_template, url_for
from views import viewsBP
KEY = os.urandom(16)
os.environ['SECRET_KEY'] = str(KEY) # REQUIRED
os.environ['DB_USER'] = '<username>' # REQUIRED
os.environ['DB_PASS'] = '<password>' # REQUIRED
os.environ['BASE_DIR'] = os.path.dirname(__file__)
os.environ['LOG_DIR'] = os.environ.get('BASE_DIR') + '/log'
os.environ['whitelist'] = '["127.0.0.1", "192.168.0.37"]' # REQUIRED
os.environ['blacklist'] = '["71.71.71.71"]' # REQUIRED
app = Flask(__name__)
app.config.from_mapping(SECRET_KEY=os.environ.get('SECRET_KEY'))
app.config['UPLOAD_FOLDER'] = 'repo/'
from interlink import *
app.register_blueprint(viewsBP) # Your views.py file
app.register_blueprint(templetonBP) # Add to use interlinks templating engine
app.register_error_handler(404, url_not_found) # From the templeton lib
app.register_error_handler(500, internal_error) # From the templeton lib
if debug == False:
app.run(debug=True, host='0.0.0.0', port='8000')
templetonBP has all the templates you need. There
is a default admin, forms, reports, blog, login, index page, and its own
documentation. It helps to load the templetonBP
after your own library. If you have variables set
outside the scope of the __init__.py file, interlink will
not find them. 127.0.0.1:8000/admin/blog
127.0.0.1:8000/forms/blog/manifest
127.0.0.1:8000/reports/blog/manifest
127.0.0.1:8000/blog/manifest # for the blog you want everyone to see
127.0.0.1:8000/admin/blog
127.0.0.1:8000/copyright/
127.0.0.1:8000/404/
127.0.0.1:8000/500/
127.0.0.1:8000/docs/<page>/ # the docs page for this library.
127.0.0.1:8000/loginRequired/
127.0.0.1:8000/login/
127.0.0.1:8000/register/
127.0.0.1:8000/index/| Modules | Description |
|---|---|
| formulator | Form and Report Generator |
| templeton | Template Generator |
| safeHaven | Security Guard |
| toolkit | Misc Tools |
| Classes | Description |
|---|---|
| Generator | Object method used to query database |
| DB | Object method used to connect and close connection to database |
| Tempulation | Custom Views |
| Functions | Description |
|---|---|
| tempulator | templates |
| honeypot | distraction |
| backdoor | entry way |
| login | check user |
| site_map | site map for SEO |
| url_not_found | 404 Error |
| internal_error | 500 Error |
| templetonBP | Templeton Templates |
This is the Toolkit Module. It contains classes and functions that are reuseable across the entire library.
Get the directory path of the project
Generate a URL for each view that does not have a GET or POST method.
The formulator is used as the SQL engine to gather the data from the database to populate the template.
The formulator module makes use of the Generator()
object, to connect to the database, find the proper table, query the
results, and return a value that can be passed into an html template. It
is the main module behind the Interlink library. It acts as the SQL
engine, to generate a return value, that can be manipulated to the
developers needs. It’s main dependancy is the toolkit.DB()
object for connection to a database. Make sure you have the proper
environment variables set to ensure proper connection. If the project
does not fit into the templetonBP this module will assist
in automating redundant SQL statements, form, and report development,
and navigation menus which need to sort administration, from users, from
bad actors. It can be used along side other modules in the library as
well as imported directly into your own project.
Let’s say you dont like templetons blog template and you want to use
your own blog template. Use the formulator.Generator to
make a query of your blog table from your SQL database. Create a
variable from it, and then using Jinja’s Templating Engine with Flask,
we can manipulate the variable in an html template anyway we want.
In your views.py file you only need two specific views that will
generate every form, and report respectively. In the
index() function you will see the nav variable set to
generateNav(). This generates the navigation bar for you.
It can be used in the template to build the navigation menu. If you’re
familiar with flask’s Blueprints, then this should look pretty simple.
If not, check out the flask docs, it’s pretty cool.
Basically, make a route for a reports url and a route for a forms url
so that the computer doesn’t confuse the two. For your route you need to
define a parameter for your database, and table. This is just to pass
into the generateReport() or generateForm()
functions which is used to find the table, and create the form or
report. The report needs 4 parameters(One for the column names of the
table, one for the data in the table, a title, and a generic error) and
the form needs 3(One to generate the forms, a title, and a generic
error). The generateNav() doesn’t need a parameter, but it
searches for the database you set to your
Generator.__init__(). Make sure to register the views:
    __init__.py

      from views import viewsBP
      app.regist_blueprint(viewsBP)
views.py
from flask import Blueprint, render_template
import interlink as i
viewsBP = Blueprint('/', __name__, url-prefix='/')
@viewsBP.route(/)
def index():
gen = i.Generator('DB', 'DB_USER', 'DB_PASS')
nav = gen.generateNav()
return render_template('index.html', nav=nav)
@viewsBP.route('/<db>/<table>')
def blog(db, table):
gen = Generator(db, 'DB_USER', 'DB_PASS')
content = gen.generateQuery(table)
return render_template('template.html', content=content)
@viewsBP.route('/reports/<db>/<table>')
def generateReport(db, table):
gen = i.Generator(db, 'DB_USER', 'DB_PASS')
colName, colRow, error, title = gen.generateReport(table)
return render_template('reports.html', colName=colName, colRow=colRow, error=error, title=title)
@viewsBP.route('/forms/<db>/<table>', methods=['GET', 'POST'])
def generateForm(db, table):
gen = i.Generator(db, 'DB_USER', 'DB_PASS')
error, form, title = gen.generateForm(table)
return render_template('forms.html', form=form, error=error, title=title)
@viewsBP.route('/admin/<db>')
def admin(db):
nav = Generator(db, 'DB_USER', 'DB_PASS').generateNav()
return render_template('admin.html', nav=nav, db=db, title=db)Make a template for your Forms:
      forms.html

      {% extends 'base.html' %}
      {% block description %}{% endblock %}
      {% block keywords %}{% endblock %}
      {% block title %}{{ title }}{% endblock %}

      {% block content %}

      <article class="index">
        <section class="col-6 col-s-6 col-m-6">
          <fieldset class="form">
            <label>{{ error }}</label>
            <form method="POST">
              {% for f in form %}
                <label for="{{ f[0] }}">{{ f[0] }}</label>
                <input type="text" name="{{ f[0] }}">
              {% endfor %}
              <input type="submit" value="submit">
            </form>
          </fieldset>
        </section>
      </article>

      {% endblock %}
Make a template for your reports:
      reports.html

      {% extends 'base.html' %}
      {% block description %}{% endblock %}
      {% block keywords %}{% endblock %}
      {% block title %}{{ title }}{% endblock %}

      {% block content %}

        <article class="col-12 col-s-12 col-m-12">
          <h1>{{ title }} Report</h1>
          {{ error }}
          <table class="data">
            <tr>
              {% for c in colName %}
                <th>{{ c[0] }}</th>
              {% endfor %}
            </tr>
            {% for row in colRow %}
              <tr>
                {% for c in row %}
                <td>{{ c }}</td>
                {% endfor %}
              </tr>
            {% endfor %}
          </table>
        </article>

      {% endblock %}
Finally, make a navigation menu for it all. The formulator filters “timestamp”, “pri”, “uni”, “mul”, “updated”, and “q”.
      base.html

      <nav class="pc mobile">
        <a href="{{ url_for('/.index') }}">Index</a>
        <div class="dropdown">
          <span>Reports</span>
          <div class="dropdownContent">
            {% for p in nav %}
            <a href="{{ url_for('templeton.generateReport', db='{}'.format(db),  page='{}'.format(p[0])) }}">{{ p[0] }}</a>
            {% endfor %}
          </div>
        </div>
        <div class="dropdown">
          <span>Forms</span>
          <div class="dropdownContent">
            {% for p in nav %}
            <a href="{{ url_for('templeton.generateForm', db='{}'.format(db),  page='{}'.format(p[0])) }}">{{ p[0] }}</a>
            {% endfor %}
          </div>
        </div>
      </nav>
That’s it! So if you have a DB with tables named books, authors, planets, solarSystems….etc. Just type in the url for the table name. For example:
https://www.website.com/reports/library/authors
https://www.website.com/reports/library/books
https://www.website.com/forms/library/authors
https://www.website.com/forms/library/books
OR
https://www.website.com/reports/science/solarSystems
https://www.website.com/reports/science/planets
https://www.website.com/forms/science/solarSystems
https://www.website.com/forms/science/planets
The DB class is designed to facilitate operations on databases using MariaDB. It enables you to establish connections to your database with credentials that possess appropriate permissions. Ensure you close the connection after completing your operations to avoid potential resource leaks.
| Args | Description |
|---|---|
| db (str) | Database Name, Must be an ENV VAR |
| user (str) | User Name, Must be an ENV VAR |
| password (str) | Password, Must be an ENV VAR |
| Returns | Description |
|---|---|
| mydb (str) | Connection to Database |
Example:
    os.eviron['db'] = 'library'
    os.eviron['user'] = 'franklin'
    os.eviron['password'] = 'aklsdjhashdfsajkdfh'
    @viewsBP.route('/report/<db>/<page>')
    def myFuntion(db, user, password):
      db_conn = DB(db, user, password).connect()
      cursor = db_conn.cursor(buffered=True)
      cursor.execute(f"SELECT TABLE_NAME FROM INFORMATION_SCHEMA.TABLES WHERE TABLE_SCHEMA='{db}'; ")
      sql = cursor.fetchone()
      db_conn.close()
return sqlInitialize the database object
None
None
Used to make a connection to MariaDB
Used to close a connection to MariaDB
The DataHandler class is designed to manage various data operations related to databases, including fetching database and table names, retrieving enumerated list data, and obtaining metadata.
| Args | Description |
|---|---|
| db_name (str) | The name of the database. |
| user (str) | The username for the database connection. |
| password (str) | The password for the database connection. |
None
Get Database Names which the user has access to.
| Returns | Description |
|---|---|
| sql(list) | A list of tuples containing database names |
Get Table Names from a specific Database which the user has access to.
| Returns | Description |
|---|---|
| sql(list) | A list of tuples containing table names. |
Retrieve HTML options for enumerated lists from a given table.
| Args | Description |
|---|---|
| table (str) | The name of the table. |
| Returns | Description |
|---|---|
| html(str) | An HTML string representing the select element. |
Obtain metadata related to foreign keys in a specified table.
| Args | Description |
|---|---|
| table (str) | The name of the table. |
| Returns | Description |
|---|---|
| html(str) | An HTML string representing the select element. |
The generator is the module used to generate your forms, reports, queries, and anything DB related. It wraps the core functionality of the modeule into a reusable Class Object which you can use to recall a connection or query to a specifc database and table. In practice, the developer would not have to write the boilpate code needed to connect, query, and close connection to the database. By leveraging the concept of OOP, the intent is to mitigate, and slow down DDOS attacks, by preventing the end user from creating multiple concurrent conections to any given website.
| Args | Description |
|---|---|
| db (str) | Database Name, Must be an ENV VAR |
| user (str) | User Name, Must be an ENV VAR |
| password (str) | Password, Must be an ENV VAR |
Example:
    @templetonBP.route('/blog/')
    @honeypot
    @backdoor
    def blog():
      gen = Generator('blog', 'DB_USER', 'DB_PASS')
      colName, colRow, error, title = gen.generateReport('blog')
return render_template('blog.html', colName=colName, colRow=colRow, error=error, title=title)Initialize the Generator object. This would, in theory, create a new object in the session which the server could point back to.
None
None
Generate a form using table name to populate the
form.html template.
TODO:
- Find better terms for the functions and values of data and
enumList
| Args | Description |
|---|---|
| table (str) | Name of table within database |
| Returns | Description |
|---|---|
| error (str) | 200 404 500 |
| form (str) | Data used to populate template |
| data (str) | Finds metadata and creates a dropdown menu |
| enumList(str) | Finds any enumerations in SQL and creates a dropdown menu |
| title (str) | Name of db given from init |
Example:
    @templetonBP.route('/forms/<db>/<page>', methods=['GET', 'POST'])
    @backdoor
    @login
    @honeypot
    def generateForm(db, page):
      gen = Generator(db, 'DB_USER', 'DB_PASS')
      error, form, data, enumList, title = gen.generateForm(page)
return wrapper('forms.html', form=form, error=error, title=title, data=data, enumList=enumList)Generate a report using table name to populate the
report.html template.
| Args | Description |
|---|---|
| table (str) | Name of table within database |
| Returns | Description |
|---|---|
| colName (str) | Name of each column in the table |
| colRow (str) | Data within each row of the table |
| error (str) | 200 404 500 |
| title (str) | Name of table given from init |
Example:
    @templetonBP.route('/reports/<db>/<page>')
    @backdoor
    @login
    @honeypot
    def generateReport(db, page):
      gen = Generator(db, 'DB_USER', 'DB_PASS')
      colName, colRow, error, title = gen.generateReport(page)
return wrapper('reports.html', colName=colName, colRow=colRow, error=error, title=title)Run a custom SELECT statement to see the results.
TODO:
- Add *args to select different columns.
| Args | Description |
|---|---|
| table (str) | Table name to query |
| select (str) | List of column names to filter. List a traditional SQL Select Statement. |
| Returns | Description |
|---|---|
| sql (str) | Index of the data for each column in a record |
Generate a URL for each table in a db, which the user has access. This is useful within an Admin Page, to generate a url for each form or report of the table.
Example:
-> views.py
    @templetonBP.route('/admin/<db>')
    @backdoor
    @login
    @honeypot
    def admin(db):
      nav = Generator(db, 'DB_USER', 'DB_PASS').generateNav()
      return wrapper('admin.html', nav=nav, db=db, title=db)
-> base.html
    <div class="adminNav col-5">
      <h2>Reports:</h2>
          {% for p in nav %}
            <a href="{{ url_for('templeton.generateReport', db='{}'.format(db),  page='{}'.format(p[0])) }}">{{ p[0] }}</a><br>
          {% endfor %}
    </div>
    <div class="adminNav col-5">
      <h2>Forms:</h2>
          {% for p in nav %}
            <a href="{{ url_for('templeton.generateForm', db='{}'.format(db),  page='{}'.format(p[0])) }}">{{ p[0] }}</a><br>
          {% endfor %}
</div>Generate a URL for each db, which the user has
access. This is useful to generate a navigation bar in a
base.html file, to access each database. Which would lead
you to an admin page to generate a url for each table within the
database.
Example:
-> views.py
     @templetonBP.route('/dashboard/')
     def dashboard():
       database = Generator('', 'DB_USER', 'DB_PASS').generateURL()
       return render_template('data.html', database=database)
-> base.html
    {% for d in database %}
      <li><a href="{{ url_for('templeton.admin', db='{}'.format(d[0])) }}" title="{{ d[0] }} Panel"><img src="{{ url_for('templeton.static', filename='/img/icons/ai-settings2-t.png') }}"><span>{{ d[0] }}</span></a></li>
{% endfor %}Safe Haven is like the security team for the president. Always lurking in the shadows, ready to defend your best interest. Since these are decorators they’re easy to use.
All you have to do is add the appropriate decorator to each page that you want to add the functionality to. Here’s a simple index page, that I want really locked down.
@viewsBP.route('/')
@backdoor
@honeypot
@login
def index():
  return render_template('index.html')
And there’s nothing more to it then that. Safe Haven checks that the person connecting passes, and if not redirects them to the appropriate page. If you’re using templeton’s Blueprints it will redirect to its login screen, and everything works seamlessly.
Python decorator you can use as a honeypot. Any IP Adress that is black listed will be redirected to a login page that logs the username and password they attempt to use.
Python decorator you can use as a backdoor. Any page which has this decorator will give IP Address’ on the whitelist full access to the page.
Python decorator you can use to check if a user is logged in. If not, they will be redirected to a login page from where they can log in.
This module is used to access Interlink from the CLI.
Test Model
None
None
CLI Mode
Generate a report for table
This script prints some colors. It will also automatically remove all ANSI styles if data is piped into a file.
Give it a try!
Templeton is like the butler used to fetch the templates, fill in the proper parameters, and serve it to you on a silver platter. Templeton builds the skeleton website for you. All you have to do is type in the proper URL, or generate the navigation bar.
The easiest way to use templeton is to register its Blueprint’s in
your app. There are three; 404, 500, and
templetonBP.
  -> __init__.py
      from interlink.templeton.views import templetonBP
      app.register_blueprint(templetonBP)
      app.register_error_handler(404, url_not_found)
      app.register_error_handler(500, internal_error)
The templetonBP has a default set of templates you can
use to have a full website deployed. The URL’s which Templeton uses are
as follows:
      127.0.0.1:8000/admin/<db>
      127.0.0.1:8000/forms/<db>/<table>
      127.0.0.1:8000/reports/<db>/<table>
      127.0.0.1:8000/<db>/<table> # for the blog you want everyone to see
      127.0.0.1:8000/admin/<db>
      127.0.0.1:8000/copyright/
      127.0.0.1:8000/404/
      127.0.0.1:8000/500/
      127.0.0.1:8000/docs/<page>/ # the docs page for this library.
      127.0.0.1:8000/loginRequired/
      127.0.0.1:8000/login/
      127.0.0.1:8000/register/
      127.0.0.1:8000/index/
Whatever the name of the database, type the name into the db parameter. Whatever the name of the table, type the name into the table parameter. It will generate a generic template for you.
The Tempulations are used to build a new url rule, based on the developers needs.
[!NOTE]
Remember that with templeton’s tempulator, the generic templates are only coming frominterlink.templeton.views. If you want to change where it’s coming from you can use templeton’s Tempulation, and create a new url loader function.
Templeton also comes equiped with a tempulator, which runs off of Tempulations. The tempulator is basically just Flask Lazy Loading URL’s in a wrapper. This feature is used to route Templetons templates to a URL, but does not have an endpoint(e.g. does not load by default). It is used to add extra templates to the app, if needed, without added overhead to the base project. For example, if you make a blog, you should be able to build a blog without also loading the catalog from an ecommerce site into memory, and vice versa. By using the tempulator, you can load a blog without a journal, or an ecommerce site without a repository, or a snosberry without an everlasting gobbstopper. You can also use the tempulator to load one endpoint before the other. If you like templetons catalog view, and you’re an ecommerce site you may want to load that as your index page. This would achieve those results. If you like the admin page, but need it rerouted to another URL, you would use templulator.
Generate a new url_rule from any view within your project. This is used if you would like to map out url rules for each of your own endpoints.
Examples:
# Use the Tempulation's to create a new URL:
app.add_url_rule('/dash', view_func=Tempulation('interlink.templeton.views.dashboard'))

# make a new tempulator
def myNewTempulator(import_name, url_rules=[], **options):
    view = Tempulation(f"@{app_name@}.@{import_name@}")
    for url_rule in url_rules:
app.add_url_rule(url_rule, view_func=view, **options)Initialize the Tempulation object. This will hold the variable for the new url_rule.
| Args | Description |
|---|---|
| object (str) | Endpoint for new view |
None
None
The tempulator is used to add extra templates to the app, if needed, without added overhead to the base project. For example, if you make a blog, you should be able to build a blog without also loading the catalog from an ecommerce site into memory, and vice versa. By using the tempulator, you can load a blog without a journal, or a ecommerce site without a repository, or a snosberry without an everlasting gobbstopper. You can also use the tempulator to load one endpoint before the other. If you like templetons catalog view, and you’re an ecommerce site you may want to load that as your index page. This would achieve those results.
--> views.py
# load templetons catalog view as the index view
@templetonBP.route('/')
@login
def catalog():
  return tempulator("views.catalog", ['/catalog'], app = app)

# add a single route to the catalog view
tempulator('views.catalog', ['/catalog'], app = app)

# add two routes to a single function endpoint
url_rules = ['/catalog/','/catalog/<item>']
tempulator('views.catalog', url_rules, app = app)Used to wrap all the web pages in default params.
TODO:
- Make a decorator.
| Args | Description |
|---|---|
| page(str) | Passes the var to render_template |
| kwargs(dict) | Added settings to the webpage. |
MakeMe
Joe Corso - Lead Developer
2025-11-15
[Describe the problem this project solves]
[List the main objectives]
[Define the boundaries of the project: what’s included/excluded]
[Key benefits and value proposition]
[Potential issues and mitigation plans]
[Sign-off or decision to proceed]
NA
NA
git-shell or gitearsync or
restic[How data moves through the system, with diagrams if needed]
Build Date: 2025-07-09
Designed for:llama.cpp(3B–7B CPU Inference), Arch Linux, Headless/Server Ready
Estimated Power: ~150W max (CPU-only), ~300W w/ GPU
Target Use: Local LLMs, PADS builder, dev server
| Qty | Component | Model / Description | Price (USD) |
|---|---|---|---|
| 1 | CPU | AMD Ryzen 5 5500 – 6-core, 12-thread Zen 3 (w/ Wraith Stealth Cooler) | $62.00 |
| 1 | Motherboard | MSI PRO B550M-VC WiFi (mATX, AM4, PCIe 4.0, WiFi 6E, BT 5.2) | $75.99 |
| 1 | RAM | Crucial Pro 32GB (2×16GB) DDR4-3200 UDIMM | $74.99 |
| 1 | NVMe SSD | Crucial P3 Plus 1TB PCIe Gen4 (M.2 2280) | $61.90 |
| 1 | HDD | Seagate Exos 7E8 4TB 7200RPM SATA (Renewed) | $64.88 |
| 1 | Case | Cooler Master MasterBox Q300L (mATX, filtered, compact) | $39.99 |
| 1 | PSU | ARESGAME AGV 500W 80+ Bronze, non-modular | $37.99 |
| 1 | Case Fans | DARKROCK 120mm x3, 3-pin, 1200 RPM, low-noise | $8.99 |
Estimated Total: $426.73
All prices are approximate from Amazon as of July 2025. Tax/shipping not included.
| Component | Purpose |
|---|---|
| 1–2x SATA cable | For HDD if none included |
| HDMI/DP cable | For external monitor output |
| USB stick (8GB) | For initial Arch bootloader |
project: llama-arch-box
date: 2025-07-09
format: markdown
target_model: llama.cpp q4/q5 (3B–7B)
ram_min: 16GB
ram_recommended: 32GB
gpu_required: false/mnt
├── media # Jellyfin Server
│ ├── games
│ ├── movies
│ ├── music
│ ├── pics
│ └── shows
└── repo
├── archive # Backups
├── code # Libs used for RPi
└── git # Local Repo[Wireframes, mockups, or descriptions of user interactions] ### Security Considerations
vault/ufwProvide background information, objectives, and the scope of the technical work.
Clearly define the technical challenge or need that this report addresses.
Describe the processes, tools, and technologies used to address the
problem.
Include diagrams, charts, or pseudocode if applicable.
Explain how the solution was developed or executed.
List hardware, software, configurations, or environments used.
Present the findings, data, or performance outcomes of the technical
work.
Include tables, graphs, or screenshots where relevant.
Interpret the results and discuss their significance.
Highlight successes, issues, and unexpected outcomes.
List any technical constraints, risks, or difficulties encountered.
Suggest improvements, next steps, or further areas of research.
Summarize the technical achievements and how they meet the project goals.
List all technical references, standards, and documentation sources.
“Running record of steps, discoveries, and next actions.”
Setting up the Ender-3 after it’s been sitting in the closet for about a year. The firmware was wiped in a catastrophic boating accident.
[!NOTE]
You need to put the URL in quotes since the geniuses over at Creality decided to use spaces in the filename. Or insert %20
$ wget "https://file2-cdn.creality.com/file/b7da70b1c1352a5ca1eb40b83e7e3c0e/Ender-3 Marlin2.0.6 Factory firmware.zip" $ unzip "Ender-3 Marlin2.0.6 Factory firmware.zip" $ sudo mount /dev/sd* /mnt
# For some reason there are 2 spaces between Ender-3__Marlin* (Because China)
$ sudo cp "Downloads/Ender-3 Marlin2.0.6 Factory firmware
Ender-3Marlin2.0.6HW4.2.2.bin" /mnt
$ sudo umount /dev/sd*Insert the card into the 3d printer, and turn it on. The printer will auto detect the .bin file, and install the firmware.
Turn off the printer, remove the SD Card, and turn the printer back on to ensure the firmware is installed correctly.
For a beginner test print, we will use this website as our slicer program. I used this XYZ 20mm Calibration Cube as a test. Download the .stl.
Open the webpage above. Hover over files and click
import. Hover over start click slice, then export. You
should get a .gcode file.
Mount the SD Card again. Remove the .bin file. Copy the .gcode file to the SD Card. Unmount the SD Card
    $ sudo mount /dev/sd* /mnt
    $ sudo rm /mnt/*
    $ sudo cp ~/Downloads/*.gcode /mnt
    $ sudo umount /dev/sd*
Insert the SD Card into the printer. Level the bed, as explained here.
Select Print from TF Card on the printer. It will
start the print. Watch the first few layers for inconsistencies, and
either adjust or stop the print and re-level the bed.
Example: “Tested SAS HBA with breakout cables — confirmed all four drives detected.”
lsblk.(Continue adding sections for each workday or session)
[Brief recap of what the project is and its purpose]
[How the project was developed step-by-step]
[List of final features and modules]
[Full specs, APIs, protocols used]
[Testing approach, tools used, and results]
[Key takeaways and improvements for next time]
[Potential next versions, enhancements, or research]
Template generated by ChatGPT
Documentation generated by PADDOCS
Compendium section: 10-docs
Title: Project MakeMe
Author: Joe Corso
Created: 2025-11-14
Updated: 2025-11-15
Tags: Creality, Ender-3, 3D Printing, Blender, Slic3r
Status: Draft
Template:
- 00-project-proposal.md
- 01-project-overview.md
- 02-design-report.md
- 03-technical-report.md
- 04-research-log.md
- 05-final-report.md
License: “All Rights Reserved”
Schema: technical
Version: 0.1.1
Branding: Mindmap
PADS (Personal Assistant and Deployment System)
Joe Corso
2023-06-05
The initiation for the project comes from the need to organize, consolidate, maintain, deploy, and automate coding libraries, web apps, and development environments in to a clear, thoughtful, and easy to understand manner.
paddocs subsystem.By consolidating development, deployment, and documentation tasks into a cohesive ecosystem, PADS empowers users to increase productivity, reduce manual overhead, and maintain high-quality, reproducible workflows.
PADS is a modular, shell-based automation and project management system designed to streamline personal development workflows and infrastructure deployment. It provides a unified command-line interface to manage system-level tasks, Python project scaffolding, documentation generation, and utility tools—all integrated to support reproducibility, scalability, and maintainability.
As a sole developer, it can be difficult to manage multiple projects, and each code snippet. This project was built from the need to have a certain “personal assistant”, which can handle the manual task of building, and maintaining a business infrastructure.
PADS is divided into modules. Each module maintains it own logic, and documentation. They are grouped by task. Each module has it’s own binary file, and source code directory within the pads directory.
paddocs subsystem.Rapid deploment, and low maintainence of an ecommerce business.
PADS is organized into four main modules:
git-shell or gitearsync or
resticInput command -> process logic -> Output
-> run LLM -> Output
pads -> process which command to use -> process OPT/ARGS -> pass command to module -> Output
-> build env -> Output
paddocs ->
proj ->
sys ->
tools ->The PADS project uses a clear directory hierarchy:
pads/
├── sys/ # System-level scripts
├── proj/ # Python project generators and managers
├── paddocs/ # Documentation system source and config
│ ├── src/
│ ├── config/
│ ├── includes/
│ ├── manuscript/
│ ├── output/
│ └── metadata.yaml
├── tools/ # Helper scripts and utilities
├── models/ # LLM prompts, outputs, and evaluation
├── etc/ # Configuration files
├── var/ # Logs and runtime files
├── install/ # Installation and uninstallation scripts
└── tests/ # Unit and integration testsBuilt in configs for Qtile, KDE Plasma, Arch Linux
Built in Conky Panels showing system performance, mounted devices,
etc.
PADS integrates a prompt command:
- located at
$PADS_DIR/etc/prompt_command.sh
promptCommand(){
local code=$?
blue="\[$(tput setaf 4)$(tput bold)\]"
green="\[$(tput setaf 2)$(tput bold)\]"
red="\[$(tput setaf 1)$(tput bold)\]"
yellow="\[$(tput setaf 227)$(tput bold)\]"
orange="\[$(tput setaf 208)$(tput bold)\]"
grey="\[$(tput setaf 240)$(tput bold)\]"
r="\[$(tput sgr0)\]"
bg=${grey}
ve=${grey}
f=${grey}
nx=${grey}
git=${grey}
[[ $PWD =~ "git" ]] && git=${orange}
[[ -n $VIRTUAL_ENV ]] && ve=${orange}
PS1="[ ${git} ${r} ${ve}VE${r} ${blue}\u@\h \W${r} ] \$ "
}PADS has it’s own set of logging, and error reporting using signal
traps: - located at:
\$PADS_DIR/etc/pads.sig
    msg(){
      local code=$?
      [[ ${code} -eq 0 ]] && printf "[ ${grey}INFO${r} ] :: ${1}\n"
    }

    hup_script(){
      notify-send "PADS" "Bye"
    }
    err_script(){
      local code=$?
      printf "[$code]$red ERROR:${BASH_SOURCE##*/}:${FUNCNAME[0]}:$r ${0##*/}.${mod}.$BASH_LINENO:$BASH_COMMAND\n"
      return $code
    }
    quit_script(){
      printf "Quitting...\n"
      exit 1
    }
    interrupt_script(){
      printf "\n^C\n"
      [[ -f ${lock} ]] && echo "rm lock" && rm $lock
      exit 130
    }

    terminate_script(){
      notify-send "Terminated"
      killall $!
    }
    exit_script(){
      code=$?
      # Code goes here
      exit $code
}var/ for easy
rotation and monitoring..env and pads.conf allow
environment-specific overrides without modifying source code.PADS is a modular Bash and Python-based automation system designed to manage personal projects, system tasks, documentation, and integration with large language models (LLMs). It aims to provide a cohesive, reproducible workflow for developers who require both system-level controls and project-level automation.
paddocs)metadata.yaml to store document-wide
settings.models/.trap commands to log script execution
and errors.ast module
and Bash comment parsing.etc/), runtime data (var/), and source code
(src/ within modules).bin/ provide easy CLI access..env
and vault solutions.PADS is a versatile platform combining automation, project management, documentation, and AI-readiness. It enables developers to streamline complex workflows within a structured, secure, and extensible environment.
PADS is a comprehensive, extensible system designed to automate and streamline development and deployment workflows. By combining scripting, documentation, and AI readiness, it positions itself as a future-proof platform for personal and small team project management.
NA
PADS is a modular, command-line driven automation and project management system aimed at personal developers and small teams. It integrates system-level operations, project scaffolding, documentation generation, and tooling under a unified interface to simplify complex workflows.
Template generated by ChatGPT
Documentation generated by PADDOCS
Compendium section: 10-docs
Title: Project PADS
Author: Joe Corso
Created: 2022-05-04
Updated: 2025-10-26
Tags: automation, bash
Status: [ Draft / Final / Reviewed ]
Template:
- 00-project-proposal.md
- 01-project-overview.md
- 02-design-report.md
- 03-technical-report.md
- 04-research-log.md
- 05-final-report.md
License: “All Rights Reserved”
Schema: technical
Version: 0.1.1
Branding: Operation Mindmap
This manual is for PADDOCS (1.1.0, 2025-10-25) A module which self-generates documentation
Paddocs is a module for PADS which self generates documentation from
code into a technical manual, blog, info, and man pages. This
documentation was generated using the same library. You can generate the
book layout into the ~/dev/pads/paddocs/ directory. Write
the documentation within the programs files using the headers outlined
in Notes. Build the documentation with
-b, then generate the docs with -g. You can
also use paddocs to generate report templates, metadata for
the book, covers, bibliography info. etc.
Repository: https://github.com/padsRepo/pads
Before you begin, make sure you meet these prerequisites:
$ git clone https://github.com/padsRepo/paddocs $ makepkg -si $ paddocs -b book && paddocs -b metadatamanuscript/<sectionName>/<cmd>/assets/schemas to
/manuscript/<sectionName>/ $ paddocs -c <cmd> -l <lang> -b doc && paddocs -g book html $ paddocs -s
$ http://127.0.0.1:8000<cmd> -[<argument>] [<name>]
paddocs -[b:,c:,g:,l:,s,v,h] [<name>]-b <name> Build <name> to manuscript/
<type> is one of: book, metadata, readme, license, doc, man
-c <name> Command to generate docs for
-g <type> <prefix> <sectionName> Generate <name> to output/
<type> is one of: markdown, html, pdf, section, chapter, man
-l <name> Coding language to use for the code block.
-s Run python -m http.server and exit
-v Show Version
-h Show Usage| Script | Description |
|---|---|
| parse.sh | Configure the necessary vars for the template |
| build.sh | Make and save the template with the parsed vars |
| generate.sh | Create the full book, sections, or chapters |
| Function/Class | Module | Parameters | Returns | Description |
|---|---|---|---|---|
| parseBash | parse.sh | shell_tags | 0 success 1 error | If -l ${lang} is bash configure vars from given -c ${cmd} |
| parsePython | parse.sh | python_tags | 0 success 1 error | If -l ${lang} is python configure vars from given -c ${cmd} |
| book | build.sh | -b book | 0 success 1 error | Build the skeleton directory for a new project |
| metadata | build.sh | -b metadata | 0 success 1 error | Generate metadata.yaml file for the book |
| readme | build.sh | -b readme | 0 success 1 error | Generate README.md file from given -c ${cmd} |
| license | build.sh | -b license | 0 success 1 error | Generate LICENSE file from give -c ${cmd} |
| man | build.sh | -b man | 0 success 1 error | Generate GROFF man page from given -c ${cmd} to
manuscript/11-manual/\${cmd} |
| doc | build.sh | -b doc | 0 success 1 error | Generate Technical Documentation from given -c ${cmd} to
manuscript/10-docs/\${cmd} |
| genBook | generate.sh | -g book [<html,pdf,md>] | 0 success 1 error | Generate entire manuscript to output/book directory in given format |
| genSection | generate.sh | -g book [<html,pdf,md>] |
0 success 1 error | Generate output/section in given
format |
| genChapter | generate.sh | -g book [<html,pdf,md>] |
0 success 1 error | Generate output/chapter in given
format |
| genMan | generate.sh | -g man -c ${cmd} | 0 success 1 error | Generate man to output/man and update
/usr/share/man/man1 |
paddocs -hpaddocs -vpaddocs -b bookpaddocs to
\${base_dir}/paddocs/
paddocs -c paddocs -l bash -b docspaddocs into the
paddocs/manuscript/10-docs/\<projDir\> directory.
This is if you need more of a report. If you want the manpage use
man instead.
paddocs -c paddocs -l bash -b manpaddocs into the
paddocs/manuscript/11-manual/\<cmd\>.md directory.
paddocs -g book pdfmanuscript/
directory to output/compendium.pdf
paddocs -g book htmlmanuscript/
directory to output/compendium.html
| Code | Status |
|---|---|
| 0 | Success |
| 1 | Failure |
| 127 | K18 |
| 130 | Ctl+C |
| Key | Value |
|---|---|
| None | N/A |
| Files/Directories | Path | Description |
|---|---|---|
| ${base_dir}/src/paddocs | Source Code Directory, Book manuscript, metadata, and output | |
| ${base_dir}/etc | Directory for trap signals/config files | |
| paddocs | ${base_dir}/bin/paddocs | Executable Directory |
| paulBunyan.sh | ${base_dir}/etc/paulBunyan.sh | Library for logs using trap signals |
paddocs -shttp://127.0.0.1:8000
paddocs -c paddocs -l bash -b man && paddocs -g man -c paddocspaddocs into the
paddocs/manuscript/11-manual/\<cmd\>.md directory.
Then generate a man page for paddocs. This
will automatically mv the tar.gz file to
/usr/share/man/man1. After it’s complete you will be able
to type man <name> for the man page.
paddocs -c interlink -l python -b doc && paddocs -g section html interlink/output/section/<cmd>.
git checkout -b feature-name)git commit -m "Add feature")git push origin feature-name)MIT License
Copyright (c) 2022 Joe Corso
Permission is hereby granted, free of charge, to any person obtaining a copy of this software and associated documentation files (the “Software”), to deal in the Software without restriction, including without limitation the rights to use, copy, modify, merge, publish, distribute, sublicense, and/or sell copies of the Software, and to permit persons to whom the Software is furnished to do so, subject to the following conditions:
The above copyright notice and this permission notice shall be included in all copies or substantial portions of the Software.
THE SOFTWARE IS PROVIDED “AS IS”, WITHOUT WARRANTY OF ANY KIND, EXPRESS OR IMPLIED, INCLUDING BUT NOT LIMITED TO THE WARRANTIES OF MERCHANTABILITY, FITNESS FOR A PARTICULAR PURPOSE AND NONINFRINGEMENT. IN NO EVENT SHALL THE AUTHORS OR COPYRIGHT HOLDERS BE LIABLE FOR ANY CLAIM, DAMAGES OR OTHER LIABILITY, WHETHER IN AN ACTION OF CONTRACT, TORT OR OTHERWISE, ARISING FROM, OUT OF OR IN CONNECTION WITH THE SOFTWARE OR THE USE OR OTHER DEALINGS IN THE SOFTWARE.
buildbook, genreadme,
genlicense, gendocs, genman,
genhtml, genpdf, genall
functionsbuild.sh and
generate.shsection, chapter,
mangenerate.shbuild.sh$quickie to $readmevars.sh to parse.shpython and bash module into
parse.sh/{parseBash,parsePython}-s flag for built in web server
python -m http.server 8088generate.shmodule, api, advanced,
troubleshoot, contributing headersprogramming-manual.md template into
doc() function## to
render the markdown properly. Ex: ##_ NOT ##.
Or they can use new lines for proper formatting.usage()
function)man paddocs, info pads
title="Paddocs"
subtitle="Self-Generating Documentation Module"
version="1.1.0"
OPTSTRING="b:,c:,g:,l:,s,v,h"
synopsis="<cmd> -[<argument>] [<name>]"
syntax="${0##*/} -[${OPTSTRING}] [<name>]"
base_dir="$(dirname "$(readlink -f "${0%/*}")")"
description(){
cat << EOF
* ${title}
* ${subtitle}
EOF
}
usage(){
cat << EOF
Synopsis: $synopsis
Syntax: $syntax
Usage:
-b <name>                        Build <name> to manuscript/
                                 <type> is one of: book, metadata, readme, license, doc, man
-c <name>                        Command to generate docs for
-g <type> <prefix> <sectionName> Generate <name> to output/
                                 <type> is one of: markdown, html, pdf, section, chapter, man
-l <name>                        Coding language to use for the code block.
-s                               Run python -m http.server and exit
-v                               Show Version
-h                               Show Usage
Ex: paddocs -c pads -l bash -b doc | paddocs -c paddocs -l bash -b man | paddocs -c interlink -l python -b doc && paddocs -g section html interlink
See also: man paddocs, info pads
EOF
}
manual(){
description
usage
}
while getopts ${OPTSTRING} mod; do
case ${mod} in
b) build=${OPTARG};;
c) cmd=${OPTARG};;
g) type=${OPTARG}; prefix=${3}; sectionName=${4};;
l) lang=${OPTARG};;
s) server=True;;
v) echo "${version}"; exit;;
h) usage; exit;;
?) echo " * ${0##*/} -h for help"; exit 2;;
*) echo "K18 Error"; exit 2;;
esac
done
[[ $# -eq 0 ]] && manual && exit
. "${base_dir}/etc/paulBunyan.sh"
. "${base_dir}/src/paddocs/src/parse.sh"
cd $base_dir/src/paddocs
if [[ ${lang} == "bash" ]]; then
parseBash
elif [[ ${lang} == "python" ]]; then
parsePython && [[ $? -eq 0 ]] && INFO "\nBuild: ${build} \nCMD: ${cmd} \nFile: file:/\${saveDir}/10-${cmd}.md \n" && exit
elif [[ -n $server ]]; then
python -m http.server 8000 &
fi
[[ -n ${build} ]] && . "$base_dir/src/paddocs/src/build.sh" && $build && [[ $? -eq 0 ]] && INFO "\nBuild: ${build} \nCMD: ${cmd} \nFile: file://${savePath} \n" && exit
[[ -n ${type} ]] && . "${base_dir}/src/paddocs/src/generate.sh" && [[ $? -eq 0 ]] && INFO "\nGenerate: file://${save_dir}\n" && exit 0Template generated by ChatGPT
Documentation generated by PADDOCS
Compendium section: 10-docs
Title: Paddocs
Author: Joe Corso
Tags: [self-generate, documentation, manual, bash]
Status: [ Draft / Final / Reviewed ]
Post ID: paddocs.md
Template: programming-manual.md
License: All Rights Reserved
Schema: manuals
Version: 1.1.0
This manual is for PADS (1.1.0, 2025-10-22) Personal Assistant and Deployment System
PADS is a shell-based automation framework designed to simplify system tasks and project scaffolding through concise command-line flags. PADS serves as a wrapper around common system and development tasks, providing a more streamlined and user-friendly interface. PADS is designed to support the VCS, Workflow, and development of [Project Starship].
Repository: https://github.com/padsRepo/pads
Blog: https://padsrepo.github.io/pads/
Docs: https://github.com/padsRepo/pads/wiki
Before you begin, make sure you meet these prerequisites:
Download:
git clone git+ssh://pi@rpi400.local/srv/repo/git/pads.git
Install: makepkg -si
Add to /etc/pacman.conf:
[datasphere]
SigLevel = Optional TrustAll
Server = http://rpi400.local/db/core

[multiverse]
SigLevel = Optional TrustAll
Server = http://rpi400.local/db/extra<cmd> -[<module>] -[<argument>] -[<option>] [name...]
pads -[L:,B:,S:,P:,R:,T:,x,v,h] -[arg]-B <name> <subtitle> Build new binary command
-D <name> Build skeleton directory for given project
-L Chat with PADS LLM
-S [-h] System Module
-P [-h] Project Module
-R [-h] Utilities Module
-T [-h] Test Module
-x Set -x
-v Show Version
-h Show Usage| Script | Description |
|---|---|
| -S | Managing System Commands |
| -P | Managing Projects |
| -R | Misc helper scripts |
| -T | Testing Commands |
| Function/Class | Module | Parameters | Returns | Description |
|---|---|---|---|---|
| system_manager.sh | -S | -[b,u,l,r,h,v] [name…] | 0 success 1 error | Src Code for logic in system scripts |
| project_manager.sh | -P | -[m:,s:,d:,h,v] |
0 Success 1 Error | Src Code for logic in managing projects |
| tools_manager.sh | -R | -[s,h,v] [name] | 0 Success 1 Error | Src Code for logic in Running commands |
pads -Pfm project && pads -Pfs projectproject.
pads -Supads -Su neofetch ...pacman or yay.
| Code | Status |
|---|---|
| 0 | Success |
| 1 | Failure |
| 127 | K18 |
| 130 | Ctl+C |
| Key | Value |
|---|---|
| NA | NA |
| Files/Directories | Path | Description |
|---|---|---|
| ${base_dir}/bin | Executable Directory | |
| ${base_dir}/docs | Documentation generated by [paddocs][#paddocs] | |
| ${base_dir}/etc | Directory for traps/config files | |
| ${base_dir}/lib | Libraries used by PADS | |
| ${base_dir}/src | Source Code for functions |
paddocs do somethingpaddocs do somethingpaddocs do somethingpaddocs do somethinggit checkout -b feature-name)git commit -m "Add feature")git push origin feature-name)MIT License
Copyright (c) 2022 Joe Corso
Permission is hereby granted, free of charge, to any person obtaining a copy of this software and associated documentation files (the “Software”), to deal in the Software without restriction, including without limitation the rights to use, copy, modify, merge, publish, distribute, sublicense, and/or sell copies of the Software, and to permit persons to whom the Software is furnished to do so, subject to the following conditions:
The above copyright notice and this permission notice shall be included in all copies or substantial portions of the Software.
THE SOFTWARE IS PROVIDED “AS IS”, WITHOUT WARRANTY OF ANY KIND, EXPRESS OR IMPLIED, INCLUDING BUT NOT LIMITED TO THE WARRANTIES OF MERCHANTABILITY, FITNESS FOR A PARTICULAR PURPOSE AND NONINFRINGEMENT. IN NO EVENT SHALL THE AUTHORS OR COPYRIGHT HOLDERS BE LIABLE FOR ANY CLAIM, DAMAGES OR OTHER LIABILITY, WHETHER IN AN ACTION OF CONTRACT, TORT OR OTHERWISE, ARISING FROM, OUT OF OR IN CONNECTION WITH THE SOFTWARE OR THE USE OR OTHER DEALINGS IN THE SOFTWARE.
.padsrc to main project folder for a file to
search.Datasphere. A project for a personal
repository. This lib is now a going to move in the direction of a
project/package manager for the repository.proj ->
/src/pads/project_manager.shsys ->
`/src/pads/system_manager.shgetopts will be created as a
new binary command in /$base_dir/binsys, proj, tools, paddocs, man pads, info pads
title="PADS"
subtitle="Personal Assistant and Deployment System"
version="1.1.1"
OPTSTRING="L:,B:,S:,P:,R:,T:,x,v,h"
synopsis="<cmd> -[<module>] -[<argument>] -[<option>] [name...]"
syntax="${0##*/} -[${OPTSTRING}] -[arg]"
base_dir="$(dirname "$(readlink -f "${0%/*}")")"
. "${base_dir}/etc/paulBunyan.sh"
description(){
cat << EOF
* ${title}
* ${subtitle}
EOF
}
usage(){
cat << EOF
Synopsis: $synopsis
Syntax: $syntax
Usage:
  -B <name> <subtitle> Build new binary command
  -D <name> Build skeleton directory for given project
  -L ${opts} Chat with PADS LLM
  -S [-h] System Module
  -P [-h] Project Module
  -R [-h] Utilities Module
  -T [-h] Test Module
  -x      Set -x
  -v      Show Version
  -h      Show Usage
Ex: pads -Pfs <flaskproject> | pads -Su nano neofetch firefox
See also: sys, proj, tools, man pads, info pads
EOF
}
manual(){
description
usage
}
while getopts ${OPTSTRING} mod; do
mod=${mod}
case ${mod} in
  x) set -$mod;;
  B) . "${base_dir}/pads/build_cmd.sh"; exit;;
  D) . "${base_dir}/pads/build_dir.sh"; exit;;
  S) cmd="sysmgr"; param=${OPTARG};;
  P) cmd="projmgr"; param=${OPTARG};;
  R) param=${OPTARG}; cmd="handyman";;
  T)
    param=${OPTARG}; exec $base_dir/bin/sys -$param;
    ;;
  v) echo "${version}"; exit;;
  h) usage; exit;;
  ?) echo " * ${0##*/} -h for help"; exit 2;;
  *) echo "K18 Error"; exit 2;;
esac
done
[[ $# -eq 0 ]] && manual && exit
${base_dir}/bin/${cmd} -${param} ${@:2}
Template generated by ChatGPT
Documentation generated by PADDOCS
Compendium section: 10-docs
Title: PADS
Author: Joe Corso
Tags: [self-generate, documentation, manual, bash]
Status: [ Draft / Final / Reviewed ]
Post ID: pads.md
Template: programming-manual.md
License: All Rights Reserved
Schema: manuals
Version: 1.1.1
This manual is for PROJ (0.0.5, 2025-02-26) A module made for PADS
The purpose of this module is to automate project management on your machine. It should build, start, delete and manage the a virual env, projects from differents languages and web frameworks.
Repository: https://github.com/padsRepo/pads
Blog: https://padsrepo.github.io/pads/
Docs: https://github.com/padsRepo/pads/wiki
<cmd> -[<argument>] -[<option>] [name...]
proj -[p:,f:,g:,h,v] -[m,s,d] <name> -p -[m,s,d] <name> Manage a python project
-f -[m,s,d] <name> Manage a flask project
-g -[m,s,d] <name> Manage a pygame project
-h Show usage
-v Show versionproj -fm project && proj -fs projectproject.
proj -d projectproject.
proj -e flaskflask.
Exit Status:
| Code | Status |
|---|---|
| 0 | Success |
| 1 | Failure |
| 127 | K18 |
| 130 | Ctl+C |
Environment Variables:
| Key | Value |
|---|---|
| $project_dir | “${BIN_DIR}/lib/${proj}” “${HOME}/srv/${proj:-$name}” “${HOME}/games/${proj}” |
| $template_dir | “python” “flask” “game” |
Config Files/Directories:
| Files/Directories | Path | Description |
|---|---|---|
| $HOME/pads/bin/proj | Executable Directory | |
| $HOME/pads/src/proj/parseopts | Source Code Directory | |
| $HOME/pads/handler/signales/pads.sig | Directory for signal handlers |
MIT License
Copyright (c) 2022 Joe Corso
Permission is hereby granted, free of charge, to any person obtaining a copy of this software and associated documentation files (the “Software”), to deal in the Software without restriction, including without limitation the rights to use, copy, modify, merge, publish, distribute, sublicense, and/or sell copies of the Software, and to permit persons to whom the Software is furnished to do so, subject to the following conditions:
The above copyright notice and this permission notice shall be included in all copies or substantial portions of the Software.
THE SOFTWARE IS PROVIDED “AS IS”, WITHOUT WARRANTY OF ANY KIND, EXPRESS OR IMPLIED, INCLUDING BUT NOT LIMITED TO THE WARRANTIES OF MERCHANTABILITY, FITNESS FOR A PARTICULAR PURPOSE AND NONINFRINGEMENT. IN NO EVENT SHALL THE AUTHORS OR COPYRIGHT HOLDERS BE LIABLE FOR ANY CLAIM, DAMAGES OR OTHER LIABILITY, WHETHER IN AN ACTION OF CONTRACT, TORT OR OTHERWISE, ARISING FROM, OUT OF OR IN CONNECTION WITH THE SOFTWARE OR THE USE OR OTHER DEALINGS IN THE SOFTWARE.
info pads
module="(P)roject Module"
description="For managing projects that are not bash"
version="0.0.5"
author="Joe Corso (https://www.joecorso.com)"
created="$(date -d '20230605')"
docs="https://github.com/padsRepo"
license="MIT License"
OPTSTRING="p:,f:,g:,h,v"
options="-[m,s,d] <name>"
synopsis="<cmd> -[<argument>] -[<option>] [name...]"
syntax="${0##*/} -[${OPTSTRING}] ${options}"
base_dir="$(dirname "$(readlink -f "${0%/*}")")"
description(){
cat << EOF
* ${module}
* ${description}

EOF
}
usage(){
cat << EOF
Synopsis: $synopsis
Syntax: $syntax
Usage:
  -p $options Manage a python project
  -f $options Manage a flask project
  -g $options Manage a pygame project
  -h Show usage
  -v Show version
Ex: ${0##*/} -r neofetch | ${0##*/} -u nano neofetch firefox
See also: man ${0##*/}, man pads, info pads, pads
Author: $author
Version: $version
Created: $created
$license
EOF
}
manual(){
description
usage
}
while getopts $OPTSTRING arg; do
arg=$arg
opt=${OPTARG#*-}
name=${3:-$2}
case $arg in
  p)
    project_dir="${BIN_DIR}/lib/${proj}"
    template_dir="python"
    echo "This is disabled for now line: $LINENO module: $module_dir/proj/proj"
    exit
    ;;
  f)
    project_dir="${HOME}/srv/${proj:-$name}"
    template_dir="flask"
    virtualenv_dir="${HOME}/env/flask"
    ;;
  g)
    project_dir="${HOME}/games/${proj}"
    template_dir="game"
    virtualenv_dir="${HOME}/env/games"
    ;;
  h) manual; exit;;
  v) echo $version; exit;;
  *) echo " * ${0##*/} -${mod}h for help"; exit 2;;
esac
done
[[ $# -eq 0 ]] && manual  && exit 2
. "${base_dir}/src/proj/parseopts"
${opt}_proj
Template generated by ChatGPT
Documentation generated by PADDOCS
Compendium section: 10-docs
Title: (P)roject Module
Author: Joe Corso
Tags: [self-generate, documentation, manual, bash]
Status: [ Draft / Final / Reviewed ]
Post ID: proj.md
Template: programming-manual.md
License: All Rights Reserved
Schema: manuals
Version: 0.0.5
This manual is for SYS (0.0.5, 2025-02-26) A module made for PADS
The purpose of this module is to automate system commands on your machine. It should be able to build your DE, WM, configs, install the OS, set up your bashrc, backup your machine, etc.
Repository: https://github.com/padsRepo/pads
Blog: https://padsrepo.github.io/pads/
Docs: https://github.com/padsRepo/pads/wiki
<cmd> -[<argument>] -[<option>] [name...]
sys -[b,u,i,l,d,r:,m,s,h,v] [name...] -b Backup System
-u [name...] Update machine. Supply name of package to install.
-i Update pads' info page
-l List packages on this machine
-d Update pads' man page
-r <name...> Remove supplied packages
-m Set up mariadb
-s Show system information
-h Show help
-v Show versionsys -msys -usys -u neofetch ranger btop ...pacman or yay.
Exit Status:
| Code | Status |
|---|---|
| 0 | Success |
| 1 | Failure |
| 127 | K18 |
| 130 | Ctl+C |
Environment Variables:
| Key | Value |
|---|---|
| BACKUP_DIR | ~/.config/pads/profile.cfg |
Config Files/Directories:
| Files/Directories | Path | Description |
|---|---|---|
| $PADS_DIR/bin/sys | Executable Directory | |
| $PADS_DIR/sys/ |
Source Code Directory | |
| $PADS_DIR/etc/pads.sig | Directory for trap signals/config files |
MIT License
Copyright (c) 2022 Joe Corso
Permission is hereby granted, free of charge, to any person obtaining a copy of this software and associated documentation files (the “Software”), to deal in the Software without restriction, including without limitation the rights to use, copy, modify, merge, publish, distribute, sublicense, and/or sell copies of the Software, and to permit persons to whom the Software is furnished to do so, subject to the following conditions:
The above copyright notice and this permission notice shall be included in all copies or substantial portions of the Software.
THE SOFTWARE IS PROVIDED “AS IS”, WITHOUT WARRANTY OF ANY KIND, EXPRESS OR IMPLIED, INCLUDING BUT NOT LIMITED TO THE WARRANTIES OF MERCHANTABILITY, FITNESS FOR A PARTICULAR PURPOSE AND NONINFRINGEMENT. IN NO EVENT SHALL THE AUTHORS OR COPYRIGHT HOLDERS BE LIABLE FOR ANY CLAIM, DAMAGES OR OTHER LIABILITY, WHETHER IN AN ACTION OF CONTRACT, TORT OR OTHERWISE, ARISING FROM, OUT OF OR IN CONNECTION WITH THE SOFTWARE OR THE USE OR OTHER DEALINGS IN THE SOFTWARE.
info pads
module="(S)ystem Module"
description="Running system commands on your machine."
version="0.0.5"
author="Joe Corso (https://www.joecorso.com)"
created="$(date -d '20230605')"
docs="https://github.com/padsRepo"
license="MIT License"
packages="${@:2}"
OPTSTRING="b,u,i,l,d,r:,m,s,h,v"
synopsis="<cmd> -[<argument>] -[<option>] [name...]"
syntax="${0##*/} -[$OPTSTRING] [name...]"
base_dir="${PADS_DIR}/sys"
. "${PADS_DIR}/etc/pads.sig"
description(){
cat << EOF
* ${module}
* ${description}
EOF
}
usage(){
cat << EOF
Synopsis: ${synopsis}
Syntax: ${syntax}
Usage:
  -b           Backup System
-u [name...] Update machine. Supply name of package to install.
-i           Update pads' info page
-l           List packages on this machine
-d           Update pads' man page
-r <name...> Remove supplied packages
-m           Set up mariadb
-s           Show system information
-h           Show help
-v           Show version
Ex: ${0##*/} -r neofetch | ${0##*/} -u nano neofetch firefox
See also: man ${0##*/}, man pads, info pads, pads
EOF
}
manual(){
description
usage
}
while getopts $OPTSTRING name; do
arg=$name
case $arg in
b) function="backup";;
u) function="update";;
i) function="updateinfo";;
l) pacman -Qqen; exit;;
d) function="updateman";;
r) sudo pacman -Rcns $packages; exit;;
m) function="setupmariadb";;
s) function="sysinfo";;
h) usage; exit;;
v) echo "$version"; exit;;
?) echo " * ${0##*/} -${mod}${arg}h for help"; exit 2;;
esac
done
[[ -z $arg ]] && manual && exit
. "${base_dir}/${function}"
[[ $? -eq 0 ]] && msg "Success!" || msg "Failure!"Template generated by ChatGPT
Documentation generated by PADDOCS
Compendium section: 10-docs
Title: (S)ystem Module
Author: Joe Corso
Tags: [self-generate, documentation, manual, bash]
Status: [ Draft / Final / Reviewed ]
Post ID: sys.md
Template: programming-manual.md
License: All Rights Reserved
Schema: manuals
Version: 0.0.5
This manual is for TOOLS (0.0.5, 2025-02-26) A module made for PADS
The purpose of this module is to run random scripts on your machine.
Repository: https://github.com/padsRepo/pads
Blog: https://padsrepo.github.io/pads/
Docs: https://github.com/padsRepo/pads/wiki
<cmd> -[<argument>] -[<option>] [name...]
tools -[s,v,h] [name...] -s
passgen Generate a random password
note Take a note
buildpkg Build Package to install
conkystart Start Conky panels
timer <int> Start a countdown timer for 3 seconds
progress Show a progress bar
resetpath Reset default $PATH -h Show help
-v Show version
tools -s genpasstools -s timer 10tools -s noteExit Status:
| Code | Status |
|---|---|
| 0 | Success |
| 1 | Failure |
| 127 | K18 |
| 130 | Ctl+C |
Environment Variables:
| Key | Value |
|---|---|
| None | N/A |
Config Files/Directories:
| Files/Directories | Path | Description |
|---|---|---|
| $HOME/pads/bin/tools | Executable Directory | |
| $HOME/pads/src/tools/ |
Source Code Directory | |
| $HOME/pads/handler/signales/pads.sig | Directory for signal handlers |
MIT License
Copyright (c) 2022 Joe Corso
Permission is hereby granted, free of charge, to any person obtaining a copy of this software and associated documentation files (the “Software”), to deal in the Software without restriction, including without limitation the rights to use, copy, modify, merge, publish, distribute, sublicense, and/or sell copies of the Software, and to permit persons to whom the Software is furnished to do so, subject to the following conditions:
The above copyright notice and this permission notice shall be included in all copies or substantial portions of the Software.
THE SOFTWARE IS PROVIDED “AS IS”, WITHOUT WARRANTY OF ANY KIND, EXPRESS OR IMPLIED, INCLUDING BUT NOT LIMITED TO THE WARRANTIES OF MERCHANTABILITY, FITNESS FOR A PARTICULAR PURPOSE AND NONINFRINGEMENT. IN NO EVENT SHALL THE AUTHORS OR COPYRIGHT HOLDERS BE LIABLE FOR ANY CLAIM, DAMAGES OR OTHER LIABILITY, WHETHER IN AN ACTION OF CONTRACT, TORT OR OTHERWISE, ARISING FROM, OUT OF OR IN CONNECTION WITH THE SOFTWARE OR THE USE OR OTHER DEALINGS IN THE SOFTWARE.
info pads
module="(R)un Module"
description="Running misc scripts. Good for testing"
version="0.0.3"
author="Joe Corso (https://www.joecorso.com)"
created="$(date -d '20230605')"
docs="https://github.com/padsRepo"
license="MIT License"
packages="${@:2}"
OPTSTRING="s,v,h"
synopsis="<cmd> -[<argument>] -[<option>] [name...]"
syntax="${0##*/} -[$OPTSTRING] [name...]"
base_dir="$(dirname "$(readlink -f "${0%/*}")")"
. "${PADS_DIR}/etc/pads.sig"
description(){
cat << EOF
* ${module}
* ${description}

EOF
}
usage(){
cat << EOF
Synopsis: $synopsis
Syntax: $syntax
Usage:
 -s
     passgen           Generate a random password
     note              Take a note
     buildpkg          Build Package to install
     conkystart        Start Conky panels
     timer <int>       Start a countdown timer for 3 seconds
     progress          Show a progress bar
     resetpath         Reset default \$PATH
 -h                    Show help
 -v                    Show version
Ex: paddocs -c pads -l bash -nmrwxs | paddocs -c paddocs -l bash -wsxp
See also: man paddocs, info pads
EOF
}
manual(){
description
usage
}
while getopts $OPTSTRING arg; do
opt=${OPTARG}
name=${3:-$2}
case ${arg} in
  s) . "${PADS_DIR}/tools/${name}" $OPTARG; exit;;
  v) echo "$version"; exit;;
  h) manual; exit;;
  *) echo "$OPTARG * ${0##*/} -${mod}h for help"; exit 2;;
esac
done
[[ $# -eq 0 ]] && manual  && exit 2
Template generated by ChatGPT
Documentation generated by PADDOCS
Compendium section: 10-docs
Title: (R)un Module
Author: Joe Corso
Tags: [self-generate, documentation, manual, bash]
Status: [ Draft / Final / Reviewed ]
Post ID: tools.md
Template: programming-manual.md
License: All Rights Reserved
Schema: manuals
Version: 0.0.3
Project Datasphere
Joe Corso - Developer, Author
2025-10-03
As a developer starts to gain experience; naturally, their projects start to grow. They make changes which break systems, they don’t know how to back things up. They don’t understand the need for version control They don’t understand the need for good CI/CD pipelines and workflow through documenting, building, deploying, and maintaining a project. They tend to get stuck in development purgatory when it comes time to decide the scaffolding, styling, and namespaces of a project. They may not understand how to write good comments, or that inline comments can become the documentation for the project. Finally, they have not been a developer long enough to experience catastrophic failures, rebuilding systems, or that they suffer from CRS.
To solve the aforementioned issues, we will introduce the concept of CI/CD Pipelines, Semantic Versioning, Workflow, and Style Guides for starting a project. This is not comprehensive, and can be added to as needs change.
We will be plotting out blueprints, that can be used for:
| Topic | Description |
|---|---|
| Version Control | By using git and
PKGBUILD’s we can leverage versioning with ease |
| Workflow | By building skeleton git repos for each type of project, we automate styling, rapid deployment, and self-documentation into one downloadable package. |
| CI/CD Pipelines | By documenting the Architecture of the project. We will build it into a skel repo, and creating scripts to automate handling a package. |
| Backups | This part of the pipeline is build into the versioning system, and structure of the repository |
| Style Guide | This will be covered by creating a skel repo for each type of project |
| Rebuilding Arch | Meta packages will be used to automate rapid deployment of a new system |
| Bad Memory | This documentation serves as a proof of concept for people who suffer from CRS |
| Back up from data loss | This repository can easily be backed up off site |
| Control Data flow | By building the scaffolding we can demonstrate our understanding of why these concepts matter, as well as maintaining our own infrastructure |
| No clouds | We don’t need to deal with privacy concerns |
We can build our own package manager, but this streamlines the process, has less bugs, and more features. Since it’s open source it has more developers. You can contribute too!
The intent of the project is create a proof of concept, which also acts as the architecture, style guide, version control, workflow, and CI/CD automation for all future project. This is should demonstrate the importance of such pipelines. This project should be simple enough for any Linux user to understand, and small enough to work with minimum infrastructure.
I, myself, have been stuck in development purgatory many times before. It was not until I had a 1tb HDD fill with backups inside backups inside backups that I also understood the need in a proper workflow. I’ve spent the past 6 months studying documentation, how to document, how to research, how to write research reports, organizing all the parts of a book, and siting everything properly. This project is a “stepping off” point. Which I will demonstrate my research in a way that can be repeatable, to achieve the same results.
Plus, I suffer from CRS, and lest I find myself in a paradox of falling into another developers persecutory, I must document everything. I must show that I can work out all the details, so that I don’t have to remember all these details. So that in my free time I can actually relax. So that I also don’t start to suffer from FOMO.
Dependencies
─────────────────────────────────────────────
/dev/sda → OS & Apps
─────────────────────────────────────────────
Mount points:
/boot
/
[SWAP]
Contents:
- /boot
- / (root filesystem)
- [SWAP]
Notes: - Base system drive for Linux installation.
- Contains all core binaries, libraries, and system configs.
- Keep /var large enough for logs and caches.
- No separate /home partition; user storage is on /srv or /mnt.
─────────────────────────────────────────────
/dev/sdb → Repo & Archives
─────────────────────────────────────────────
Mount: /srv
Contents:
/srv
├── archives
│   ├── interlink        → Library source code, templates, scripts
│   ├── paddocs          → Documentation source, templates, outputs
│   ├── pads             → System scripts, modules, configs
│   └── src              → Misc source code or project archives
├── backups
│   ├── projects/        → Project backups
│   ├── media/           → Media backups
│   └── repos/           → Repo backups
├── http
│   ├── CHANGELOG.md
│   ├── LICENSE
│   ├── README.md
│   ├── compendium.html
│   ├── dashboard
│   └── index.html
│   Notes: Served content for internal HTTP server; docs & dashboard.
├── repo
│   ├── CHANGELOG.md
│   ├── LICENSE
│   ├── README.md
│
│   ├── assets           → Static/media assets for projects/web/docs
│   │   ├── audio        → Sound files
│   │   ├── css          → Stylesheets
│   │   ├── etc          → Misc config or asset files
│   │   ├── html         → HTML templates or pages
│   │   ├── img          → Images
│   │   ├── js           → JavaScript files
│   │   ├── less         → LESS CSS files
│   │   ├── templates    → Project templates
│   │   └── video        → Video files
│
│   ├── db               → Databases used by projects
│   │   ├── datasphere.db -> datasphere.db.tar.zst
│   │   ├── datasphere.db.tar.zst
│   │   ├── datasphere.db.tar.zst.old
│   │   ├── datasphere.files -> datasphere.files.tar.zst
│   │   ├── datasphere.files.tar.zst
│   │   ├── datasphere.files.tar.zst.old
│   │   ├── multiverse.db -> multiverse.db.tar.zst
│   │   ├── multiverse.db.tar.zst
│   │   ├── multiverse.files -> multiverse.files.tar.zst
│   │   └── multiverse.files.tar.zst
│
│   ├── docs             → Project documentation and manuals
│   │   ├── bookshelf    → General docs library
│   │   ├── paddocs      → Auto-generated docs from PADS
│   │   └── vault        → Archives / reference docs
│
│   ├── git              → Skeleton Git repos for projects
│   │   ├── skel         → Bash skeleton repo
│   │   ├── skelfl       → Qtile skeleton repo
│   │   ├── skelpy       → Python skeleton repo
│   │   └── skelsh       → Shell script skeleton repo
│
│   ├── gitbuild         → Personal project/game builds
│   │   ├── blackjack
│   │   ├── engine
│   │   ├── guess_the_number
│   │   ├── questbound
│   │   └── themes
│
│   ├── pkg              → Compiled packages for Arch repo
│   │   ├── core
│   │   └── extra
│
│   └── py               → Python packages / archives
│       └── interlink-0.1.6.tar.gz
│
└── scripts              → Miscellaneous utility scripts for development and system tasks
Notes: - Primary repo and archive storage for development.
- Stores PADS, Interlink, internal packages, and backups.
- Git directory now only contains skeletons (skel, skelfl, skelpy,
skelsh).
─────────────────────────────────────────────
/dev/sdc → Media (Jellyfin + Games + IPTV)
─────────────────────────────────────────────
Mount: /mnt
Contents:
/mnt
├── games
├── iptv
├── lost+found
├── movies
├── music
├── pics
└── shows
Notes: - Large media storage for streaming, gaming, and personal
content.
- Fast read access preferred.
- Can be shared via NFS or Samba.
─────────────────────────────────────────────
Summary Table
─────────────────────────────────────────────
| Drive | Role | Mount | FS | Notes |
|---|---|---|---|---|
| sda | OS & Apps | / | ext4 | Linux root + system binaries + swap; no /home |
| sdb | Repo & Archives | /srv | ext4 | PADS, Interlink, repo, backups, logs (Git skeletons only) |
| sdc | Media | /mnt | ext4 | Games, Jellyfin, IPTV, movies, music |
─────────────────────────────────────────────
Recommended Mount Config (/etc/fstab)
─────────────────────────────────────────────
UUID=<sda1-uuid> /boot  ext4 defaults,noatime 0 2
UUID=<sda2-uuid> none   swap sw 0 0
UUID=<sda3-uuid> /      ext4 defaults,noatime 0 1
UUID=<sdb1-uuid> /srv   ext4 defaults,noatime 0 2
UUID=<sdc1-uuid> /mnt   ext4 defaults,noatime 0 2
─────────────────────────────────────────────
Symlinks (Optional)
─────────────────────────────────────────────
$ ln -s /srv ~/Repo
$ ln -s /mnt ~/Media
$ ln -s /srv/archives ~/Archives─────────────────────────────────────────────
Project Skeletons Reference
─────────────────────────────────────────────
Bash Project Skeleton (skelsh)
─────────────────────────────────────────────
skelsh/
├── CHANGELOG.md
├── PKGBUILD
├── README.md
└── build/
    ├── bin
    ├── docs
    ├── etc
    ├── lib
    └── src
Notes:
- System-level scripts, modular directories, ready for Arch
packaging.
─────────────────────────────────────────────
Python Project Skeleton (skelpy)
─────────────────────────────────────────────
skelpy/
├── pyproject.toml
├── setup.cfg
├── README.md
├── LICENSE
├── requirements.txt
├── src/projectname/
│   ├── __init__.py
│   ├── core.py
│   ├── utils.py
│   └── modules/__init__.py
├── tests/
│   ├── __init__.py
│   └── test_core.py
├── docs/
│   ├── conf.py
│   ├── index.md
│   └── usage.md
├── scripts/dev.sh
└── examples/demo.py
Notes:
- Modular Python project layout with packaging, tests, docs, and
examples.
─────────────────────────────────────────────
Flask Project Skeleton (skelfl)
─────────────────────────────────────────────
skelfl/
├── __init__.py
├── log
├── nginx.conf
├── requirements.txt
├── run
├── static
├── templates
├── uwsgi.ini
├── views.py
└── wsgi.py
Notes:
- Standard Flask project skeleton. - __init__.py
initializes the app. - views.py contains route handlers. -
static/ stores CSS, JS, and image files. -
templates/ holds Jinja2 HTML templates. - run
is the development launcher. - uwsgi.ini for deployment via
uWSGI. - nginx.conf optional local Nginx config. -
log directory for logging runtime data.
I need to learn Mermaid Charts
Respository Workflow
CMD
    $ mkdir
    $ repo-add *.db.tar.zst
    $ git init --bare skel
Bash Workflow
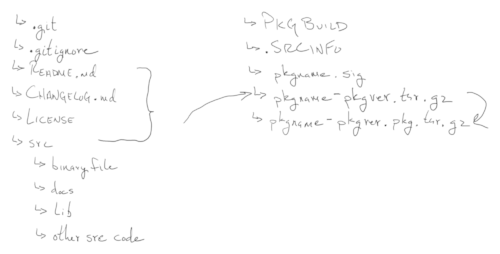
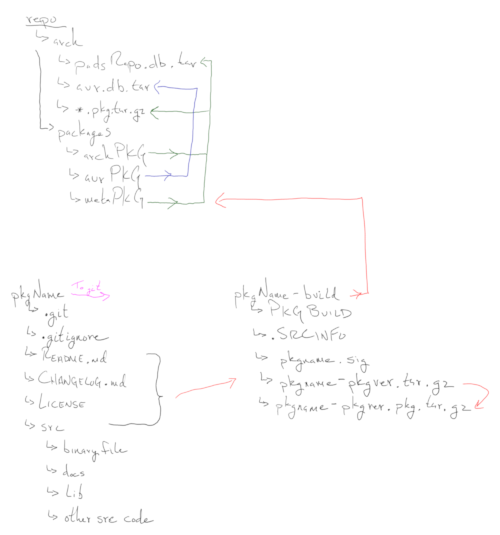
CMD
    $ tar -cf pkgname.pkgversion.tar.gz
    $ cat /usr/share/pacman/PKGBUILD.proto >> PKGBUILD
    $ cat /usr/share/pacman/proto.install >> .install
    $ makepkg --printsrcinfo > .SRCINFO
    $ makepkg -s
Git Workflow
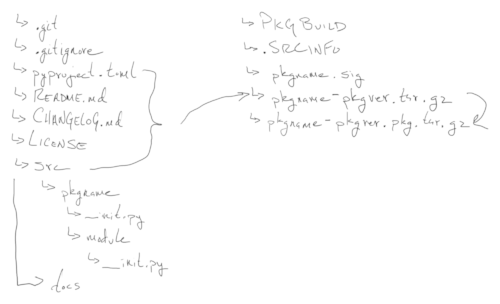

CMD
    $ git init --bare skelpy
    $ git clone --bare skelpy pkgname.git
    $ git clone pkgname.git
    $ git add .
    $ git commit -m "Initial Commit"
    $ git push
Documentation Workflow
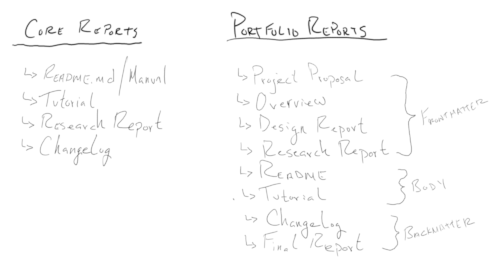
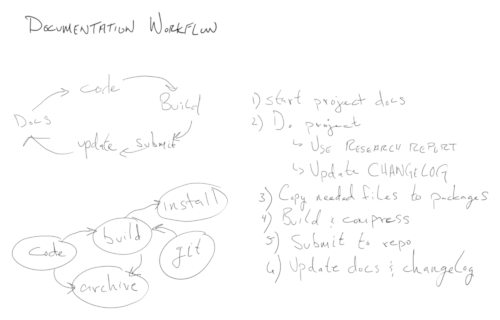
Demonstrate the concept of building and maintaining a personal repository for the benefit of historical data and increased performance minimal latency.
Creating user friendly CI/CD Pipelines
Historical documentation with the intent to educate, encapsulate, and furthermore recreate said design philosophy of Joe Corso.
This report aims at building a personal repository using PKGBUILD’s, and git to solve the following problems:
/srv directory/etc/pacman.confmakepkg to create it.repo-add to update/srv/docs dirrepo-addA functional repository, and Jellyfin media server.
This was a fantastic project to help organize years of scattered thoughts. But it is not for the faint of heart. If you’ve spent a lot of time pacing, and over thinking, it might help to spend a lot of time organizing those thoughts in a way that you control all the nodes, entry and exit points.
A lot of research, and maintenance is involved in this project. There are other more professional turnkey solutions.
More research on workflows, and maintaining repositories.
Get involved with the community.
This is a great way to manage personal packages, and data.
Building a Personal Repository to host on Local Network.
Today I am going to set up the initial repo and submit a meta package.
    [test-repo]
    SigLevel = Optional TrustAll
Server = http://rpi400.local/srv/repo/arch # Maintainer: Joe Corso pads.email.address@gmail.com
pkgname=test-meta
pkgver=0.0.1
pkgrel=1
pkgdesc="A test entry, metadata"
arch=('any' 'x86_64')
url="http://rpi400.local/docs/index.html"
license=('GPL')
depends=('ranger') # Example in /etc/makepkg.conf
PACKAGER="John Doe <john.doe@example.com>"Setting up an Rpi Repository
Building the Repository on Codename: Motherboard. A custom PC build from random parts.
    [starship]
    SigLevel = Optional TrustAll
    Server = http://hp.local/srv/repo/arch

    [any]
    SigLevel = Optional TrustAll
Server = http://hp.local/srv/repo/arch server {
listen 80;
server_name hp.local; # Replace with your domain or IP
root /srv/repo;
location /arch {
autoindex on; # Enable directory listing for easy browsing
}
} pkgname=base-meta
pkgver=1.0.0
pkgrel=1
epoch=
pkgdesc="Meta package to install necessary files which Arch Linux needs to start building a fresh instsall."
arch=('x86_64')
url="http://hp.local/docs/index.html"
license=('GPL')
groups=('base-meta')
depends=('base' 'base-devel' 'dhcpcd' 'efibootmgr' 'fakeroot' 'fastfetch' 'git' 'grub' 'iwd' 'linux' 'linux-firmware' 'lshw' 'man-db' 'man-pages' 'nano' 'nginx' 'nmap' 'openssh' 'reflector' 'sudo' 'texinfo' 'tree' 'upower' 'arch-install-scripts' 'jellyfin-server' 'jellyfin-web') types {
text/markdown md;
}Create new skeleton gits for each type of project style.
On client:
On server machine:
/srv/repo/src dir for project in Alpha, and
Beta testing/srv/repo/py dir with an nGINX server block to
download pypi libs.Install and initialize setup of Jellyfin Server.
https://localhost:8096 and do initial set
uphttps://iptv-org.github.io/iptv/raw/\<FILENAME\>.m3u https://iptv-epg.org/files/epg-us.xmlhttps://raw.githubusercontent.com/iptv-org/iptv/refs/heads/master/streams/us.m3u https://iptv-org.github.io/ While using the repository, I found a few things I needed to move around.
I found this on Reddit
Setup your local development environment: IntelliJ, Cygwin, Chrome DevTools, WolframAlpha, Debuggers, Profilers, Linters. Actively study how to use your tools.
Software should be setup to run on local windows desktops. No developing code remotely on servers. Deployment to servers should be fully automated and happen after the GIT commit.
All code and configuration has a copy in GIT No forgetting to check in your code once you are done.
GIT and branching are like saves points in a computer game, use them frequently, whenever you first get working code check in. Code that might accidentally cause breaking changes should go in a feature branch then merged back into trunk. Release branches are created after major feature work and require a QA cycle.
Diff of your code before every GIT commit, ask yourself if this is exactly what you want to commit
Small, self-contained GIT checkins with commit messages designed to produce readable logs
Google is your friend, anytime you have a question you don’t know the answer to, type it into Google. Same goes for error codes and error messages, just type it into google and you will find someone who has seen it before.
RTFM, if you have been placed in charge of using an unfamiliar software, tool, language, framework, or library; then it is your responsibility to use google to locate the homepage, GitHub and documention manual
Write unit tests, and functions small enough to be unit tested, consider all the edge cases
Automate any task you know you will need to repeat
Learn how to use a debugger, profiler and a linter
Once, twice, refactor. If you have two similar pieces of code and need to write a third, then refactor the solution to be a single piece of code. Learn how to use Object Oriented Programming and Inheritance
Documentation is the best form of self-code-review. If something is difficult or convoluted to explain, then refactor the code until it is easy to explain. Do your handover in advance and do not feel rushed into submitting your first draft of code to QA.
Naming things is half the battle, think deeply and name things to be self documenting. Document your data structures. Separate configuration from implementation.
Fundamentally all you have to do is explain yourself to the computer. Unlike humans, you can create your own language by defining new words and syntax then explain to the computer exactly what you mean by this word. This lets you speak in higher order sentences which is essential for solving problems of any significant complexity.
If you don’t know exactly what a function, symbol or piece of syntax means, google it and write practice code if you have to. How can you explain yourself to the computer if you don’t know what you yourself are saying?
Definition of DONE includes fully automated deployment, documentation, and hosting on a domain name url.
We should have a working Repository, Jellyfin, and development workflow
Note taking, and research.
Following the process created.
Jellyfin
IPTV
CI/CD
Semantic Versioning
Development Workflow
Documentation Workflow
Arch Linux
nGINX
Jellyfin-web
Jellyfin-server
git
makepkg
    $ nginx -t
$ cat /var/log/nginx/{access,error}.logThe importance of version control, CI/CD Pipelines, and development workflow
Self-documenting code
Binary commands to maintain infrastructure
Learning new pipelines and workflows
Mermaid Charts
Template generated by ChatGPT
Documentation generated by PADDOCS
Compendium section: 10-docs
Title: Project Datasphere
Author: Joe Corso
Created: 2025-09-26
Updated: 2025-10-04
Tags: pkgbuild, makepkg, jellyfin, nginx, git, repository, iptv
Status: [ Draft / Final / Reviewed ]
Template:
- 00-project-proposal.md
- 01-project-overview.md
- 02-design-report.md
- 03-technical-report.md
- 04-research-log.md
- 05-final-report.md
License: “All Rights Reserved”
Schema: technical
Version: 0.1.1
Branding: Operation Mindmap
Your mom made you strong. We’ll make you dab strong.
Detailed reports on the structure and daily operations of The Company. A concise overview of the business plan, highlighting key points.
Briefly describe the business concept, market, and mission.
Wrap up why the business will succeed.
Describes the company, mission, vision, and structure.
Be what makes you happy
Long-term aspirations.
Details about what the company sells.
High-level description of products or services.
What makes it stand out.
Future features or expansions.
Research and insights on your industry and target customers.
Size, growth rate, and trends.
Demographics, psychographics, and needs.
Where you fit in and how you’ll win.
Plan to promote and sell your offerings.
Logo, colors, tone.
Pricing model and justification.
Advertising, PR, partnerships.
Online, retail, wholesale.
Lead generation to close.
How your business will run day-to-day.
Location, tools, infrastructure.
Steps to deliver your product/service.
Vendors, suppliers, logistics.
Roles, headcount, hiring plan.
Team structure and leadership.
Owner / Founder – Joe Corso
Owner / Founder – Joe Corso
- Oversees overall business direction and creative vision
- Approves all strategic decisions
- Leads major product and design initiatives
Production Manager
- Manages production schedule and workflow
- Supervises glass artists and technicians
- Enforces safety and quality standards
Glass Artists / Technicians
- Fabricate custom and batch glass products
- Operate kilns, lathes, torches, and polishing tools
- Maintain artistic and manufacturing quality
Inventory Coordinator
- Tracks raw materials, tools, and packaging supplies
- Manages storage and shelving system
- Conducts regular stock audits
Shipping & Receiving Clerk
- Packages and labels outgoing orders
- Receives and inspects incoming materials
- Coordinates with delivery services and logistics
Operations Assistant
- Handles scheduling, internal coordination, and communication
- Processes documentation, filing, and reports
- Supports day-to-day office functions
Bookkeeper / Accountant
- Maintains financial ledgers and bank reconciliation
- Manages invoicing, payroll, and tax preparation
- Generates monthly financial reports
Sales Representative
- Manages direct and wholesale accounts
- Tracks sales performance and customer relationships
- Attends events, expos, and gallery meetings
Marketing Specialist - Runs web, email, and social
media marketing
- Designs print and digital materials
- Develops campaign calendars and performance analytics
Customer Service Lead
- Handles all client communication and post-sale inquiries
- Tracks satisfaction and coordinates returns
- Bridges Office and Sales teams
Workshop Coordinator
- Assists in both Production and Warehouse
- Prepares tools, raw materials, and workspace
- Trains new assistants and helps enforce shop safety
Key financial projections and funding.
How you make money.
How much, for what, and when.
Point where revenue covers costs.
Potential threats and how you’ll handle them.
List and describe risks.
How you’ll reduce or manage risks.
Backup plans.
Supporting documents.
| Account Number | Account Name | Description |
|---|---|---|
| 1010 | Cash on Hand | Physical cash available |
| 1020 | Checking Account | Primary business checking account |
| 1030 | Accounts Receivable | Customer invoices issued but unpaid |
| 1040 | Inventory | Raw materials and finished goods |
| 1050 | Prepaid Expenses | Rent, insurance paid in advance |
| 1060 | Equipment | Kilns, tools, and fabrication hardware |
| Account Number | Account Name | Description |
|---|---|---|
| 2010 | Accounts Payable | Vendor bills and materials not yet paid |
| 2020 | Credit Card Payable | Outstanding balance on business card |
| 2030 | Loan Payable | Equipment or capital loan |
| 2040 | Taxes Payable | Sales tax and other government obligations |
| Account Number | Account Name | Description |
|---|---|---|
| 3010 | Owner’s Equity | Initial capital contributions |
| 3020 | Retained Earnings | Prior profits not withdrawn |
| 3030 | Owner Draw | Withdrawals made by the owner |
| Account Number | Account Name | Description |
|---|---|---|
| 4010 | Product Sales | Revenue from finished glass goods |
| 4020 | Custom Commissions | One-off pieces and made-to-order work |
| 4030 | Wholesale Revenue | Bulk sales to distributors or galleries |
| Account Number | Account Name | Description |
|---|---|---|
| 5010 | Cost of Goods Sold | Materials and labor used in production |
| 5020 | Rent | Studio and workshop space |
| 5030 | Utilities | Gas, electricity, water |
| 5040 | Marketing & Advertising | Social media, print ads, online presence |
| 5050 | Office Supplies | Paper, pens, printer ink, etc. |
| 5060 | Repairs & Maintenance | Equipment service and upkeep |
| 5070 | Professional Services | Accounting, legal, consulting |
Template generated by ChatGPT
Compendium section: 12-business
Title: [Title]
Author: [Name]
Tags: [project, update, devlog]
Status: [ Draft / Final / Reviewed ]
Template:
- 00-executive-summary.md
- 01-company-overview.md
- 02-products-services.md
- 03-market-analysis.md
- 04-marketing-sales.md
- 05-operations-report.md
- 06-management-report.md
- 07-financial-report.md
- 08-risk-report.md
- 09-misc-report.md
- 10-appendix.md
License: “All Rights Reserved”
Schema: business
Version: 0.0.1
Branding: Wormhole / PADS
“Punch line”
A concise overview of the business plan, highlighting key points.
Briefly describe the business concept, market, and mission.
Wrap up why the business will succeed.
Describes the company, mission, vision, and structure.
One sentence mission.
Long-term aspirations.
Details about what the company sells.
High-level description of products or services.
What makes it stand out.
Future features or expansions.
Research and insights on your industry and target customers.
Size, growth rate, and trends.
Demographics, psychographics, and needs.
Where you fit in and how you’ll win.
Plan to promote and sell your offerings.
Logo, colors, tone.
Pricing model and justification.
Advertising, PR, partnerships.
Online, retail, wholesale.
Lead generation to close.
How your business will run day-to-day.
Location, tools, infrastructure.
Steps to deliver your product/service.
Vendors, suppliers, logistics.
Roles, headcount, hiring plan.
Team structure and leadership.
Org chart or hierarchy.
If applicable.
Key financial projections and funding.
How you make money.
How much, for what, and when.
Point where revenue covers costs.
Potential threats and how you’ll handle them.
List and describe risks.
How you’ll reduce or manage risks.
Backup plans.
Snapshot of strengths, weaknesses, opportunities, threats.
Internal advantages.
Internal limitations.
External chances for growth.
External challenges.
If your business has a tech or product development component.
Tools, platforms, infrastructure.
Phases and milestones.
Research, prototyping, testing.
Environmental, Social, and Governance commitments.
Efforts to reduce footprint.
Community engagement, DEI.
Ethics, compliance, transparency.
Legal and compliance considerations.
Relevant laws and requirements.
Required approvals.
How you’ll stay compliant.
Strategic collaborations.
Who, what they bring.
Targets for future partnerships.
Why and how.
Supporting documents.
Note/TODO Chart
ADD THIS HEADER TO THE FILE
---
config:
  kanban:
    ticketBaseUrl: 'https://mermaidchart.atlassian.net/browse/#TICKET#'
---Guest Presentation Workflow
Bar Chart
Pie Chart
Entity Chart
Journey Map
GANTT Chart of daily operations
Template generated by ChatGPT
Documentation generated by PADDOCS
Compendium section: 12-business
Title: [Title]
Author: [Name]
Tags: [project, update, devlog]
Status: [ Draft / Final / Reviewed ]
Template: - 00-executive-summary.md
- 01-company-overview.md - 02-products-services.md - 03-market-analysis.md - 04-marketing-sales.md - 05-operations-report.md - 06-management-report.md - 07-financial-report.md - 08-risk-report.md - 09-misc-report.md - 10-appendix.mdLicense: “All Rights Reserved”
Schema: business
Version: 0.0.1
Branding: Wormhole / PADS
“They got Joe Fries!”
A concise overview of the business plan, highlighting key points.
Briefly describe the business concept, market, and mission.
Wrap up why the business will succeed.
Describes the company, mission, vision, and structure.
One sentence mission.
Long-term aspirations.
Details about what the company sells.
High-level description of products or services.
What makes it stand out.
Future features or expansions.
Research and insights on your industry and target customers.
Size, growth rate, and trends.
Demographics, psychographics, and needs.
Where you fit in and how you’ll win.
Plan to promote and sell your offerings.
Logo, colors, tone.
Pricing model and justification.
Advertising, PR, partnerships.
Online, retail, wholesale.
Lead generation to close.
How your business will run day-to-day.
Location, tools, infrastructure.
Steps to deliver your product/service.
Vendors, suppliers, logistics.
Roles, headcount, hiring plan.
Team structure and leadership.
Org chart or hierarchy.
If applicable.
Key financial projections and funding.
How you make money.
How much, for what, and when.
Point where revenue covers costs.
Potential threats and how you’ll handle them.
List and describe risks.
How you’ll reduce or manage risks.
Backup plans.
Snapshot of strengths, weaknesses, opportunities, threats.
Internal advantages.
Internal limitations.
External chances for growth.
External challenges.
If your business has a tech or product development component.
Tools, platforms, infrastructure.
Phases and milestones.
Research, prototyping, testing.
Environmental, Social, and Governance commitments.
Efforts to reduce footprint.
Community engagement, DEI.
Ethics, compliance, transparency.
Legal and compliance considerations.
Relevant laws and requirements.
Required approvals.
How you’ll stay compliant.
Strategic collaborations.
Who, what they bring.
Targets for future partnerships.
Why and how.
Supporting documents.
Template generated by ChatGPT
Compendium section: 12-business
Title: [Title]
Author: [Name]
Tags: [project, update, devlog]
Status: [ Draft / Final / Reviewed ]
Template:
- 00-executive-summary.md
- 01-company-overview.md
- 02-products-services.md
- 03-market-analysis.md
- 04-marketing-sales.md
- 05-operations-report.md
- 06-management-report.md
- 07-financial-report.md
- 08-risk-report.md
- 09-misc-report.md
- 10-appendix.md
License: “All Rights Reserved”
Schema: business
Version: 0.0.1
Branding: Wormhole / PADS
“Brief one-sentence summary of the property.”
Short paragraph describing the property, its unique features, and any relevant history.
Describe nearby businesses, transit, schools, and attractions.
Any special considerations, restrictions, or upcoming changes.
“List of all units and their status.”
| Unit # | Type | Size (sqft) | Status | Current Tenant | Monthly Rent | Lease End |
|---|---|---|---|---|---|---|
| 101 | 1BR | 600 | Occupied | John Doe | $1,200 | 2025-08-01 |
“Summary of maintenance requests, status, and costs.”
General condition of property and systems.
| Date | Unit # | Description | Status | Cost |
|---|---|---|---|---|
| 2025-08-01 | 203 | AC repair | Completed | $350 |
List of scheduled maintenance or inspections.
“List of current tenants with lease details.”
| Tenant Name | Unit # | Lease Start | Lease End | Monthly Rent | Notes |
|---|---|---|---|---|---|
| John Doe | 101 | 2025-01-01 | 2026-01-01 | $1,200 | N/A |
“Current rent obligations and payment status.”
| Unit # | Tenant Name | Monthly Rent | Last Payment Date | Balance Due |
|---|
“Track upcoming lease expirations.”
| Tenant Name | Unit # | Lease End Date | Renewal Status |
|---|
“Current and upcoming vacancies.”
| Unit # | Type | Size (sqft) | Rent | Notes |
|---|
| Unit # | Tenant Name | Lease End Date | Notes |
|---|
“Snapshot of property financials.”
“Detailed breakdown of expenses.”
| Date | Category | Description | Amount |
|---|---|---|---|
| 2025-08-01 | Maintenance | Plumbing repair | $200 |
“Planned vs. actual financials.”
| Category | Budgeted Amount | Actual Amount | Variance |
|---|
“Major upgrades and renovations.”
| Date | Description | Cost | Status |
|---|
“Results of property inspections.”
| Area / Item | Condition | Notes | Required Action |
|---|
“Document accidents or security issues.”
“List of vendors, contracts, and performance.”
| Vendor Name | Service Provided | Contact Info | Contract Expiration | Notes |
|---|
“Track energy, water, and other utilities.”
| Month | Utility Type | Usage | Cost |
|---|
“Ensure legal and safety compliance.”
| Requirement | Status | Expiration Date | Notes |
|---|
“Track advertising and leads for vacancies.”
| Campaign Name | Start Date | End Date | Cost | Leads Generated |
|---|
“Track work orders for repairs and improvements.”
| Order # | Date Created | Description | Status | Cost |
|---|
“Document tenant transitions.”
| Tenant Name | Unit # | Date | Notes |
|---|
| Tenant Name | Unit # | Date | Notes |
|---|
“Track cleaning and prep between tenants.”
| Unit # | Date Completed | Vendor | Cost | Notes |
|---|
“List of emergency contacts for the property.”
| Name | Role | Phone | Notes |
|---|
“Track keys, codes, and access cards.”
| Key ID | Location / Use | Holder | Issued Date | Returned Date |
|---|
“Insurance coverage and claims.”
| Provider | Policy # | Coverage Type | Expiration | Notes |
|---|
| Date Filed | Claim # | Description | Amount | Status |
|---|
“Summary prepared for property owners.”
One to two paragraphs summarizing the property’s performance.
“Overview of multiple properties.”
| Property Name | Units | Occupancy Rate | Monthly Income | Notes |
|---|
Template generated by ChatGPT
Documentation generated by PADDOCS
Compendium section: 10-docs
Title: [Title]
Author: [Name]
Tags: [project, update, devlog]
Status: [ Draft / Final / Reviewed ]
Template:
- 00-project-proposal.md
- 01-project-overview.md
- 02-design-report.md
- 03-technical-report.md
- 04-research-log.md
- 05-final-report.md
License: “All Rights Reserved”
Schema: technical
Version: 0.0.1
Branding: Wormhole / PADS
“Brief one-sentence summary of the tenant’s status or key notes.”
| Month | Rent Due | Paid | Balance | Notes |
|---|---|---|---|---|
| Date | Request | Status | Notes |
|---|---|---|---|
Include behavior notes, communications, special arrangements, or other relevant tenant info.
Template generated by ChatGPT
Documentation generated by PADDOCS
Compendium section: 13-property
Title: [Title]
Author: [Name]
Tags: [project, update, devlog]
Status: [ Draft / Final / Reviewed ]
Template: License: “All Rights Reserved”
Schema: technical
Version: 0.0.1
Branding: Wormhole / PADS
“Brief one-sentence summary of the incident.”
Detailed description of what happened, including sequence of events and context.
| Action | Responsible Party | Date / Time | Notes |
|---|---|---|---|
Any other observations, recommendations, or lessons learned.
Template generated by ChatGPT
Documentation generated by PADDOCS
Compendium section: 13-property
Title: [Title]
Author: [Name]
Tags: [project, update, devlog]
Status: [ Draft / Final / Reviewed ]
Template: License: “All Rights Reserved”
Schema: technical
Version: 0.0.1
Branding: Wormhole / PADS
“Brief one-sentence summary of the memo’s purpose.”
To: [Recipient Name / Department]
From: [Sender Name / Department]
Date: [YYYY-MM-DD]
Main content of the memo. Use paragraphs to clearly communicate the purpose, context, and any required action.
Any additional context, references, or clarifications.
Template generated by ChatGPT
Documentation generated by PADDOCS
Compendium section: 13-property
Title: [Title]
Author: [Name]
Tags: [project, update, devlog]
Status: [ Draft / Final / Reviewed ]
Template: License: “All Rights Reserved”
Schema: technical
Version: 0.0.1
Branding: Wormhole / PADS
“Brief one-sentence summary of the project and its objectives.”
Short description of the project, goals, and expected outcomes.
| Phase | Start Date | End Date | Status | Notes |
|---|---|---|---|---|
| Planning | ||||
| Design | ||||
| Procurement | ||||
| Implementation | ||||
| Testing / Inspection | ||||
| Completion / Handover |
| Task / Activity | Assigned To | Start Date | End Date | Status | Notes |
|---|---|---|---|---|---|
| Resource / Material | Quantity | Purpose | Estimated Cost | Actual Cost | Notes |
|---|---|---|---|---|---|
| Date | Issue | Impact | Resolution / Action Taken | Notes |
|---|---|---|---|---|
| Milestone | Target Date | Completed Date | Status | Notes |
|---|---|---|---|---|
Template generated by ChatGPT
Documentation generated by PADDOCS
Compendium section: 13-property
Title: [Title]
Author: [Name]
Tags: [project, update, devlog]
Status: [ Draft / Final / Reviewed ]
Template: License: “All Rights Reserved”
Schema: technical
Version: 0.0.1
Branding: Wormhole / PADS
Difficulty: Easy / Intermediate /
Advanced
Estimated Time: X minutes / hours
Prerequisites:
- List required knowledge or tools (e.g., Python basics, Git installed,
etc.)
Briefly describe what the tutorial covers, why it’s useful, and what the reader will learn.
List all hardware, software, accounts, or libraries needed before starting.
Example:
    # Install dependencies
$ sudo pacman -S python python-pipVerify boot mode. If this command runs with no errors, you’re using EFI Mode.
$ ls /sys/firmware/efi/efivarsConnect to the internet. If you’re on Ethernet, it should be
connected automatically.
1) Enable and start dhcpcd.service
      $ systemctl enable dhcpcd.service
$ systemctl start dhcpcd.service $ iwctl
$ device list
$ station device scan
$ station device get-networks
$ station device connect SSID $ ping www.google.comUpdate system clock
  $ timedatectl set-ntp true
  $ timedatectl set-timezone America/New_York
$ timedatectl statusPartition the disk. I use fdisk. DO NOT OVERWRITE REDUNDANT STORAGE!!!! List devices, and choose your device.
  $ fdisk -l
  $ fdisk /dev/<disk>
EFI Boot Mode:
Build partition table
n # /mnt/boot partition
p # primary partition
1 # /dev/sda1
"" # first block default
+512M # last block 512mb
n # swap partition
p # primary partition
2 # /dev/sda2
"" # first block default
+2G # last block 2gb (Or however big you want swap)
n # /mnt partition
3 # /dev/sda3
"" # first block default
"" # last block takes rest of space
w # write partition table
q # quit fdisk (Might exit automatically)
Make filesystem:
$ mkfs.fat -F 32 /dev/sda1
$ mkswap /dev/sda2
$ mkfs.ext4 /dev/sda3
Mount filesystem:
$ mount --mkdir /dev/sda1 /mnt/boot
$ swapon /dev/sda2
$ mount /dev/sda3 /mnt
BIOS Boot Mode:
Build partition table
n # /mnt partition
p # primary partition
1 # partition number
"" # first block default
+500G # last block (make it as big as you want)
t # type of filesystem
83 # linux filesystem
a # bootable flag
1 # partition number to make bootable
n # swap partition
p # primary partition
3 # partition number
"" # first block default
+2G # last block partition
t # type of filesystem
3 # partition number
82 OR swap # swap filesystem
w # write partition table
q # quit fdisk
Make filesystem:
$ mkfs.ext4 /dev/sda1
$ mkswap /dev/sda2
$ swapon /dev/sda2
Mount filesystem:
$ mount /dev/sda1 /mntBackup and Select your mirrorlist
  $ cp /etc/pacman.d/mirrorlist /etc/pacman.d/mirrorlist.bak
  $ reflector --verbose -c "US" -f 12 -l 50 -n 12 --sort rate --protocol https --save /etc/pacman.d/mirrorlist
$ cat /etc/pacman.d/mirrorlist $ pacstrap /mnt base gcc linux linux-firmware fastfetch fakeroot nano sudo man-db man-pages texinfo lshw upower dhcpcd iwd[!NOTE]
If your iso file is old, you may get an error like this:error: some-package: signature from "Some Person email@@some.domain" is unknown trustYou will need to update your key-ring with:
-pacman -Sy
-sudo pacman -S archlinux-keyring
[!NOTE]
If you’re using a hypervisor install proper guest utilities:
-pacstrap /mnt virtualbox-guest-utils && systemctl enable vboxservice.service && systemctl start vboxservice.service
Mount any extra partitions (e.g. /home,
/mnt, /tmp)
$ genfstab -U /mnt >> /mnt/etc/fstab $ arch-chroot /mntConfigure timezone for system
  $ ln -sf /usr/share/zoneinfo/Region/City /etc/localtime
$ hwclock --systohcSet device locale
1) Manually edit /etc/locale.gen and uncomment your locale (eg:
en_US.UTF-8) OR run the following command:
$ sed -i "s/#en_US.UTF-8 UTF8/en_US.UTF-8 UTF-8/g" /etc/locale.gen $ locale-gen $ echo "LANG=en_US.UTF-8" >> /etc/locale.confCreate hostname, host, and user, enable dhcpcd.service
   $ systemctl enable dhcpcd.service
   $ echo "$hostname" > /etc/hostname
   $ echo "127.0.0.1 localhost" >> /etc/hosts
   $ echo "::1 localhost" >> /etc/hosts
   $ echo "127.0.1.1 $hostname" >> /etc/hosts
   $ passwd # this is for root password NOT the user
   $ useradd -m $user # add your user
   $ passwd $user # enter your user password
   $ sudo nano /etc/sudoers
- $user ALL=(ALL:ALL) ALL >> /etc/sudoersInstall Bootloader (I’m using GRUB)
    $ pacman -Syu grub efibootmgr
    $ grub-install --target=x86_64-efi --efi-directory=/boot --bootloader-id=GRUB
$ grub-mkconfig -o /boot/grub/grub.cfg $ pacman -Syu grub
$ grub-install --target=i386-pc /dev/sda
$ grub-mkconfig -o /boot/grub/grub.cfg $ exit
$ rebootExplain how to test or confirm that the tutorial steps worked.
Example:
    $ python3 my_script.py
# Expected output: "Hello, World!"List common problems and their fixes.
Problem: Error X appears
Solution: Install missing package with pip install ...Wrap up with what the reader accomplished and possible next steps.
List any resources, docs, or links you used.
Template generated by ChatGPT
Compendium section: 18-tutorials
Title: [Title]
Author: [Name]
Tags: [project, update, devlog]
Status: [ Draft / Final / Reviewed ]
Post ID: [File Name].md
Template: 00-tutorial.md License: “All Rights Reserved”
Schema: articles
Version: 0.0.1
Branding: Wormhole / PADS
Install your choice of Desktop Manager or Windows Manager I need to
fix this to make it more detailed. evnery time i install it i have
problems with the audio and such ## Setup Qtile
There isn’t much to say. This is something already well documented.
Start by installing it, and picom for dynamic windows, plus audio and bluetooth drivers:
$ sudo pacman -Syu xorg xorg-server xorg-apps xorg-xinit xterm qtile picom python-dbus-fast python-pulsectl-asyncio python-psutil ttf-nerd-fonts pulseaudio bluez bluez-utils blueman pulseaudio-alsa pulseaudio-bluetooth pulseaudio-equalizer alsa-utils python-pulsectl[!NOTE]
The default config is loaded from~/.config/qtile/config.py. If it’s not there, copy it from/usr/share/doc/qtile/default_config.py.
The config for picom is at/etc/xdg/picom.conf.
Change ~/.xinitrc to add the following line:
$ sudo nano ~/.xinitrc
picom &
exec qtile start
Install the qtile-extras to make the bar look cool: It’s only on the AUR
$ cd ~/Downloads
$ sudo git clone https://aur.archlinux.org/qtile-extras-git.git
$ cd qtile-extras
$ makepkg -siInstall the packages
$ sudo pacman -Syu xorg xorg-server xorg-apps xorg-xinit xterm xfce4 xfce4-goodies unzipChange ~/.xinitrc and add these lines:
$ sudo nano ~/.xinitrc
$ exec startxfce4
Customize the theme:
$ sudo mkdir $HOME/.icons
$ sudo mkdir $HOME/.themes
$ sudo cp /path/to/icon/.face $HOME/.face
[!NOTE]
You can find all kinds of cool looking themes and icons over at xfce-look.org. Download the theme or icon you like and unpack it just like any other tar file. Then just copy and paste your unpacked candy into its respective directory. The beauty of XFCE is that all you have to do is create a.themedirectory, an.icondirectory, and a.faceicon in your home directory, and xfce4 will find it when you log in.
A short, catchy sentence summarizing the post.
Introduce the topic and why it matters to you or your readers.
Write your main content here. Feel free to add personal anecdotes, examples, or reflections.
Share any lessons learned, thoughts to ponder, or calls to action.
Template generated by ChatGPT
Documentation generated by PADDOCS
Compendium section: 19-blog
Title: [Title]
Author: [Name]
Tags: [project, update, devlog]
Status: [ Draft / Final / Reviewed ]
Post ID: [File Name].md
Template: 00-blog.md License: “All Rights Reserved”
Schema: articles
Version: 0.0.1
Branding: Wormhole / PADS
Date: YYYY-MM-DD
Author: Your Name
Tags: #example #notes
A brief overview of what this note covers.
| Term | Definition |
|---|---|
| Concept 1 | Short explanation here |
| Concept 2 | Another explanation here |
Template generated by ChatGPT
Documentation generated by PADDOCS
Compendium section: 19-blog
Title: [Title]
Author: [Name]
Tags: [project, update, devlog]
Status: [ Draft / Final / Reviewed ]
Post ID: [File Name].md
Template: 00-blog.md License: “All Rights Reserved”
Schema: articles
Version: 0.0.1
Branding: Wormhole / PADS
“Data are just summaries of thousands of stories—tell a few of those stories to help make the data meaningful.”
- Dan Heath, bestselling author
Date: 2025-05-02
Author: Joe Corso
Tags: codexhub, directory, data_curator, library
This is an analysis of different type of directory structures that could be used for the PADS Software. There is also an outline of directives to follow when building the directory.
I have an issue where every other week I think of new ways to organize my files. I’ll sit around for hours and hours thinking of all the different naming schemas I could use, make the directories, copy everything over, and instantly decide I don’t like it, and want to change it again. But I would never write down any diagrams, or my thoughts. So I figured with this new found power of documentation, I could tackle this problem once and for all.
v0.0.2 - Each layout will start as a new section
below.
- Each layout will be named by version for version control.
- Each layout will be built under the ~/.pads/vX.X.X
directory.
| Term | Definition |
|---|---|
| directory | A place to store files |
| layout | The structure of the directory |
| codename | Another explanation here |
/home/
├── archive                          # Archived or backup data, mostly cold storage
├── docs                             # Centralized documentation repository
│   ├── armyglass                    # Military-related documents or case studies
│   ├── companyA                     # Business documents for Company A
│   ├── companyB                     # Business documents for Company B
│   ├── guides                       # Guides, how-tos, and manpage-style docs
│   ├── notes                        # General and project notes
│   ├── paddocs                      # Documentation system for PADS and related tools
│   ├── personal                     # Personal paperwork, contracts, and budgets
│   ├── schemas                      # YAML/JSON schema files (e.g., configs, structure)
│   └── tutorials                    # Educational content and walkthroughs
├── downloads                        # Auto-populated or manually organized downloads
├── env                              # Python virtual environments
├── git                              # Git repositories (clones, mirrors, dev copies)
├── pads                             # Main source tree for the PADS system
│   ├── bin                         # Executable scripts related to PADS
│   ├── handlers                    # Event handlers, daemons, and signal traps
│   └── src                         # Core source code for PADS modules
├── srv                              # Services and network-shared assets
├── templates                        # Template files for docs, code, or content generation
├── themes                           # UI or document themes
├── tmp                              # Temporary workspace (cleared or rotated manually)
├── utils                            # General-purpose utility scripts and tools
└── vault                            # Encrypted or sensitive data
    ├── githubkey.txt               # GitHub SSH or API key (consider encrypting)
    ├── hosts                       # Custom `/etc/hosts` equivalent or network configs
    └── pc_req.txt                  # System or project requirements (e.g., specs)
/home/username/
    ├── backups    # follow dirs: arch/, dev/, extra/, pads/, vault/, wallpapers/
    ├── bin        # Binary files linked to dev/bin
    ├── dev        # Source code of each project
    ├── docs       # follow dirs: howto/, notes/conkynotes, personal/, reference/
    ├── downloads
    ├── git
    ├── projects   # Running projects
    ├── templates  # Personal or random templates
    ├── tmp
    ├── vault      # follow dirs: secrets/, ssh/
    ├── venvs
└── wallpapers.pads because it is the
personal assistant afterall..pads directory, under a new code name.operations directory will be specific to the needs
of the company.system can be divided by company, to
keep code organized as needed.docs/ directory to
build their own sections of books.Root Directory
.pads/v0.0.2
├── name
│   ├── admin
│   ├── assets
│   ├── clients
│   ├── docs
│   ├── marketing
│   ├── operations
│   ├── reports
│   └── staff
└── system
    ├── bin
    ├── build
    ├── config
    ├── database
    ├── lib
    ├── logs
    ├── src
    ├── srv
    └── test
Company/Project Directory
name/
├── admin
│   ├── accounting
│   ├── insurance
│   ├── payroll
│   └── permits
├── assets
│   ├── diagrams
│   ├── images
│   └── schemas
├── clients
│   ├── feedback
│   ├── loyalty_program
│   └── reservations
├── docs
│   ├── book
│   ├── chapter
│   ├── notes
│   │   └── note
│   └── section
├── marketing
│   ├── branding
│   ├── campaigns
│   └── social_media
├── operations
│   ├── inventory
│   │   ├── ingredients
│   │   ├── stock_reports
│   │   └── suppliers
│   ├── kitchen_logs
│   ├── menu
│   │   ├── archive
│   │   ├── current
│   │   └── drafts
│   ├── orders
│   └── recipes
│       ├── desserts
│       ├── drinks
│       └── main_dishes
├── reports
│   ├── daily_sales
│   ├── monthly
│   ├── weekly
│   └── yearly
└── staff
    ├── handbook
    ├── schedules
    └── training_materials
Software Directory
system/
├── bin
│   ├── archwiz
│   ├── paddocs
│   ├── pads
│   ├── proj
│   ├── s
│   ├── sys
│   └── tools
├── build
├── config
│   ├── bash.conf
│   ├── bash.sig
│   ├── pads.conf
│   ├── pads.sig
│   ├── profile.conf
│   └── prompt_command.sh
├── database
│   ├── accountingDB.sql
│   ├── blogDB.sql
│   └── repositoryDB.sql
├── lib
│   ├── conky
│   ├── interlink
│   ├── mindmap
│   ├── traderJoes
│   └── tux
├── logs
├── src
│   ├── archwiz
│   ├── paddocs
│   ├── pads
│   ├── proj
│   ├── sys
│   ├── tests
│   └── tools
├── srv
│   ├── dashboard
│   ├── share
│   ├── test
│   └── x
└── test
Technical Documentation Directory
system/src/paddocs/
├── assets
│   ├── diagrams
│   ├── images
│   └── schemas
├── config
│   ├── apa.csl
│   ├── ieee.csl
│   ├── man.1
│   ├── responsive.css
│   ├── template.html
│   ├── template.md
│   └── template.pdf
├── includes
│   ├── footer.html
│   ├── footer.md
│   ├── footer.pdf
│   ├── header.html
│   ├── header.md
│   ├── header.pdf
│   ├── manfooter.html
│   ├── reference.bib
│   └── todo.md
├── manuscript
│   ├── 00-front
│   ├── 10-docs
│   ├── 11-manual
│   ├── 12-business
│   ├── 13-property
│   ├── 14-trading
│   ├── 18-tutorials
│   ├── 19-blog
│   ├── 20-notes
│   ├── 99-back
│   └── metadata.yaml
├── output
│   ├── chapters
│   ├── compendium.html
│   ├── compendium.md
│   ├── compendium.pdf
│   └── sections
└── src
    ├── build.sh
    ├── generate.sh
└── parse.shTemplate generated by ChatGPT
Documentation generated by PADDOCS
Compendium section: 19-blog
Title: [Title]
Author: [Name]
Tags: [project, update, devlog]
Status: [ Draft / Final / Reviewed ]
Post ID: [File Name].md
Template: 00-blog.md License: “All Rights Reserved”
Schema: articles
Version: 0.0.1
Branding: Wormhole / PADS
“I couldn’t tell you in any detail how my computer works. I use it with a layer of automation.”
— Conrad Wolfram
To make a simple self documenting code concept.
After using mkdocs, and pandocs, there were issues with expansion, repetition, and confusion using the templates and plugins. They seemed to add unneccessary bulk to each project.
I like the direction of mkdocs, but I want the docs to generate for texinfo, groff, html, and a README for github. It seems overly complicating to me to use mkdocs, because it only wants to generate to html, to use like a wiki, as opposed to an info page, a man page, html, and a readme. pandoc on the otherhand will, but does not have a self-documenting code concept. These also depend on a lot of YAML files, and creating extra directories for the webpage, and self generating code, and you still need a source doc to generate from. I want it all to generate from the actual file with the code.
I think it would be simple enough to make my own self-documenting code using the same concept. Make headers in the file you’re coding in, search for, and replace those headers in a markdown template that’s generated from the paddocs code. Then you can use pandoc to parse the file to texi, groff, etc. You can still use mkdocs to deploy to github pages as well, just dont use the self generating concept. or make your own deployment to github pages, or the github wiki.
sed to search and replace text| Term | Definition |
|---|---|
| Concept 1 | Short explanation here |
| Concept 2 | Another explanation here |
| Beginning Tag | Ending Tag | Description |
|---|---|---|
| title | For Title | |
| subtitle | Description | |
| brief | Description | |
| desc | Description | |
| author | Description | |
| Description | ||
| created | Description | |
| repoURL | Description | |
| docsURL | Description | |
| blogURL | Description | |
| version | Description | |
| copyright | end copyright | Description |
| lic | Description | |
| synopsis | Description | |
| syntax | Description | |
| usageOpts | (This is generated from the usage() function) |
|
| exit | end exit | |
| env | end env | |
| file | end file | |
| history | end history | |
| note | end note | |
| example | end example | |
| seealso | ||
| sourcecode | ||
| readme | end readme | |
| modules | end modules | |
| api | end api | |
| advanced | end advanced | |
| troubleshoot | end troubleshoot | |
| contributing | end contributing |
| Dunder | Description |
|---|---|
| __doc__ | |
| __version__ | |
| __author__ | |
| __date__ | |
| __updated__ | |
| __copyright__ | |
| __license__ | |
| __email__ | |
| __status__ | |
| __description__ |
2025-04-10
I want to change the paddocs.sh script into a command, and I want to start adding templates I can use to convert it to html, man, info, pdf. I should include a template for a blog.
The command is comming along well. I can’t decide how to set up flags for how you want the code to generate. Either wiki or manpage, or pdf, etc. What I have so far is this:
while getopts ${OPTSTRING} mod; do
  case ${mod} in
    c) cmd=${OPTARG};;
    l) lang=${OPTARG};;
    v) echo "${version}"; exit;;
    h) usage; exit;;
    ?) echo " * pads -h for help"; exit 2;;
    *) echo "K18 Error"; exit 2;;
  esac
done
. "${base_dir}/src/paddocs/docGen.sh"
genLicense
genREADME
genWiki
genWikiHome
genSrc
But surely you wouldn’t want to run every function every time?
I decided to do this for now:
while getopts ${OPTSTRING} mod; do
  case ${mod} in
    c) cmd=${OPTARG};;
    l) lang=${OPTARG};;
    n) html=genHTML;;
    m) license=genLicense;;
    r) readme=genREADME;;
    w) wiki=genWiki;;
    x) wikiHome=genWikiHome;;
    s) src=genSrc;;
    v) echo "${version}"; exit;;
    h) usage; exit;;
    ?) echo " * pads -h for help"; exit 2;;
    *) echo "K18 Error"; exit 2;;
  esac
done
#[[ $# -eq 0 ]] && manual && exit
echo ${cmd:-"*"} ${lang:-"bash"}
. "${base_dir}/src/paddocs/docGen.sh"
$license
$readme
$wiki
$wikiHome
$src
$html
I can think about it more later. I might need to use long options for this one. So far this is a good layout I added these extra switches so that it could make the templates more clean:
[[ -n $status ]] && stat="Exit Status\n|Code|Status|\n|-----|-----|\n$status\n"
[[ -n $repoURL ]] && repo="Repository: $repoURL\n"
[[ -n $blogURL ]] && blog="Blog: $blogURL\n"
[[ -n $author ]] && auth="Author\n$author\n"
[[ -n $version ]] && ver="Version\n$version\n"
[[ -n $copyright ]] && copy="Copyright\n$copyright\n"
[[ -n $lic ]] && licl="License\n$lic\n"
[[ -n $envvars ]] && env="Environment Variables\n|Key|Value|\n|-----|-----|\n$envvars\n"
[[ -n $dirs ]] && fdir="Files/Directories\n|Path|Description|\n|-----|-----|\n$dirs\n"
[[ -n $history ]] && hist="History\n$history\n"
[[ -n $note ]] && notes="Notes\n$note\n"
[[ -n $example ]] && ex="Examples\n$example\n"
[[ -n $seealso ]] && see="See Also\n$seealso\n"
[[ -n $quickstart ]] && quickie="Setup\n$quickstart\n"
[[ -n $synopsis || -n $syntax || -n $usageOpts ]] && usage="Usage\n~~~$lang\n  $synopsis\n  $syntax\n$usageOpts\n~~~\n\n"
I made this function to generate a man page:
genMan(){
  printf \
"
---
title: $title
section: 1
header: Man Page
footer: $cmd $version
date: $created
---

# NAME
$title $brief

# SYNOPSIS
$synopsis
$syntax

# DESCRIPTION
$desc

#OPTIONS
$usageOpts

# EXAMPLES
$example

# EXIT STATUS
|Code|Status|\n|-----|-----|\n$status\n

# NOTES
$note

# AUTHORS
$author

# REPORTING BUGS
$email

# COPYRIGHT
$copyright

# SEE ALSO
$seealso
" > "$save_dir/$cmd.1.md"
  [[ $? -eq 0 ]] && printf " :: Generated: $cmd.1\n"
  pandoc "$save_dir/$cmd.1.md" -s -t man -o "$save_dir/$cmd.1"
  gzip -fv $save_dir/$cmd.1
}
First off it’s great, but I notice that groff doesn’t play well with
the <> or any special char (like what generates for
the synopsis). I’ll have to think of a way to escape those if
needed.
So I played with it for about 2 seconds, till I remembered this generates in Markdown so just indent a little and it’ll treat it as a code block instead and escape the special characters:
# SYNOPSIS
  $synopsis
  $syntax
Easy. Remember, it formats exactly like Markdown, so it’ll mimmic it, so when in doubt resort to Markdown format.
2025-04-12
I want to think about adding an info page, but I might put that off
for now. I don’t think I have much more to add with an info page except
that it’s in the terminal, and it’s more interactive then a man page.
But my commands aren’t so complex that they need a full info page, most
of the information is good enough for a man page, or a simple
-h flag. Having it online helps, because I can look up
infomation on my phone if all I have is a terminal (no GUI, or web
browser on the machine). But the info page I wanted to use as more of a
comprehensive guid to all of it, including tutorials, like installing
arch, setting up a website, etc. But if I’m stuck in a terminal, I use
my phone because I wouldn’t want to have to search the info page for
step one, then close it, do the step, open it back up, search for step
two, close it, do the step, open it back up, search for step three, etc.
So really a PDF I can print out would be more handy, as opposed to more
repetitive terminal information. But I do like me a good info page.
2025-04-20
I put this down for a few days to move around some. I’ve been thinking of how to convert to pdf. It looks like using this as a header, and using this as a command to generate it does the trick. this enables world wrap on long lines of code block so they don’t run off the page:
---
header-includes:
 - \usepackage{fvextra}
 - \DefineVerbatimEnvironment{Highlighting}{Verbatim}{breaklines,commandchars=\\\{\}}
---

pandoc --toc --pdf-engine=xelatex --eol=lf git/datasphere/index.md -o ./index.pdf
This generates a nice looking PDF you can print out. It’ll also still render to HTML Nicely.
I really need to think about how to organize this. If it generates source docs from one MD page. I need a directory to organize each commands docs into, then copied to the repository, then printed into a book format. I need a seperate directory for the blog which could be organized like a website, or simple MD. Each tutorial should be it’s own page, each command should be it’s own page so that if things change I only have to print that one page, or change, rather than 26 pages of docs. If I want to use custom templates I need a directory for those as well (e.g jez.html, jez.css). Maybe a layout like this:
└── docs
    ├── companyA
    │   ├── cover.png
    │   ├── lic.md
    │   ├── plan.txt
    │   └── productflow.png
    ├── companyB
    │   ├── cover.png
    │   ├── lic.md
    │   ├── plan.txt
    │   └── productflow.png
    ├── notes
    └── paddocs
        ├── proj1
        │   ├── blog
        │   ├── cmd.1.md
        │   ├── cmd.html
        │   ├── cmd.md
        │   ├── cmd.pdf
        │   ├── LICENSE.md
        │   ├── README.md
        │   └── wiki
        ├── proj2
        │   ├── blog
        │   ├── cmd.1.md
        │   ├── cmd.html
        │   ├── cmd.md
        │   ├── cmd.pdf
        │   ├── LICENSE.md
        │   ├── README.md
        │   └── wiki
        ├── proj3
        │   ├── blog
        │   ├── cmd.1.md
        │   ├── cmd.html
        │   ├── cmd.md
        │   ├── cmd.pdf
        │   ├── LICENSE.md
        │   ├── README.md
        │   └── wiki
        └── templates
I can use my regular old Documents directory to organize
the documents. Each project might have it’s own code behind it, but we
document it in one source file, and save it to multiple formats that can
be used however from there. Company A might have a chart of accounts,
and you might want to list it in a file that outlines all that. But the
SQL for it goes with the code, not the docs. So when we need to access
the information later on, we can use the man pages, the wiki, the
printed form, and the blog just uses words to describe my thoughts about
it.
2025-05-12
So I’m coming back to revisit this, although I have a late start, it’s 1630 hrs. and I have to be at work at 1800 hrs. I still need to build self-documenting code for python modules. I’m specifically saying python, because I’m a python developer, and not a Ruby developer. If I translate this code to Ruby, it would be Ruby. But it’s not, it’s python.
I should add that in the past week I wrote another blog on directory management, in which I restructed my docs directory to reflect this:
/home/$USER/docs/paddocs/
├── blogs
│   ├── adventures_with_chatgpt.md
│   ├── directory_management.md
│   ├── index.md
│   ├── llm.md
│   ├── project_paddocs.md
│   └── rpi3.md
├── index.md
├── manuals
│   ├── index.md
│   ├── paddocs.1.md
│   ├── paddocs.md
│   ├── pads.1.md
│   ├── pads.md
│   ├── proj.1.md
│   ├── proj.md
│   ├── sys.1.md
│   ├── sys.md
│   ├── tools.1.md
│   └── tools.md
├── print
│   ├── cover.odt
│   ├── installingArch.pdf
│   ├── maincover.odt
│   ├── paddocs.pdf
│   ├── padsguide.pdf
│   ├── pads.pdf
│   ├── proj.pdf
│   ├── sys.pdf
│   └── tools.pdf
├── references
│   ├── footnotes.md
│   ├── glossary.md
│   ├── LICENSE.md
│   └── README.md
├── templates
│   ├── jez.css
│   └── jez.html
├── tutorials
│   ├── de_wm.md
│   ├── index.md
│   └── installingarch.md
└── web
    ├── index.html
    ├── paddocs.html
    ├── pads.html
    ├── proj.html
    ├── sys.html
    └── tools.html
2025-05-14
Trying to find where I left off yesterday. I found a pretty big bug in the script:
$ paddocs -c bash
cat: /home/$USER/pads/bin/: Is a directory
cat: /home/$USER/pads/bin/: Is a directory
cat: /home/$USER/pads/bin/: Is a directory
cat: /home/$USER/pads/bin/: Is a directory
cat: /home/$USER/pads/bin/: Is a directory
cat: /home/$USER/pads/bin/: Is a directory
cat: /home/$USER/pads/bin/: Is a directory
cat: /home/$USER/pads/bin/: Is a directory
cat: /home/$USER/pads/bin/: Is a directory
cat: /home/$USER/pads/bin/: Is a directory
#
# /etc/bash.bashrc
#
# If not running interactively, don't do anything
[[ $- != *i* ]] && return
# Prevent doublesourcing
if [[ -z "${BASHRCSOURCED}" ]] ; then
BASHRCSOURCED="Y"
# the check is bash's default value
[[ "$PS1" = '\s-\v\$ ' ]] && PS1='[\u@\h \W]\$ '
case ${TERM} in
Eterm*|alacritty*|aterm*|foot*|gnome*|konsole*|kterm*|putty*|rxvt*|tmux*|xterm*)
PROMPT_COMMAND+=('printf "\033]0;%s@%s:%s\007" "${USER}" "${HOSTNAME%%.*}" "${PWD/#$HOME/\~}"')
;;
screen*)
PROMPT_COMMAND+=('printf "\033_%s@%s:%s\033\\" "${USER}" "${HOSTNAME%%.*}" "${PWD/#$HOME/\~}"')
;;
esac
fi
if [[ -r /usr/share/bash-completion/bash_completion ]]; then
. /usr/share/bash-completion/bash_completion
fi
#
# ~/.bashrc
#
# If not running interactively, don't do anything
[[ $- != *i* ]] && return
#[[ $- == *i* ]] && source /usr/share/blesh/ble.sh
[ 0 interlink ] $ paddocs -c python -l python
paddocs -c python -l python
promptCommand1
[ user@pc ] $ ls
ls
promptCommand1
[ user@pc ] $ pwd
pwd
promptCommand1
[ user@pc ] $ clear
clear
promptCommand1
[ user@pc ] $For some reason it’s printing out the bash.bashrc all
the the source files with it. This is probably a security issue.
2025-05-28
I’ve been spending the past few days trying to figure out a layout for a compendium. I found some good references.
~/docs/paddocs
├── assets
│   ├── code
│   ├── data
│   ├── diagrams
│   │   ├── bizStructure.png
│   │   ├── dirStructure.md
│   │   └── dirStructure.png
│   ├── images
│   │   └── ai-wormhole4.png
│   └── schemas
│       ├── bizReport.md
│       ├── bizStructure.odg
│       ├── blog.md
│       ├── cover.md
│       ├── dirStructure.odg
│       ├── metadata.yaml
│       └── techReport.md
├── config
│   ├── ieee.csl
│   ├── man.1
│   ├── template.html
│   ├── template.md
│   └── template.pdf
├── includes
│   ├── footer.md
│   ├── header.md
│   ├── reference.bib
│   └── todo.md
├── manuscript
│   ├── 00-front
│   │   ├── 00-copyright.md
│   │   ├── 01-revisions.md
│   │   ├── 02-preface.md
│   │   ├── 03-howto.md
│   │   ├── 04-structure.md
│   │   └── 05-roadmap.md
│   ├── 10-docs
│   │   ├── 00-cover.md
│   │   ├── interlink
│   │   │   └── 00-report.md
│   │   ├── metadata.yaml
│   │   └── pads
│   │       ├── 00-report.md
│   │       ├── paddocs.md
│   │       ├── pads.md
│   │       ├── proj.md
│   │       ├── sys.md
│   │       └── tools.md
│   ├── 11-manual
│   │   ├── 00-cover.md
│   │   ├── paddocs.md
│   │   ├── pads.md
│   │   ├── proj.md
│   │   ├── sys.md
│   │   └── tools.md
│   ├── 12-business
│   │   ├── 00-cover.md
│   │   ├── armyglass
│   │   │   ├── 00-report.md
│   │   │   └── 01-chartofaccounts.md
│   │   ├── metadata.yaml
│   │   └── theFshack
│   │       └── 00-report.md
│   ├── 17-tenants
│   │   └── Tenant A
│   │       ├── 00-cover.md
│   │       └── 10-menorandum.md
│   ├── 18-tutorials
│   │   ├── 00-cover.md
│   │   ├── 01-01-installingarch.md
│   │   └── 01-02-de_wm.md
│   ├── 19-blog
│   │   ├── 00-cover.md
│   │   ├── adventures_with_chatgpt.md
│   │   ├── directory_management.md
│   │   ├── llm.md
│   │   ├── project_paddocs.md
│   │   └── rpi3.md
│   └── 20-back
│       ├── a-glossary.md
│       ├── b-references.md
│       └── z-index.md
├── output
│   ├── chapters
│   │   ├── pads.html
│   │   └── pads.pdf
│   ├── compendium.html
│   ├── compendium.md
│   ├── compendium.pdf
│   └── sections
│       ├── docs.html
│       └── docs.pdf
├── metadata.yaml
└── README.md
I need to do a little more work on the assets/,
config/, includes/, and maybe the
metadata.yaml. I was also considering adding a spot to keep
track of notes for things, and mermaid charts. But I’ll have to work to
that. It will also print out just a specific chapter, section, or the
entire compendium to the output/ directory. I changed
around the paddocs logic to handle this directory
structure, and added a funtion to build the directory from scratch. I
would like to add functions to build the metadata, templates, and again,
mermaid charts from scratch. I can always add more headers as I need to.
I still need it to generate code from python, and set up a
.gitignore. This is all just setting up the book. So this
is where a good road map, and todo will do good.
2025-04-08
Using headers makes the string more “clean” for example:
Searching for a variable author in a file named
script.sh adds the quotes:
–> script.sh
  author=$(cat ~/pads/bin/${1} | grep "author=" | sed s/"author="//g)
  sed  -e "/## author/a$author" template.md > $1.md
*Output:
  ## author
  "Joe Corso"
Searching for a header author in a file name
script.sh has no quotes:
–>script.sh
  author=$(cat ~/pads/bin/${1} | grep "## author" | sed s/"## author"//g)
  sed  -e "/## author/a$author" template.md > $1.md
*Output:
  ## author
  Joe Corso
Using ## makes sense because they are considered
comments and will not be parsed, but as the reader you will see the
## and know it’s a header.
The next task was searching for a string of text between two patterns. Something like this: [1][1]
    $ usageOpts=$($1 -h | sed -n '/Usage:/,/Ex:/{//!p}')

    *Output:
       -b           Backup System
       -u [name...] Update machine. Supply name of package to install.
       -i           Update pads' info page
       -l           List packages on this machine
       -d           Update pads' man page
       -r <name...> Remove supplied packages
       -m           Set up mariadb
       -s           Show system information
       -h           Show help
       -v           Show version
Then combine it into a template. Something like this:
  $ template.md

    # title
    ## subtitle
    ### Description
    ### Author
    ### Version
    ### Copyright
$ script.sh
sed -e "s/title/$title/g" -e "/### Author/a\ \n$author\n" -e "/### Version/a\ \n$version\n" -e "/## Usage/a\ \n$usageOpts" template.md > $1.mdThe issue I’m having with following this process is that the sed nested within the sed is finding the first dash (e.g -b) and trying to interpret it as a command, and of course failing. It may be easier to just use stdout to build the template as it goes. Something like this:
  $ script.sh

   printf "# Usage\n  $usageOpts" > $1.md
2025-04-09
I was thinking I would just use stdout to print to a markdown file. It would be easier than trying to get this nested sed to work. Plus I won’t have to make sure to carry around a template, because the code will generate the template. So let’s go with that, and see where the next hiccup happens.
I’ve spent the majority of the day trying to decide how much of the
docs should generate from comments, and what should generate from code.
For example, it makes sense to make comments at the top of the script to
include creation date, author, copyright, version, and description of
the script. But it also makes sense to just type
<cmd> -h for a help, or <cmd> -v
for the version. There would be excessive overhead to have to:
$ version=$(cat "$file" | grep "## version" | sed s/"## version "//g)As opposed to:
$ version=$($cmd -v)Some things would make sense to have as a header, (e.g copyright, license, creation date, long description, tutorial, examples, exit status) Some things are already generated within the code, (e.g usage, version, syntax, synopsis, optstring). For a section of the docs, that does not logically make sense to be the code, it would be easier to include tags like within html, so that you know to search for text within a pattern, and print that text as a string of characters. The easiest way to do that is with obvious, human-readable tags. For example:
    ## desc
    ## This is the description
    ## for your really awesome
    ## program you spent hours
    ## asking chatGPT how
    ## to write.
    ## end desc
You can see it relatively similar to texinfo in that it has an
obvious beginning to the description, and an obvious end. Everything in
between will be printed, regardless of the number of lines or the
formatting. Notice that each line start with ## <tag>
and with blocks would end with ## end <tag> to make
it easy to search for within a text document. The difference from html
is that html uses:
$ desc=$(cat "$file" | sed -n "/## desc/,/## end desc/{//!p}" | sed s/"## //g")We can keep the ## on each line so that we can
simultaneously run the command without errors, because the computer will
consider those comments and not be parsed. Then just strip it all off to
have a block of plain text. Trust me it’s easier than using
sed to search and replace complex patterns.
The next task was applying a nice looking template. This is where we
can still use pandoc to generate the markdown file into
nice looking html. I took some time to look around on github for an open
source template to start with, and I found this:
https://jez.io/pandoc-markdown-css-theme/
I would like to take time to come back to this, and create my own template (maybe incorporate it into templetons templates). But for now, I’m using the ones from above, and giving credit to the creator; until I can make my own. All I need for now is the format, the code blocks, and a nav. Pandoc can generate all of that execept the css and html. I’ll use this command to generate the html:
$ pandoc -s --toc --number-sections --highlight-style=pygments -c jez.css --template jez.html --metadata pagetitle="${cmd}" pads.md -o ${cmd}.htmlThat command alone will generate the table of contents(nav), numbered sections, the css template, the html template, a title, the input file(the self generated one), and an output file. I think in the future I would make the html template with all the style and js on the same page so I don’t have to package an entire library as a template that would have to piggyback off of each project. Just make one template with all the html, css, and js inline, then host on the github project which has the self generating code, then you can just bootstrap the template with https://github.com/my/pandoc/template.git. Easy. That part’s done.
Next was the things like the exit status or env vars, and how to render that. So this is where the start and end tags win again. In your script all you have to do is place this somewhere in the file:
    ## exit
    ## 0 | Success
    ## 1 | Failure
    ## 127 | K18
    ## 130 | Ctl+C
    ## end exit
The markdown format for a table is like this:
  | Syntax | Description |
  | ----------- | ----------- |
  | Header | Title |
  | Paragraph | Text |
Notice that you need the pipe (|) in between so that it
seperates it into the proper columns. So for this we would need sed
again. We would need to find the text between the start and end tags,
strip off the extra pound symbols ## and insert a pipe
between the first whitespace. That last part gives me problems. If you
do something like this:
$ cat ~/pads/bin/pads | grep "## exit" | sed s/"## exit "//g | sed s/""/" | "/gYou get:
$ sed: -e expression #1, char 0: no previous regular expressionBut if I wrap it in a start and end tag, then write the pipe manually in between, we can do something like this:
  status=$(cat "$file" | sed -n "/## exit/,/## end exit/{//!p}" | sed s/"## //g")
  ## Exit Status\n
  |Code|Status|
  |-----|-----|
  $status
Then the pipe is already there, and markdown assumes it’s for the
table. This renders the table properly, and it’s easier than getting
into the weeds with sed. We can follow this same pattern
for our ENV Vars, our FILES, DIRS, etc. Anything formatted in a texinfo
file that would be a key:value pair.
Moving right into the ENV Vars. Do this:
## env
## BROWSER | w3m
## PROMPT_COMMAND | prompt_command
## RANGER_LOAD_DEFAULT | false
## PATH | \$PATH:\$HOME/pads/bin
## end env
Notice the forward slash in front of the $. If you don’t
add the forward slash pandocs wont read it, and will render the table
without them. They’re important considering they, themselves, are
Environment Variables.
I added another parameter ($2) so that we can tell the script how to label the code blocks for better syntax highlighting. EX:
  lang=${2}
  ## Usage\n~~~$lang\n  $synopsis\n  $syntax\n$usageOpts\n~~~\n\n\
NOT:
## Usage\n~~~bash\n $synopsis\n $syntax\n$usageOpts\n~~~\n\n\OR
## Usage\n~~~\n $synopsis\n $syntax\n$usageOpts\n~~~\n\n\When it comes to documenting the directory structure that could also
probably be automated using the ls command, and maybe
sed to add a description for each directory. Maybe printed
to a secondary, or tertiary file to be manipulated some how. For now
I’ll keep using the tags. Those are easy. I’m liking those more.
Next is the history, or updates, or whatever. That is easy too. Bring in the starting and ending tags, and add a dash to make a list. Markdown automatically reads it as a list and make a nice bullet style list. Make it however you would to format in markdown and it’ll format like that.
For an example code block, it’s the same and just as easy. Following the exact same styling here: https://www.markdownguide.org/extended-syntax/#definition-lists, we can just add the beginning and ending tags and style it the same way. For example:
## example
## `pads -Pfm *project*`
## : In this example we make and start a Flask project named `project`.
## end example
That’s all there is to that part.
I added a quickstart block that will be rendered as a README.md file for github, etc. Just make it the same as a numbered list for markup. This is an example:
## quickstart
## 1) Download:
##   `git clone https://github.com/padsRepo/pads`
## 2) Install:
##   `makepkg -si`
## end quickstart
I added a few tags for URLs, and made a base directory so it would organize it into a book, and be ready for github. I decided to start using the github wiki for the docs and the pages for the blog.
So basically the workflow would be to create the code with the tags. run the command. make the first wiki page, and clone it. then copy the files you want into the cloned directory. commit and push. i may not nee the readme and license for each project but i’ll have the self generated code. Then i’ll need to add a printable format and a terminal format.
2025-04-22
I had forgotten about print the source code along with the docs. So I
just threw in a spot for it above the “See Also” section. the first
problem I’m having is that the computer is trying to parse the shebang
line as a command. I can try to strip it with sed, but then
it says “event not found”. Like this:
cat pads/bin/pads | grep "#!"
*Output:
#!/bin/bash
OR:
cat pads/bin/pads | grep "#!" | sed s/"#!/bin/bash"//g
*Output:
bash: !/bin/bash: event not found
OR:
cat pads/bin/pads | grep "#!" | seds/"\#!/bin/bash"//g
*Output:
bash: !/bin/bash: event not found
OR:
cat pads/bin/pads | grep "#!" | sed s/"\#!"//g
*Output:
/bin/bash
AND:
paddocs -c pads -l bash -s
*Output
paddocs/docGen.sh: line 89: #!/bin/bash: No such file or directory
So I though rather then to search for the pattern and replace it with
blank, we could instead just strip off the first line entirely. The
shebang will always be the first line, and it always starts with
#!, so we know for documentation purposes we don’t need it.
So all we have to do is this:
cat pads/bin/pads | grep "#!" | sed -r s/.//g
Ok. So I was wrong on that. It strips off the first line, for sure; but it also strips off everything after that too. So the output is just blank.
sed -r 's/^#!.{9}//' pads/bin/pads
I got this together, which strips off just the first line. It
bashically (the typo just coined a new word bashically. like when you
explain things basically with bashisms.). Anyway, it basically just
finds the #! and then 9 characters after that. Except that
now I get the error:
paddocs/docGen.sh: line 89: ##: command not found
It needs to escape the special characters and such. This is a lot
harder than it should be. I’ve been working at this for about 3 hours
now. If you just run printf "$source" it works. But being
run in the script gets the error above, which is the line that redirects
to the MD file. Which leads me to believe that the redirection is making
it want to run as a script. Except no other vars are being parsed that
way. I thought I would try: [2][2]
cat $file | grep -v "^#!"
It still gets the same error as above. It just seems to want to keep
parsing the ## as a command for some reason. But they’re
just comments, and every other variable is being rendered as a string.
It’s only the variable for the source code that seems to want to run as
a command for some reason. If I work around that some how, it just says
title: command not found. So it’s just going down the
page.
I finally figured out what was going on. It’s printf. It
doesn’t have anything to do with sed or grep.
The proper syntax to escape the commands is this: [3][3]
printf "%s\n" "$var"
That escapes it properly, but now since I’m using the ##
as the headers, markdown wants to render it as headers, and it’s ruining
the formatting. So with some tinkering I came up with this:
printf -v printsource "Source Code\n ~~~bash\n%s\n~~~\n" "${sourcecode}"
That prints it properly as a string, in a code block with the proper formatting. Then the command is basically this:
genSrc(){
  printf \
# %s
 "${printsource}" > "$save_dir/${cmd}.md"
  [[ $? -eq 0 ]] && printf " :: Generated: $cmd.md\n"
}
There it’ll generate a code block for the source code. I decided to
strip off the text that generates the code, and just leave the actual
code it takes up less space. I needed to strip off the ##
and the blank lines it left behind:
sed -e '/^#/d' -e '/^$/d' "$file"
It’s just my preference so it doesn’t take up so much space. I don’t care about the header for the self generating docs. I should make a script that will generate examples and source code from the fuctions used in each command.
2025-05-12
I started by googling
how to import a python module without running it, and found
this
blog. It’s really simple, just add the if __name__
block. Like this:
if __name__ == '__main__':
  print(__doc__)
else:
  import interlink
If you are importing the module; say within a Flask
server, it’ll import all the modules without getting an error for saying
there no flask module. If you’re importing it from the command line,
python will set the __name__ of __init__ to
__main__, and we can grab the __doc__ string
__version__ etc. Now how do we bring this into bash? Well
from the terminal we can run a command like this:
x=$(python __init__.py); echo -e "$x \n"If we can run the script from the terminal, we can add it to
paddocs. This is also slightly different then adding
## headers to the top of a file. Python already has docstrings,
and those are already really cool. So I don’t want to reinvent the wheel
for that. I want to use them, and extract them, and manipulate them.
I’ll spend some time tinkering with grep and
sed and printing to an MD file. Before I get
to that, I have to restructure my python libraries a little. The
if __name__ == __main__ block works fine, but if I were to
try to import the Formulators docstring, I would come full circle to the
same issue if importing the module, and running it, which would raise
the error that there is no flask module. So we change it to import the
everything, only when the function is being called. Using the
formulator.Generator as an example:
class Generator:
  '''
  The generator is the module used to generate your forms, reports,
queries, and anything DB related.

Let's say you want to generate a blog. Use the formulator.Generator to
make a query of your blog table from your SQL database. Create a
variable from it, and then using Jinja's Templating Engine with Flask,
we can manipulate the variable in an html template anyway we want.

Examples:

    from interlink import Generator
    @templetonBP.route('/forms/<db>/<page>', methods=['GET', 'POST'])
    def generateForm(db, page):
        gen = Generator(db, 'DB_USER', 'DB_PASS')
        error, form, title = gen.generateForm(page)
        return render_template('forms.html', error=error, form=form, title=title)


    from interlink import Generator
    @templetonBP.route('/reports/<db>/<page>')
    def generateReport(db, page):
      gen = Generator(db, 'DB_USER', 'DB_PASS')
      colName, colRow, error, title = gen.generateReport(page)
      return wrapper('reports.html', colName=colName, colRow=colRow, error=error, title=title)

    @viewsBP.route(/)
    def index():
      gen = i.Generator('DB', 'DB_USER', 'DB_PASS')
      nav = gen.generateNav()
      return render_template('index.html', nav=nav)
  '''

  def __init__(self, db, user, password):
    '''Initialize the Generator object.'''
    self.db = db
    self.user = user
    self.password = password

  def generateForm(self, table):
    '''
    Generate a form to enter data into the `table`

    Returns:
      error (str): Success! Error!
      form (str): Success! 404
      title (str): DB table name
    '''
--> from .logic import createForm
    error, form = createForm(self.db, self.user, self.password, table)
    title = table
    return error, form, title
Usually, I declare all of my imports at the top of the file. Now I’ll
declare my imports within the function. Notice under
generateForm all I did was move the line
from .logic import createForm from the top, to there. Then
we can call the __doc__ without running the command. So now
in our __init__.py file we print all the variables we need
to generate the documentation:
  if __name__ == '__main__':
    from formulator import Generator as g
    print(__doc__, __version__, __author__, __date__, __updated__, g.__doc__, g.generateForm.__doc__)
2025-05-13
I’ve been trying to think of how I would want to organize the
docstrings so they can make sense, like google style
guide. Or also including
python scripts in a bash script, to be able to extract variables
that can neatly placed wherever you want them to be. I was also
thinking, assuming I’m using markdown, that the docstring can just be
formatted for markdown anyway. If you follow googles styling guide it
looks prettier in a terminal, or if you use pythons built in
help() command. After looking around for a little bit, I
found this
website, which lead me to this
link on the different methods of formatting your docstrings. I
personally like google styling the best. But I still need a way to be
able to use it in a template.
I looked here, and found this:
python b.py tempfile.txt
var=`cat tempfile.txt`
rm tempfile.txt
Then I tinkered with this:
#!/bin/bash

$ MYSTRING="Do something in bash"
$ echo $MYSTRING

$ python - << EOF
myPyString = "Do something on python"
print myPyString

EOF

$ echo "Back to bash"
I was mostly using DuckDuckGo, and not having much luck, so switched to google, and the AI Overview gave me this:
# python_script.py
variable1 = "hello"
variable2 = 123
print(f"export VAR1='{variable1}'")
print(f"export VAR2={variable2}")
#!/bin/bash
$ source <(python python_script.py)
$ echo "Variable 1: $VAR1"
$ echo "Variable 2: $VAR2"I kinda like that, because, considering I want to use bash to parse
the markdown formatting; being able to manipulate the data from bash
scripts will be handy, because each class and function will have their
own docstrings. This part of the layer has less to do with how to format
the docstring, and more with manipulating the data how we want to. We
could still just go ahead and format the docstrings to markdown, and
just print to an .md file. We can still use the same
recommended headers of other styles, but we would still have to write
more code using grep or sed to extract the
text as plain text, do any stripping etc, and still put it in the right
spot on a markdown template. There aren’t any rules that say you have to
use the popular styles, it’s just recommended, so that it’s easier for
someone else to understand. But I would think a style in markdown would
be easy to understand, wouldn’t it? That’s the point right? It doesn’t
seem like using help() or dir() or
__doc__ doe any formatting necessarily so I won’t
worry about that.
I jumped the gun on that. When I mess with it, I get this:
if __name__ == '__main__':
  from formulator import Generator as g
  x = g.__doc__
  print(f"export x='{x}'")
$ source <(python __init__.py)
bash: export: 'blog.': not a valid identifier
bash: export: 'formulator.Generator': not a valid identifier
make: *** No rule to make target 'a'. Stop.
bash: db: No such file or directoryBut instead, if I do:
if __name__ == '__main__':
  from formulator import Generator as g
  print(g.__doc__)
Everything runs clean. So if the docstrings are just styled the same
as Markdown, it might be easier. After looking at how
mkdocs generates the readthedocs template, I
think I could do the same thing. I’ve been having problems with this, in
that I’m having problems with sed, and writing the
docstring in all markdown just makes the __doc__ object
really messy. I revisited the print(f"export x='{x}'")
command, and found that it wants to print literally in bash because of
the single quotes. So I just switched them around, and now it runs
fine.
I’ve been having a problem with importing the top level
__doc__ from the interlink module. Basically, if I run the
following command, I can run it in bash, and it’ll be fine.
if __name__ == '__main__':
  from formulator import Generator as g
  print(f''' export generatorDocs="{g.__doc__}" ''')
$ source <(__init__.py)
$ echo -e "$generatorDocs \n"OUTPUT
  The generator is the module used to generate your forms, reports,
queries, and anything DB related.

Let's say you want to generate a blog. Use the formulator.Generator to
make a query of your blog table from your SQL database. Create a
variable from it, and then using Jinja's Templating Engine with Flask,
we can manipulate the variable in an html template anyway we want.

Examples:

    from interlink import Generator
    @templetonBP.route('/forms/<db>/<page>', methods=['GET', 'POST'])
    def generateForm(db, page):
        gen = Generator(db, 'DB_USER', 'DB_PASS')
        error, form, title = gen.generateForm(page)
        return render_template('forms.html', error=error, form=form, title=title)


    from interlink import Generator
    @templetonBP.route('/reports/<db>/<page>')
    def generateReport(db, page):
      gen = Generator(db, 'DB_USER', 'DB_PASS')
      colName, colRow, error, title = gen.generateReport(page)
      return wrapper('reports.html', colName=colName, colRow=colRow, error=error, title=title)

    @viewsBP.route(/)
    def index():
      gen = i.Generator('DB', 'DB_USER', 'DB_PASS')
      nav = gen.generateNav()
      return render_template('index.html', nav=nav)
But if I add the __doc__ from interlink, I get an
error.
interlinkDocs = str(__doc__)
print(f'''\
  export generatorDocs="{g.__doc__}" \
  export interlinkDocs="{interlinkDocs}" \
''')
OUTPUT
bash: /dev/fd/63: line 251: syntax error near unexpected token '('
bash: /dev/fd/63: line 251: '        <a href="{{ url_for('/.index') }}">Index</a>'
I’m wondering if it’s because the Generator is a class,
and interlink is the __init__.py top level
docstring.
I’ve been working on this all day, and I’m not getting any closer. Eventually I found a library called shlex. It’s an external library, but it’s as close as I can figure out right now.
So in the script if I do a command like
echo -e "$generatorDocs\n" | sed -e "1 i # formulator.Generator".
I can insert a header on the first line. Or if I do
echo -e "$generatorDocs\n" | sed -e "s/Examples/# Examples/g"
I can turn the Examples block from google styling, and turn it into a
markdown header. The next task is breaking up the docstring where
there’s chunks like this:
Modules:
  formulator: Form and Report Generator
  templeton: Template Generator
  safeHaven: Security Guard
  toolkit: Misc Tools

Classes:
  Generator: Forms
  DB: Connect to DB

Functions:
  tempulator: templates
  tempulation: Custom Views
  honeypot: distraction
  backdoor: entry way
  login: check user
  site_map: site map for SEO
  url_not_found: 404 Error
  internal_error: 500 Error
  templetonBP: Templeton Templates
I found this for a good start. It wont be the answer though.
echo -e "$interlinkDocs" | sed -n '/^Modules:/,/^$/p'I’ll probably have to rework the paddocs command to fit
python. I’m starting to get a brain fart. It’s 2143 hrs. I started
working today at around 0900 hrs.
2025-05-14 I’m thinking over how to generate the python
docs, and after all that work I did yesterday I’m thinking about
scrapping it. I like the code, and I think I’ll save it somewhere for
something later. But if you start from the beginning of a fresh project
the workflow would be: start/make the project -> build the docs ->
add the if __name__ block and add all this extra
boilerplate to it including an external lib:
if __name__ == '__main__':
  import shlex
  from formulator import Generator as g
  from templeton import tempulator as t
  interlinkDocs = shlex.quote(__doc__.strip())
  print(f''' \
    export version="{__version__}" \
    export interlinkDocs={interlinkDocs} \
    export generatorDocs="{g.__doc__}" \
    export templetonDocs="{t.__doc__}" \
  ''')
else:
  *etc*
That would be a lot to add to every project, and a lot harder to
piece together than simple headers (or a docstring in this case). If we
print to the screen (like using cat in bash so much), we
can just go back to using grep or sed like
earlier, and we can stick to google style guide. So all we’ll have to do
is something like this instead:
if __name__ == '__main__':
  from formulator import Generator as g
  print(__doc__)
  print(g.__doc__)
else:
  *etc*
If we follow this, we can probably reuse the same fuctions from bash as well, so that’s a win. Since it follows along with this project this is the style that google uses:
The Google Python Style Guide for docstrings uses a clean, readable structure that’s widely adopted for clarity and tooling compatibility (e.g., with Sphinx using
napoleon). Below is a complete format covering modules, classes, methods, and functions.
🧩 Google Style Docstring Format
🔹 Module-Level Docstring
"""
Short description of the module.

Longer description explaining the module’s purpose and usage,
including optional examples or references.

Modules:
 [Name](#link): Description

Classes:
  [ClassName](#link): Description

Functions:
  [funcName](#link): Description

Examples:
    foo = MyClass()
    foo.bar()
"""
🔹 Function/Method Docstring
def function_name(param1, param2="default"):
    """
    Summary line (brief description of what the function does).

    Longer description that can span multiple lines, describing
    the behavior, algorithm, or use case of the function.

    Args:
        param1 (int): Description of `param1`.
        param2 (str, optional): Description of `param2`. Defaults to "default".

    Returns:
        bool: Explanation of the return value.

    Raises:
        ValueError: If `param1` is negative.
        TypeError: If the types of inputs are incorrect.
    """
🔹 Class Docstring
class MyClass:
    """
    Summary of what the class represents.

    Detailed explanation of what the class does, its intended use,
    and any implementation notes.

    Attributes:
        attr1 (str): Description of attr1.
        attr2 (int): Description of attr2.
    """

    def __init__(self, attr1, attr2):
        """
        Constructs all the necessary attributes for the object.

        Args:
            attr1 (str): Description of `attr1`.
            attr2 (int): Description of `attr2`.
        """
🔹 Example with All Sections
def connect(host, port=3306, timeout=10):
    """
    Connects to a database.

    Attempts to establish a connection to the specified host and port.

    Args:
        host (str): The hostname or IP address.
        port (int, optional): The port number. Defaults to 3306.
        timeout (float, optional): Connection timeout in seconds. Defaults to 10.

    Returns:
        Connection: A live connection object.

    Raises:
        ConnectionError: If the connection cannot be established.
        TimeoutError: If the connection times out.

    Examples:
        >>> conn = connect("localhost")
        >>> conn.execute("SELECT * FROM users")
    """
✅ Summary of Sections
Section Description Summary line One-line description Extended description (optional) More context Args Each parameter: name (type): descriptionReturns Type and what it returns Raises Possible exceptions Examples (optional) Usage example in docteststyle
I’ll have to make a YAML schema for this or
something.
So moving back into the project, I still need to get these variables
some how. If I do
version=$(python "$file" | grep "0.0.[0-9]") or something I
feel like that is going to be unreliable. What if it’s
x.x.x.x, or x.x.x.x.xW02Y10? I had an idea
that might work better. If I do: python __init__.py it
sources the file but does not carry along the variables. I would need to
import it, but if I import it, it tries to actually run the package,
which brings us back to the error of no flask module found.
So let’s change it so it say this:
if __name__ == '__init__':
  pass
else:
Then for our script we can do:
python -c "import __init__; print(__init__.__version__)"I think that might be ok. Let’s charlie mike this project, and see what happens next. I’m still just having issues of things importing wrong, and trying to run things it shouldn’t. I almost feel like I need to start from scratch, because the project itself might need some restructuring. I’m just at a serious roadblock with this part of the project.
*2025-05-15
Well yesterday was a huge waste of time. I messed with it for about 15 minutes before work and realized all I needed to do was this:
version=$(python -c "from interlink.__init__ import __version__; print(__version__)")*2025-05-16
I had to keep testing stuff. Nothing I was doing was working. I
really want to try to find a way to work with this command
python -c "from __init__ import *; print(__version__)". It
seems like if I just remove the if __name__ == '__main__'
block, I can change it from this:
if __name__ == '__main__':
  import formulator
  #print(__version__)
  #print(__doc__)
  #print(g.__doc__)
  print("init")
else:
  # formulator functions
  print(" * Loading Formulator...")
  from interlink.formulator import Generator

  # templeton functions
  print(" * Loading Templeton...")
  from interlink.templeton import tempulator
  from interlink.templeton.views import url_not_found, internal_error, templetonBP

  # safe haven functions
  print(" * Loading Safe Haven...")
  from interlink.safeHaven import honeypot, backdoor, login

  # toolkit functions
  print(" * Loading Toolkit...")
  from interlink.toolkit import DB, get_script_path, site_map

  print(f' * Interlink {__version__} is online')
To just this:
import formulator
import templeton.views
import safeHaven
import toolkit
Maybe this will give better flexibility with the package as well,
because from there you import each class or function your own. As
opposed to my predefined import. When it get to safeHaven,
I still get the error about Flask. But I’m thinking I could either nest
that within the decorators, or just import it from the app. Because if
you think about it, flask is loading from the app you’re building first.
So maybe it could pull it from there rather then importing within the
module. If I just comment out the line for now it just goes down the
list, getting another error:
Traceback (most recent call last):
  File "<string>", line 1, in <module>
    from __init__ import *; print(__version__)
    ^^^^^^^^^^^^^^^^^^^^^^
  File "/home/frank/utils/interlink/src/interlink/__init__.py", line 288, in <module>
    import safeHaven
  File "/home/frank/utils/interlink/src/interlink/safeHaven/__init__.py", line 4, in <module>
    from flask import request, render_template, session, redirect, url_for
ModuleNotFoundError: No module named 'flask'
Traceback (most recent call last):
File "<string>", line 1, in <module>
from __init__ import *; print(__version__)
^^^^^^^^^^^^^^^^^^^^^^
File "/home/frank/utils/interlink/src/interlink/__init__.py", line 288, in <module>
import safeHaven
File "/home/frank/utils/interlink/src/interlink/safeHaven/__init__.py", line 5, in <module>
from __init__ import app
ImportError: cannot import name 'app' from partially initialized module '__init__' (most likely due to a circular import) (/home/frank/utils/interlink/src/interlink/__init__.py)
[1] ERROR:pads.sig:err_script: paddocs.?.8:python -c "from __init__ import *; print(__version__)"Traceback (most recent call last):
File "<string>", line 1, in <module>
from __init__ import *; print(__version__)
^^^^^^^^^^^^^^^^^^^^^^
File "/home/frank/utils/interlink/src/interlink/__init__.py", line 289, in <module>
import toolkit
File "/home/frank/utils/interlink/src/interlink/toolkit/__init__.py", line 4, in <module>
from flask import url_for
ModuleNotFoundError: No module named 'flask'
[1] ERROR:pads.sig:err_script: paddocs.?.8:python -c "from __init__ import *; print(__version__)"I might need to rework some of the actual library to be more prepared for this sort of stuff. When I was originally writing this library, I didn’t know what self-documenting code was, and I didn’t think I would need it in a terminal. But this part of the project is really throwing me for a loop.
I nested everything so that those modules giving me problems would only import within the function or class.
2025-05-17
Let’s recap a little.
If I do this, there’s a lot of extra boilerplate for each project:
  if __name__ == '__main__':
    from formulator import Generator as g
    print(__doc__, __version__, __author__, __date__, __updated__, g.__doc__, g.generateForm.__doc__)
Something like this might work, but for each project I would have to manuallly change the code for each project:
# python_script.py
variable1 = "hello"
variable2 = 123
print(f"export VAR1='{variable1}'")
print(f"export VAR2={variable2}")
#!/bin/bash
$ source <(python python_script.py)
$ echo "Variable 1: $VAR1"
$ echo "Variable 2: $VAR2"If we follow the Google style guide, we might be able to use this format. But considering each module has examples, and exit status’, and such it would be hard to differentiate between one or the other:
modules=echo -e "$interlinkDocs" | sed -n '/^Modules:/,/^$/p'There are a few slightly difference way we could run something like this:
version=python -c "import __init__; print(__init__.__version__)"We could also print to a text file, then source the file
in bash:
  import formulator, templeton, safeHaven, toolkit
  tmpDir = '/tmp'
  print('Exporting vars to:', tmpDir)
  with open('/tmp/paddocs_python_vars.sh', 'w') as f:
    f.write(f'''
version="{__version__}"\n\
author="{__author__}"\n\
createDate="{__date__}"\n\
updateDate="{__updated__}"\n\
copyright="{__copyright__}"\n\
license="{__license__}"\n\
email="{__email__}"\n\
status="{__status__}"\n\
description="{__description__}"\n\
''')
    f.close()
  with open('/tmp/paddocs_python_docs.sh', 'w') as f:
    f.write(f''' {__doc__} ''')
    f.close()
$ python ${file}
$ . "/tmp/paddocs_python_vars.sh"
$ echo "${version}"Or we can use the EOF. Just slightly different than this
version=python -c "import __init__; print(__init__.__version__)":
#!/bin/bash

$ MYSTRING="Do something in bash"
$ echo $MYSTRING

$ python - << EOF
myPyString = "Do something on python"
print myPyString

EOF

$ echo "Back to bash"
The thing with each of these, is that you have to be careful to only
import dependencies from within the function or
class, and you would have to manually change the names of
the library in the code every time you start a new project. I kind of
like the idea of using the styling, and sed.
I’ve been fiddling with stuff for a few more hours. I came across
this that seems to work “well” but let’s see. I’ve been let down before.
Right now, I’m having a hard time trying to import the parent directory
(i.e: interlink.__init__):
__all__ = ['__init__', 'formulator', 'templeton', 'safeHaven', 'toolkit']cd ${dir}
python ${file}
module=$(python -c '
import importlib
from __init__ import __all__
for name in __all__:
module = importlib.import_module(f"{name}")
print(f"{name}:\n{module.__doc__}\nSTOP")'
)
docs=$(python3 -c '
import ast
from __init__ import __all__
for x in __all__:
print(x)
with open(x + "/__init__.py") as f:
tree = ast.parse(f.read())
for node in tree.body:
if isinstance(node, (ast.FunctionDef, ast.ClassDef)):
name = node.name
doc = ast.get_docstring(node)
if doc:
print(f"{name}: {doc}\n")
')
echo -e "${module}\n"
echo -e "${docs}\n"I feel like I need a better testing environemt for this. I’ll have to set up a python lib to just try this right, from the beginning.
2025-07-15
On 2025-06-19 I finished the python module. It was just a
lot of fiddling with ast in python for a while. Eventually
I came up with this:
parsePython(){
  # https://gabrielelanaro.github.io/blog/2014/12/12/extract-docstrings.html

  dir=$(find "$HOME/dev/" -type d -iname "$cmd")
  projDir=$(printf "$dir" | head -1)
  saveFile="${cmd}.md"
  saveDir=$(printf "$dir" | grep "10-docs")

  python -c "
import ast
import os

number = 10
projDir = '${projDir}'
projFile = '__init__.py'
saveFile = '${saveFile}'
saveDir = '${saveDir}'
savePath = f'{saveDir}/{number}-{saveFile}'

if os.path.exists(f'{saveDir}/{saveFile}'):
  os.remove(f'{saveDir}/{saveFile}')

with open(f'{projDir}/{projFile}') as f:
  tree = ast.parse(f.read())

for node in ast.walk(tree):
  if isinstance(node, ast.Assign):
    for target in node.targets:
      if isinstance(target, ast.Name) and target.id.startswith('__') and target.id.endswith('__'):
        try:
          value = ast.literal_eval(node.value)
        except:
          value = ''
        finally:
          print(target.id, '=', value)

for path, dirname, filename in os.walk(projDir):
  for x in filename:
    if x == '__init__.py':
      filename = f'{path}/{x}'

      ast_filename = filename
      with open(filename) as fd:
        module = ast.parse(fd.read())

      class_definitions = [node for node in module.body if isinstance(node, ast.ClassDef)]
      function_definitions = [node for node in module.body if isinstance(node, ast.FunctionDef)]
      if ast.get_docstring(module) is not None:
        open(f'{savePath}', 'w').write('\n' + '## ' + os.path.basename(path) + '\n' + ast.get_docstring(module) + '\n\n')
      for c in class_definitions:
        if ast.get_docstring(c) is not None:
          open(f'{savePath}', 'a').write('### ' + c.name + '\n' + ast.get_docstring(c) + '\n\n')
        for cFun in c.body:
          if isinstance(cFun, ast.FunctionDef):
            open(f'{savePath}', 'a').write('#### ' + cFun.name + '\n' + str(ast.get_docstring(cFun)) + '\n\n')
      for f in function_definitions:
        if ast.get_docstring(f) is not None:
          open(f'{savePath}', 'a').write('### ' + f.name + '\n' + ast.get_docstring(f) + '\n\n')
  number += 1
  "
  cd ${saveDir}
  # replace googlestyle docs with markdown links to each mod, class, or function.
  sed -E -e '/Modules:/,/^$/ {' -e '/Modules:/b' -e 's/([a-zA-Z0-9_]+):/[\1](#\L\1) | /g' -e '}' -e '/Classes:/,/^$/ {' -e '/Classes:/b' -e 's/([a-zA-Z0-9_]+):/[\1](#\L\1) | /g' -e '}' -e '/Functions:/,/^$/ {' -e '/Functions:/b' -e 's/([a-zA-Z0-9_]+):/| [\1](#\L\1) | /g' -e '}' -e '/Returns:/,/^$/ {' -e '/Returns:/b' -e 's/([a-zA-Z0-9_()]+):/\1 | /g' -e '}' 1*.md > file.txt
  # Style it for a table
  sed -i s/"Modules:"/"| Modules | Description |\n|-|-|"/g file.txt
  sed -i s/"Classes:"/"| Classes | Description |\n|-|-|"/g file.txt
  sed -i s/"Functions:"/"| Functions | Description |\n|-|-|"/g file.txt
  sed -i s/"Returns:"/"| Returns | Description |\n|-|-|"/g file.txt
  rm 1*.md
  mv file.txt 10-${cmd}.md
}
After that I generated templates to use as reports for everything I
could think of. It’s under assets/schemas/. I also cleaned
up and refractored a lot of the code and added an http.server to watch
in the browser. It’s reflected in the source code, so I don’t think I
need to post it here. But it’s all done ladies and gents!
2025-08-20 I need to take notes on some editing.
This was finding the dunders in the lib.
for node in ast.walk(tree):
  if isinstance(node, ast.Assign):
    for target in node.targets:
      if isinstance(target, ast.Name) and target.id.startswith('__') and target.id.endswith('__'):
        try:
          value = ast.literal_eval(node.value)
        except:
          value = ''
        finally:
          print(target.id, '=', value)
But I needed to print them in a better format. They needed to print to this, and it is not nested in the same for loop, so it was only finding the last dunder.
if ast.get_docstring(module) is not None:
  open(f'{savePath}', 'w').write('\n' + '## ' + os.path.basename(path) + '\n' + ast.get_docstring(module) + '\n\n')
So by doing this we can manipulate the dunders better:
dunders = [(target.id, ast.literal_eval(node.value))
for node in ast.walk(tree)
if isinstance(node, ast.Assign)
for target in node.targets
if isinstance(target, ast.Name) and target.id.startswith('__') and target.id.endswith('__')
]Book: Title by Author
Article: “Title” (Date)
Template generated by ChatGPT
Documentation generated by PADDOCS
Compendium section: 19-blog
Title: [Title]
Author: [Name]
Tags: [project, update, devlog]
Status: [ Draft / Final / Reviewed ]
Post ID: [File Name].md
Template: 00-blog.md License: “All Rights Reserved”
Schema: articles
Version: 0.0.1
Branding: Wormhole / PADS
To-Do - [ ] Task 1 - [ ] Task 2
Notes - Quick note or observation. - Decision made about something.
Reminders - Reminder 1 - Reminder 2
Follow-Up - [ ] Task to revisit - [ ] Waiting on reply from…
To-Do - [ ] Task 1 - [ ] Task 2
Notes - Note 1 - Note 2
Reminders - Reminder 1 - Reminder 2
Follow-Up - [ ] Task to revisit - [ ] Waiting on reply from…
Template generated by ChatGPT
Documentation generated by PADDOCS
Compendium section: 19-blog
Title: [Title]
Author: [Name]
Tags: [project, update, devlog]
Status: [ Draft / Final / Reviewed ]
Post ID: [File Name].md
Template: 00-blog.md License: “All Rights Reserved”
Schema: planning
Version: 0.0.1
Branding: Wormhole / PADS
| Time | Monday | Tuesday | Wednesday | Thursday | Friday | Saturday | Sunday |
|---|---|---|---|---|---|---|---|
| 06:00-07:00 | Morning Routine | Morning Routine | Morning Routine | Morning Routine | Morning Routine | Morning Routine | Morning Routine |
| 07:00-09:00 | Work Block | Work Block | Work Block | Work Block | Work Block | Leisure / Study | Leisure / Study |
| 09:00-09:30 | Break | Break | Break | Break | Break | Break | Break |
| 09:30-12:00 | Meetings / Tasks | Meetings / Tasks | Meetings / Tasks | Meetings / Tasks | Meetings / Tasks | Leisure / Study | Leisure / Study |
| 12:00-13:00 | Lunch | Lunch | Lunch | Lunch | Lunch | Lunch | Lunch |
| 13:00-15:00 | Work Block | Work Block | Work Block | Work Block | Work Block | Personal Time | Personal Time |
| 15:00-15:15 | Break | Break | Break | Break | Break | Break | Break |
| 15:15-17:00 | Work / Projects | Work / Projects | Work / Projects | Work / Projects | Work / Projects | Leisure / Study | Leisure / Study |
| 17:00-18:00 | Wrap-Up / Review | Wrap-Up / Review | Wrap-Up / Review | Wrap-Up / Review | Wrap-Up / Review | Wrap-Up / Review | Wrap-Up / Review |
| 18:00-19:00 | Personal Time | Personal Time | Personal Time | Personal Time | Personal Time | Personal Time | Personal Time |
| 19:00-21:00 | Leisure / Study | Leisure / Study | Leisure / Study | Leisure / Study | Leisure / Study | Leisure / Study | Leisure / Study |
| 21:00-22:00 | Night Routine | Night Routine | Night Routine | Night Routine | Night Routine | Night Routine | Night Routine |
Focus / Summary of the Day:
To-Do / Tasks
| Task | Assigned To | Priority | Status | Notes |
|---|---|---|---|---|
| Example Task | Self / Team | High | ☐ | Optional notes |
Notes / Observations - Observation 1 - Decision made - Insight or issue
Meetings / Interactions
| Time | With Whom | Purpose | Outcome / Action Items |
|---|---|---|---|
| 09:00 AM | Team | Project Kickoff | Follow-up on deliverables |
Follow-Up / Pending Items - [ ] Item to revisit - [ ] Waiting on reply from…
Reflections / Lessons Learned - What worked - Challenges - Improvements for tomorrow
Repeat the above sections for each day, appending daily logs as needed.
Template generated by ChatGPT
Documentation generated by PADDOCS
Compendium section: 19-blog
Title: [Title]
Author: [Name]
Tags: [project, update, devlog]
Status: [ Draft / Final / Reviewed ]
Post ID: [File Name].md
Template: 00-blog.md License: “All Rights Reserved”
Schema: planning
Version: 0.0.1
Branding: Wormhole / PADS
Document Title: Operation Mindmap
Author: Joe Corso
Version: 0.1.0
Last Updated: 2025-10-25
Contact: pads.email.address@gmail.com
Download IEEE or APA CSL files:
Raspberry Pi OS